Configuring the Cases Management XSLT Query Widget
Overview
As a Global Administrator, you can download the Cases.xslt file and use it with the peo_xslt_case stored procedure have been added which will allow Global Administrators to set up a Query (XSLT) widget as a powerful Cases Management dashboard.
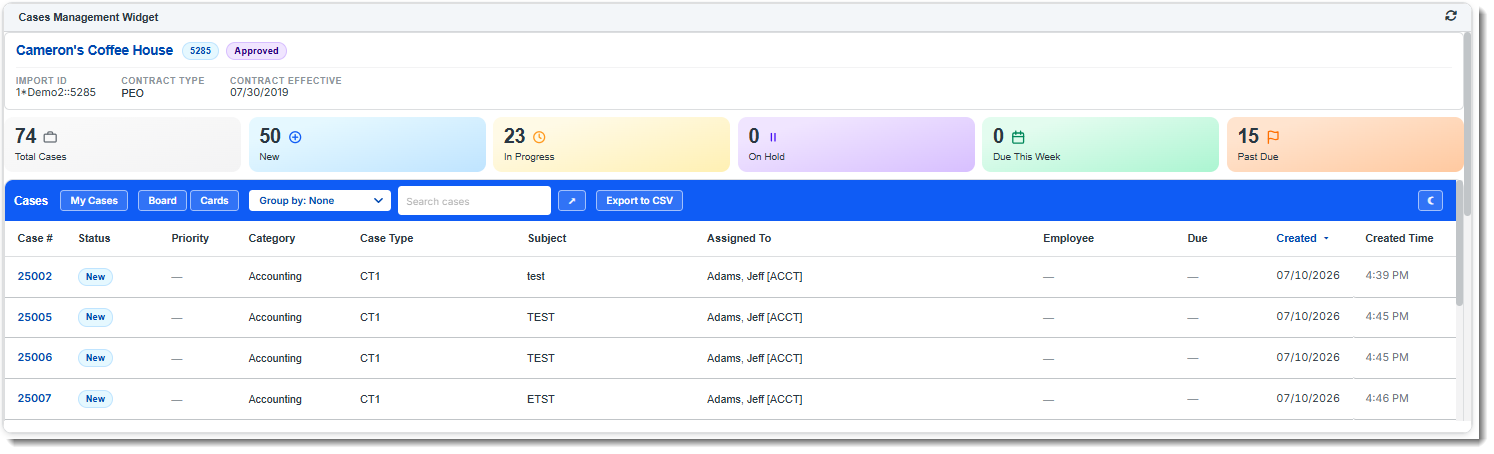
The solution is intended to be anchored to workspace landing pages.
Note:
-
Download the Cases.xslt file asset from the Spreadsheets, Templates, and Other Assets article. Use the file "as is" or customize displayed columns, formatting, filtering behavior, and navigation links. The file also can be treated as a sample XSLT template and foundation for creating additional custom query widgets that require workspace and user-aware filtering and display logic.
-
If you choose not to specify Cases.xslt in the widget configuration, the stored procedure data will be displayed in a simple table format using default ClientSpace table styles.
-
There is currently no security on the peo_xslt stored procedure.
The stored procedure returns Client Master and Client Service Case data, including client name, client number, client status, contract information, case number, category, case type, assigned user, employee information, status, priority, subject, description, resolution details, and case creation and resolution date/time values.
The Cases.xslt file includes:
-
Case count display
-
Client and case record links
-
Filtering options for assigned cases versus all cases
-
CSV export functionality
-
Workspace landing page integration
A Refresh  button in the Query Widget title bar allows you to refresh the widget to see the latest updates.
Case Management XSLT Query Widget Settings Configuration
These are the basic steps required for to configure the the Case Management XSLT Query Widget as shown in the image above. For complete step-by-step guidance on how to configure a Query widget, also see Widget: Query (XSLT).
To configure Case Managment XSLT Query Widget Settings:
-
Go to System Admin
 > Widget Layouts.
 -
Add a new widget layout or click
 (Open) next to an existing layout in the grid to edit the widget layout.
 -
On the Widget Layout Details window, click the Add Widgets button.
The Widget Library window displays.
-
Click Query Widget and then click Add Widgets as shown in the example screen below:
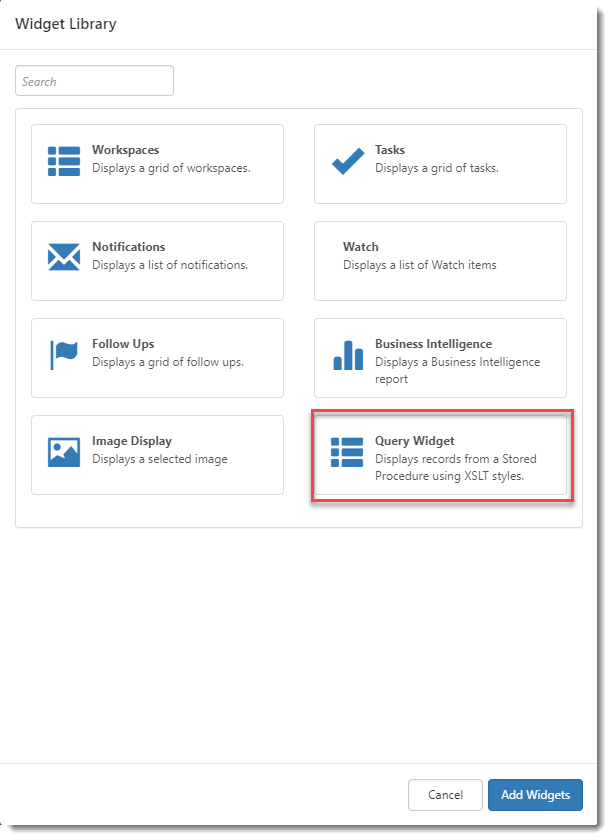
The Widget Library window closes. A Query Widget control displays on the Widget Layout Details screen.
-
Click the Settings
button on the Query Widget control.The Widget Settings window displays.
-
Complete the following fields as applicable.
XSLT File
Select Cases.xslt.
Note:
-
Download the file asset from the Spreadsheets, Templates, and Other Assets article.
-
If you choose not to specify Cases.xslt, the stored procedure data will be displayed using default ClientSpace table styles. Features such as workspace and user aware filtering are not available without the Cases.xslt file.
Stored Procedure
Select the peo_xslt_case stored procedure.
Title
Type a widget title. The title displays in the top left corner of the table header.
EX: Case Management Dashboard
-
-
Click Save Settings.
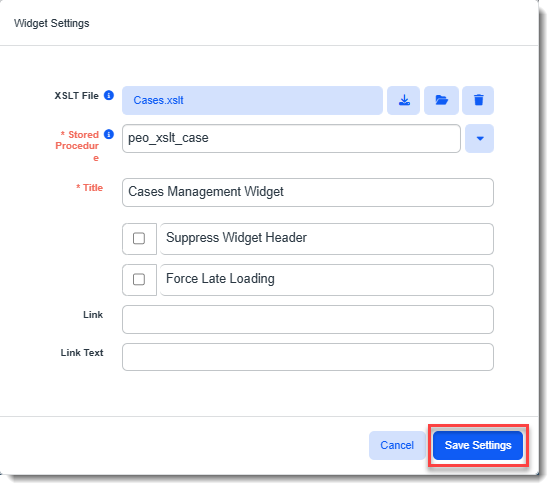
The Widget Settings window closes and you are returned to the Widget Layout Details window.
-
Drag the bottom right corner of the widget control to the desired dimensions. (The table widget has horizontal and vertical scroll bars to allow users to view rows and columns that do not fit within the frame dimensions.)
-
Click Save.
-
Test the widget in the selected display location, such as a workspace landing page.