Adding Widget Layouts
This procedure involves adding the widget layouts, browsing the library, configuring the widget and widget layouts, and publishing.
To add widget layouts:
| 1. | Go to System Admin |
The Widget Layouts dashboard opens. From here, you can add and manage widget layouts for your ClientSpace installation.
| 2. | From the Widget Layouts list, you can do the following: |
- Search / More: Works as the standard ClientSpace searches. By default, the list only displays published widgets.
- Add: Click to add a new widget layout.
- Edit: Select a widget from the list and click to edit an existing widget layout.
- Delete: Delete a selected widget layout.
- Clone: Clone a selected widget layout.
| 3. | To add a new widget layout, click Add. |
The Widget Layout Details form opens.
| 4. | Complete the form: |
| Name | Name of your new layout. This should be descriptive of layout type and audience, for example, Payroll Home. |
| Target Type |
Target Type determines where the configured widget layout is displayed within the ClientSpace application, as well as what display conditions are available for use:
|
| Weight | Determines the priority with which layouts are presented to the ClientSpace user, meaning their placement in the list. All things being equal (conditions), the weight given the layout determines what is presented. The greater the weight number, the more likely the dashboard is selected. For example, a weight of 20 is more likely to be selected than 15. |
| Add Widgets | Select and add widgets from the widget library to your widget layout. |
| Set Conditions | Use Set Conditions after you have added a widget layout to determine the conditions under which a layout is displayed. These conditions range from departmental or role-based to field value expressions, such as the status of a client. The conditions that are available for use will vary based on the selected Target Type. |
Browsing the widget library
Next, let's browse the widget library, which is the current list of available widget types that you can add to layouts. You can view the widget library from the Add Widgets action in the Widget Layout Details form. This procedure continues from the previous steps.
To view the widget library:
| 1. | From the Widget Layout Details form, click Add Widgets. |
The Widget Library is displayed showing the current list of widget types that are available, accompanied by a brief description of what the widgets display.
- Search: While the widget library is currently small and easily manageable, we envision the list will grow to the point you may need to search to find the widget type you want to add.
- Add Widgets: Select one (or more) widgets and click to add the widget(s) to your layout. You can then re-arrange the widgets to your liking.
| 2. | After you add widgets, you are returned to the Widget Layout Details form. The newly added widget appears in the grid. |
Configuring the widget and widget layouts
To configure the widgets and widget layouts:
| 1. | From the grid, the Global Administrator can determine the size and placement of the selected widgets. |
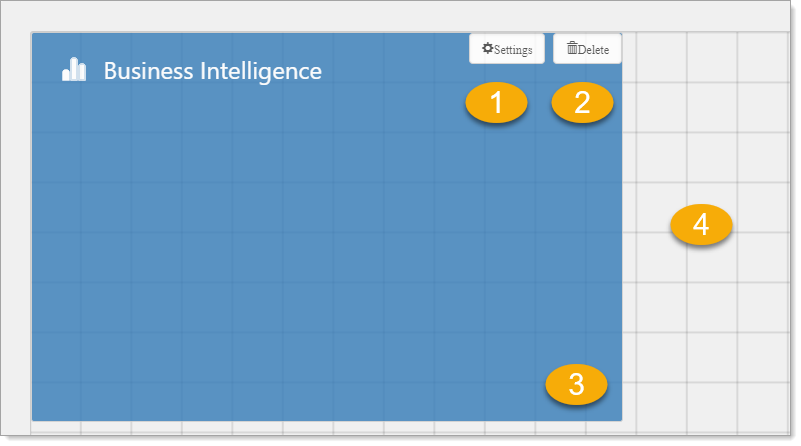
| 2. | Follow the numbers in the image and table. |
| 1. Settings | The settings control allows you to add settings to Widget Types that require additional configuration. If the Widget type does not require configuration, the settings control does not appear. |
| 2. Delete | Remove this widget from the layout. |
| 3. Re-size | Drag the arrow in the lower right corner of the widget to re-size the widget control. The system automatically snaps to the nearest grid line when you release it. Some widget types cannot be re-sized, such as Notifications and Watch. Attempts to re-size these widget types in your layout will lead to unexpected behavior in the application. |
| 4. Grid area | The grid area represents the white space on the page for adding widgets to your layout. To change your Widget Layout, drag widgets to this grid area. |
Publishing the widget layout
Next, you are ready to publish the new widget layout. You can publish the widget layout after it is saved.
To publish the new widget layout:
| 1. | After you have configured your widget layout, click Save. |
You are returned to the Widget Layouts list. Your new Widget Layout is displayed in the list as unpublished. The newly added entry is displayed in italics and bold – meaning it is unpublished.
| 2. | To publish the new widget layout, select the Published option (far right column). |
| 3. | To unpublish, clear the Published option. |