The API record connects ClientSpace to DocuSign. Your DocuSign administrator or a ClientSpace staff member can assist you with DocuSign API configuration.
Ensure that you have the items marked with an asterisk (*) in the table below before you start the configuration. Also see Before You Begin.
Step 1: Configure the API Record in ClientSpace
To configure the API record:
- Go to System Admin
 > Advanced > API Configuration.
The API Configuration dashboard opens. - To add a record, click Add. To edit an existing record, select the record and click Edit.
The API Configuration form opens.
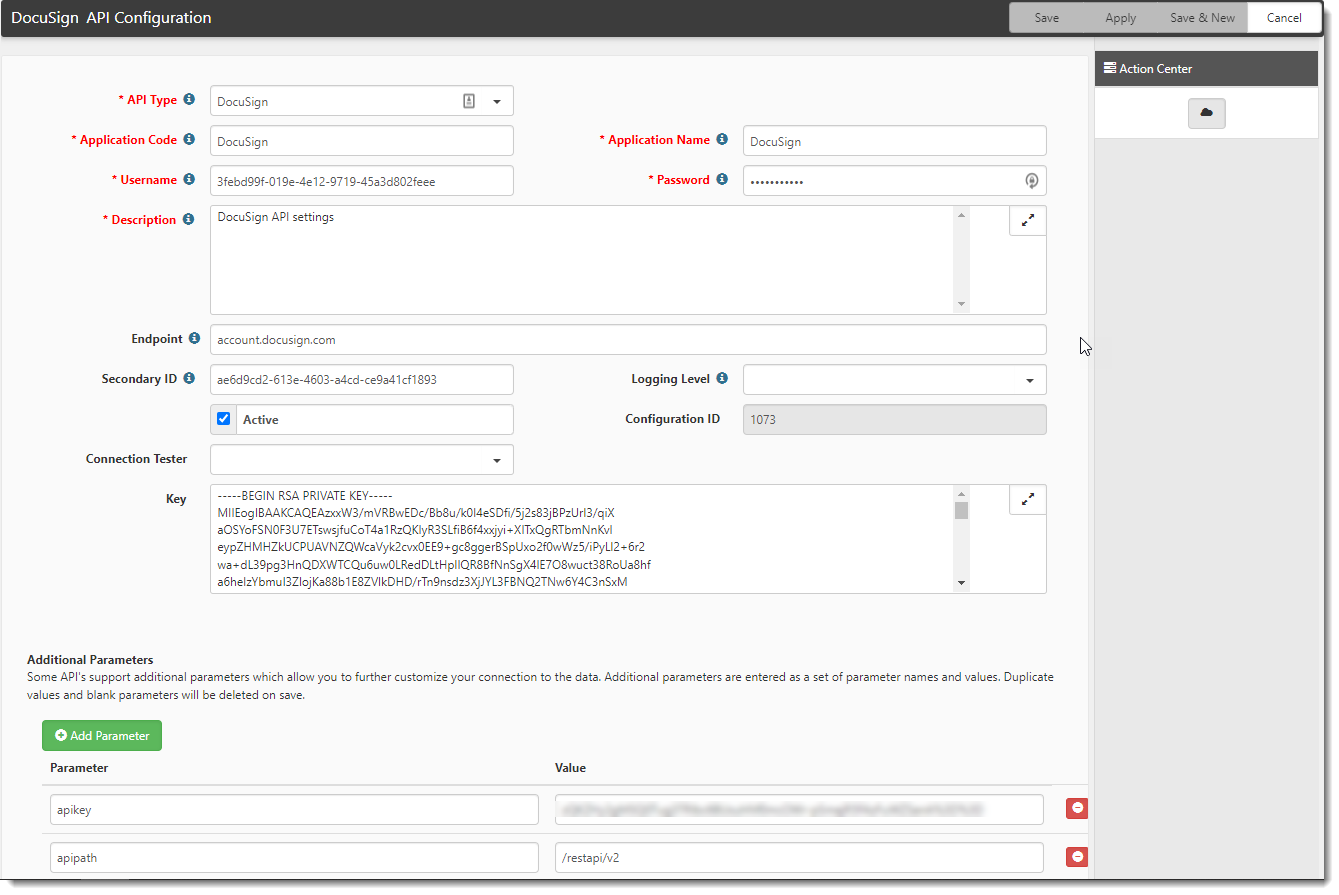
- Complete the form fields.
|
API Type |
Select DocuSign. |
||||||
|
Application Code |
Type DocuSign. |
||||||
|
Application Name |
Type DocuSign. |
||||||
|
Username* |
DocuSign user account code. Provided by DocuSign as the API UserName and is in the form of a Globally Unique Identifier or GUID, a 32-digit character string formatted as xxxxxxxx-xxxx-Mxxx-Nxxx-xxxxxxxxxxxx.
Your DocuSign Administrator can obtain the Username from Docusign.com using the following steps:
|
||||||
|
Description |
Provide a brief description of how you are using DocuSign in the ClientSpace environment (i.e. Sales, Benefits, etc.) |
||||||
|
Endpoint* |
This is the server URL to which we connect. In production environments, this is typically entered as account.docusign.com. |
||||||
|
Secondary ID* |
Integration key provided by the ClientSpace staff member assigned to assist you with DocuSign API configuration. |
||||||
|
Active |
Check Active. |
||||||
|
Logging Level |
Select Level 2 (Verbose). This controls the level of error detail added to the Exception Log. See Viewing DocuSign Exception Errors and Viewing and Managing Document Statuses in the DocuSign Process. |
||||||
|
Key* |
OAuth2 RSA Key required by DocuSign for all DocuSign API integrations after 12/31/2023. The ClientSpace staff member assisting you with the implementation provides the Key. |
||||||
|
Additional Parameters |
The following parameters are name-value pairs for additional configuration. |
||||||
|
apipath |
Required. Type /restapi/v2. |
||||||
|
apikey |
Required. This value will be provided by the ClientSpace Professional Services representative assisting you with DocuSign API configuration. |
||||||
|
endpoint |
Required. Type https://cs-functions-prd.azurewebsites.net/api/DocuSignToken. |
||||||
|
retrythreshold |
This is the number of times the system attempts to get a document if there are connection issues. In the Uploaded Files Queue, Retry Count tracks the number of errors when trying to get a DocuSign document. When the threshold is met:
Default setting for the retrythreshold field is 5. See Viewing and Managing Document Statuses in the DocuSign Process and Notifying Users of Status. |
||||||
|
RetryCount |
This is the number of times the system attempts to upload a document in CS Failure or DS Failure status before stopping. |
||||||
|
ExcludeVoidedFiles |
This parameter is for Envelopes voided from within DocuSign. When a document is voided in DocuSign or from the Void workflow in ClientSpace, you can set this parameter to allow voided documents to upload or prevent the voided document from coming back into ClientSpace. 0: Voided documents are uploaded to the linked form or field. This is the default setting if the parameter is not configured. 1: Voided documents are only uploaded to the Uploaded Files Queue record, and not the linked dataform. |
||||||
|
DocuSignRequestDays |
Allows a signed document to be retrieved into ClientSpace by the Docusign Get Docs Status scheduled process if a document status change is equal to or less than the number of days specified here. |

- Click Save.
Step 2: Enter the Redirect URI on DocuSign.com
This step must be completed by your DocuSign administrator or by the ClientSpace Professional Services representative assisting you with DocuSign API configuration. The redirect URI must exactly match one of those preregistered for the integration key in your DocuSign account. DocuSign provides the URI.
To enter a redirect URI:
-
On the Docusign.com site, scroll down to the "Service Integration" section on the window containing your Integration Key details.
Note: If this window is closed, click Actions > Edit next to the DocuSign integration record on the Apps and Keys page under "Apps and Integration Keys". (The Apps and Keys page is accessed from the DocuSign.com navigation pane under "Integrations".)

-
In the "Additional Settings" section, under Redirect URIs, click Add URI.
-
Type the URI.
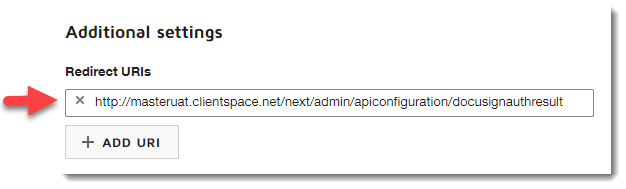
Note: The URI shown in the example above is for instructional purposes only. Your company's URI, assigned by DocuSign, will be different from the example shown here.
-
Important: Click Save at the bottom of the page on Docusign.com to save your entry.
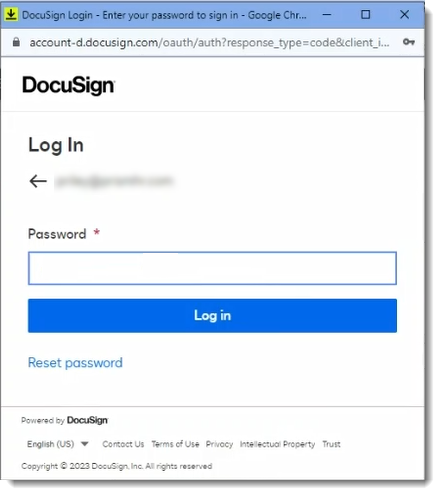
Step 3: Authorize the Connection in ClientSpace
This step must be completed by your DocuSign administrator. The ClientSpace Professional Services representative assisting you with DocuSign API configuration can help you with this step.
To authorize the connection:
- Go to System Admin > Advanced > API Configuration.
The API Configuration dashboard opens. - Select the previously saved DocuSign API Configuration record and click Edit.
-
In the Action Center, click the Authorize
 icon.
icon.A popup window displays requiring you to log in to DocuSign.
-
Enter the DocuSign password.
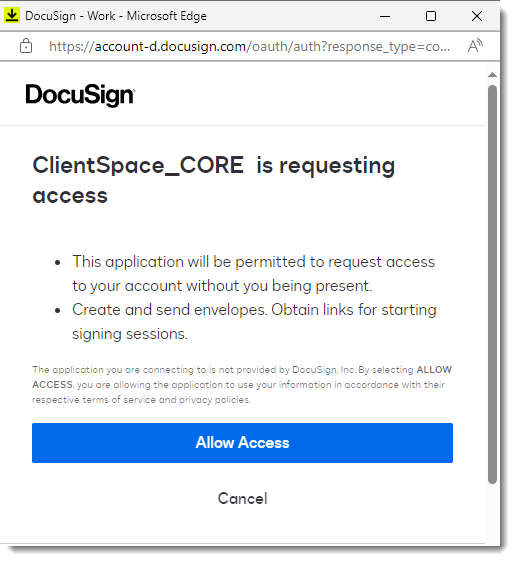
The popup window refreshes to display a request for ClientSpace to access DocuSign.
-
Click Allow Access.
If the configuration is correct, the popup window refreshes a final time to display an "Authorization was successful" message.
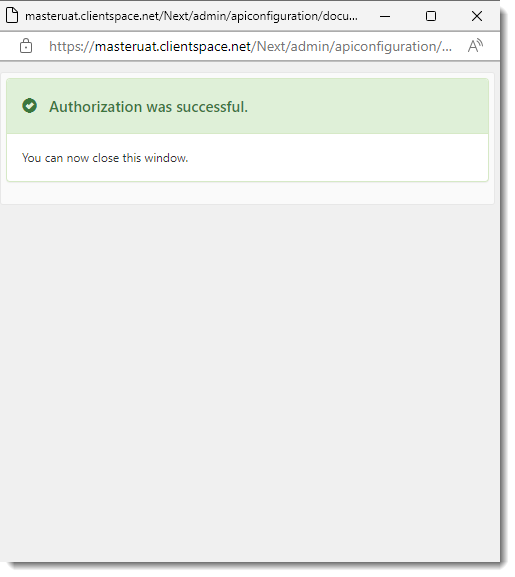
- Close the popup window.
Step 4: Test the API Connection in ClientSpace
After you create the API record, it's a good idea to test the connection.
To test the connection:
- Go to System Admin > Advanced > Scheduled Processes.
The Scheduled Process Admin dashboard opens. - Look for the entry DocuSign Request Signature and ensure it is active.
- Select the entry DocuSign Request Signature and click Queue Process.
- After the process runs, go to System Admin > Exception Log.
The Exception Log dashboard opens. - Look for an entry for the API connection. If there is an error, this means that the API credentials are incorrect, preventing access to DocuSign. Review the API credentials, make adjustments, and test again. If there is no error in the Exception Log, this means the API connection was successful.
- When you have confirmed a good API connection, proceed to the next step, Configuring the Workflow Link.