Global Search Configuration
Developer users and Global Administrators can configure which fields on a dataform are included in the Global Search index for users to search and specify the data elements to display in the Global Search results on system table forms or PEO layer dataforms beginning with "gen_". (See ClientSpace Layers and Naming Conventions for more information on ClientSpace Layers and a list of common PEO Layer dataforms.)
This topic covers:
-
How to set up the Global Search index and identify the data elements to display in the Global Search results to help users identify results on PEO dataforms.
-
How to include or exclude CORE (i.e., CRM) forms such as Activities, Organization, Contact, Task, and Workspace.
-
How to prevent module dashboards from appearing in Global Search using a setting in the Table metadata.
Note: For CORE layer forms, you do not need to identify the data elements to display in the Global Search results to help users identify the results. That part is configured for you. If the form is flagged for inclusion, a form type abbreviation is prepended to Global Search results for CORE forms to help users identify results. You can, however, select which CORE layer forms that you want to include in or exclude from the Global Search results. By default, Activities or Organizations are excluded but can be re-enabled if needed.
Configuring Global Search on PEO Dataforms
Note: These steps in this section for Developer users only.
To access the administrative area of ClientSpace:
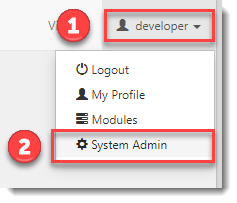
| 1. | Click the down arrow next to your username in the top right corner of the ClientSpace window. |
| 2. | Click System Admin. |
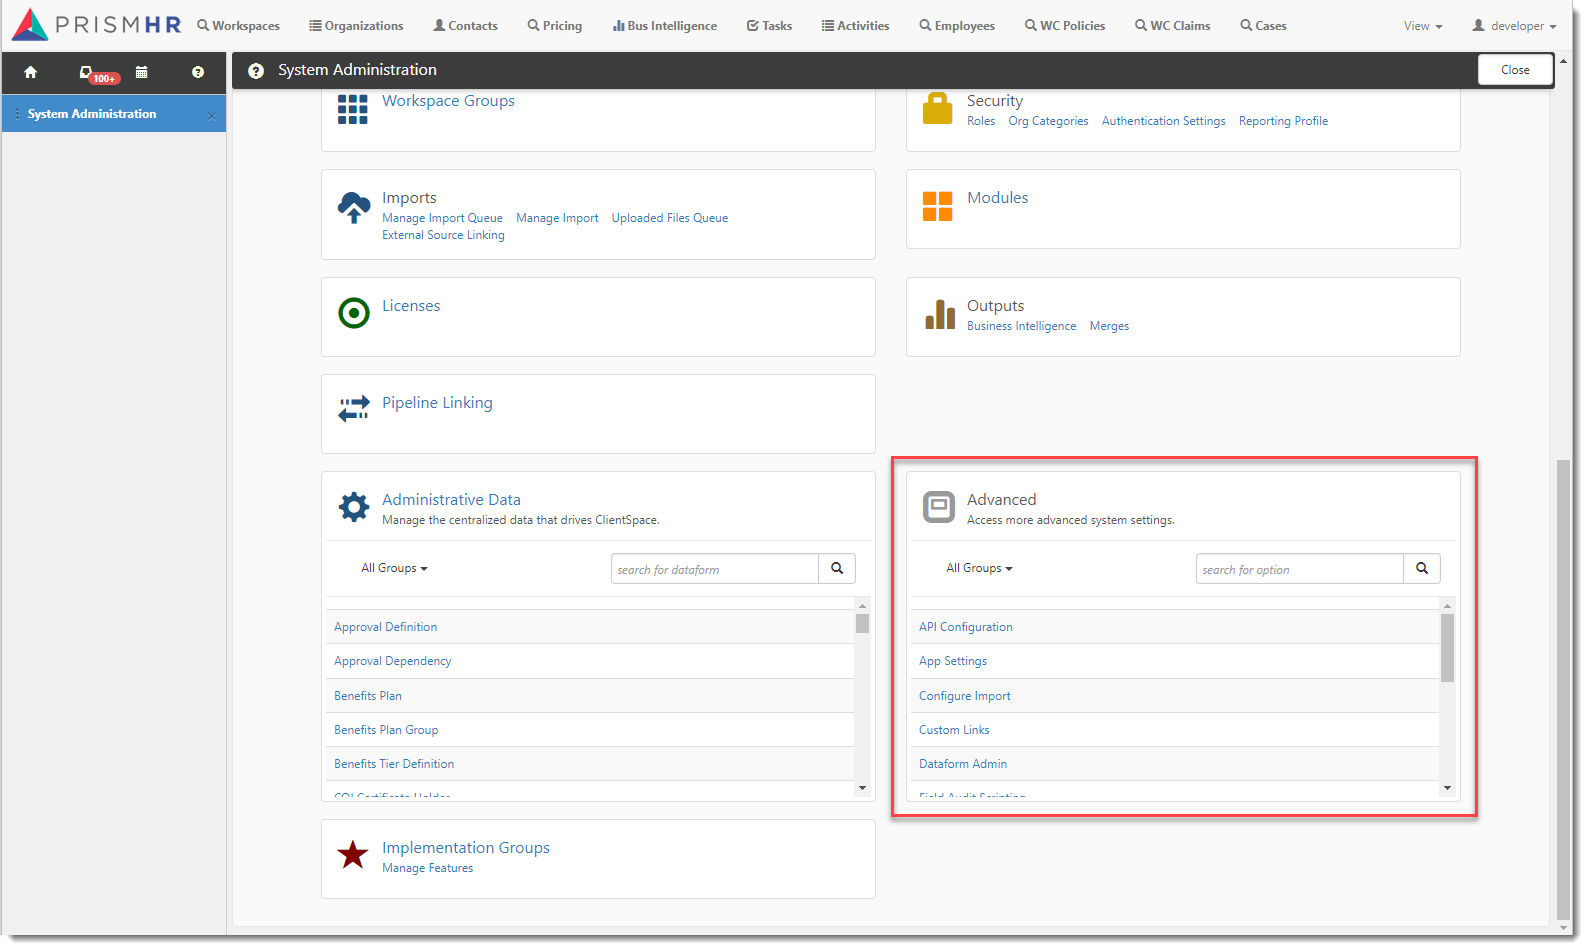
The System Administration dashboard opens. The Advanced system settings box is located in the bottom right corner.
To select index fields and configure Global Search display fields:
-
Go to System Admin
 .
. -
In the Advanced section of the System Administration dashboard, click Dataform Admin.
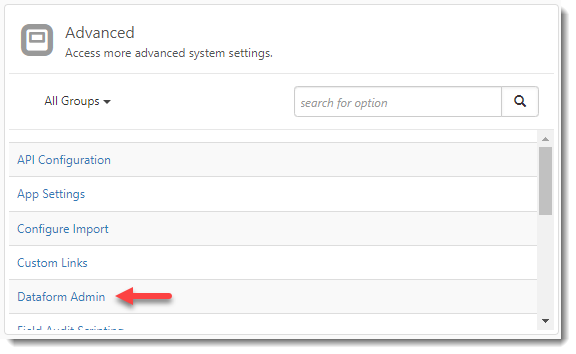
The Dataform Admin dashboard opens.
-
Click the dataform to select it and click Edit.
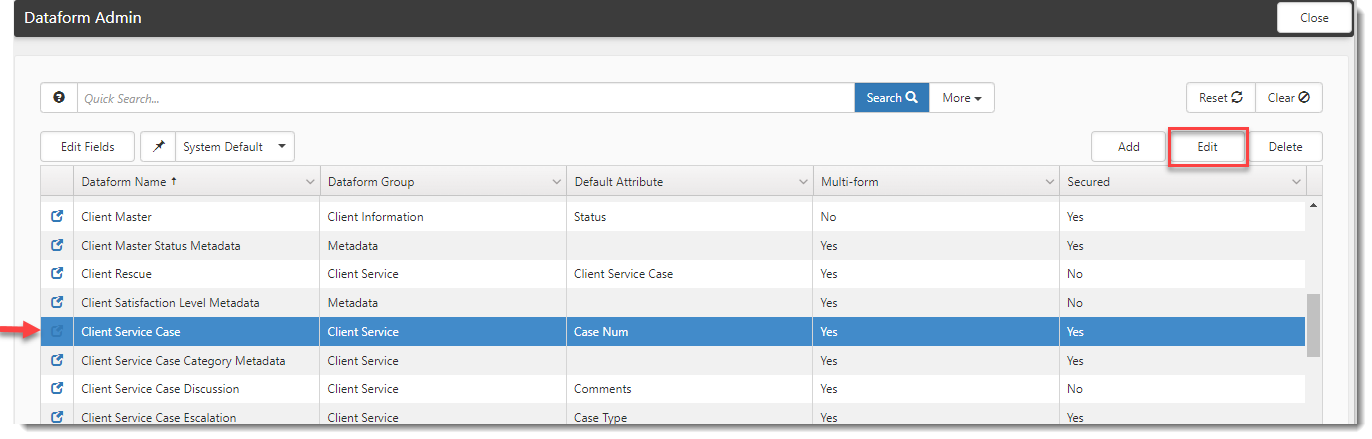
The Dataform Properties window opens.
-
In the Action Center, click Fields.
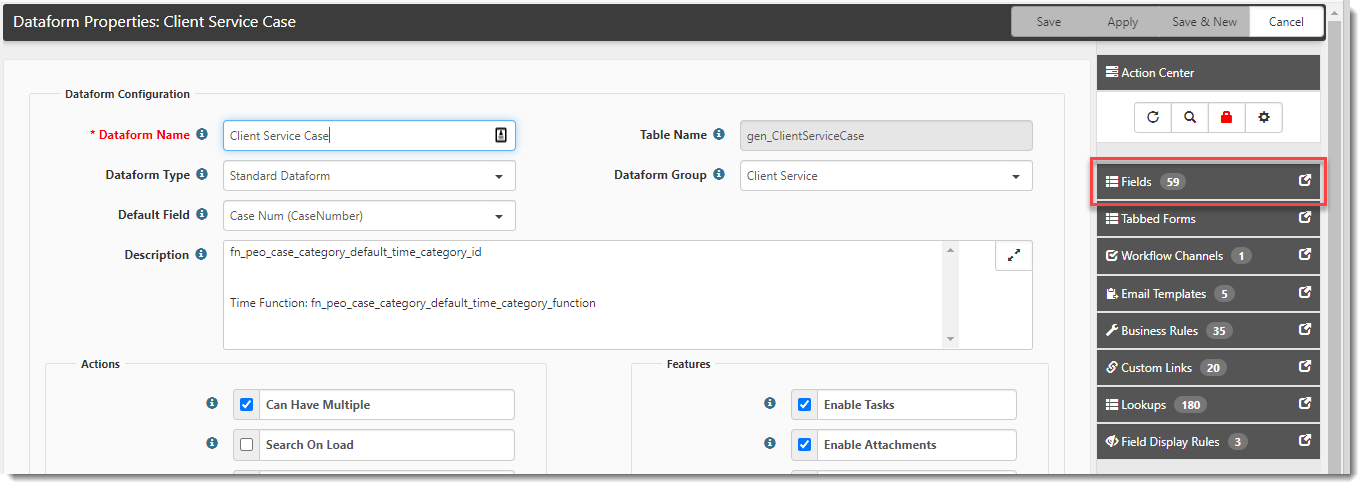
Dataform fields are presented. -
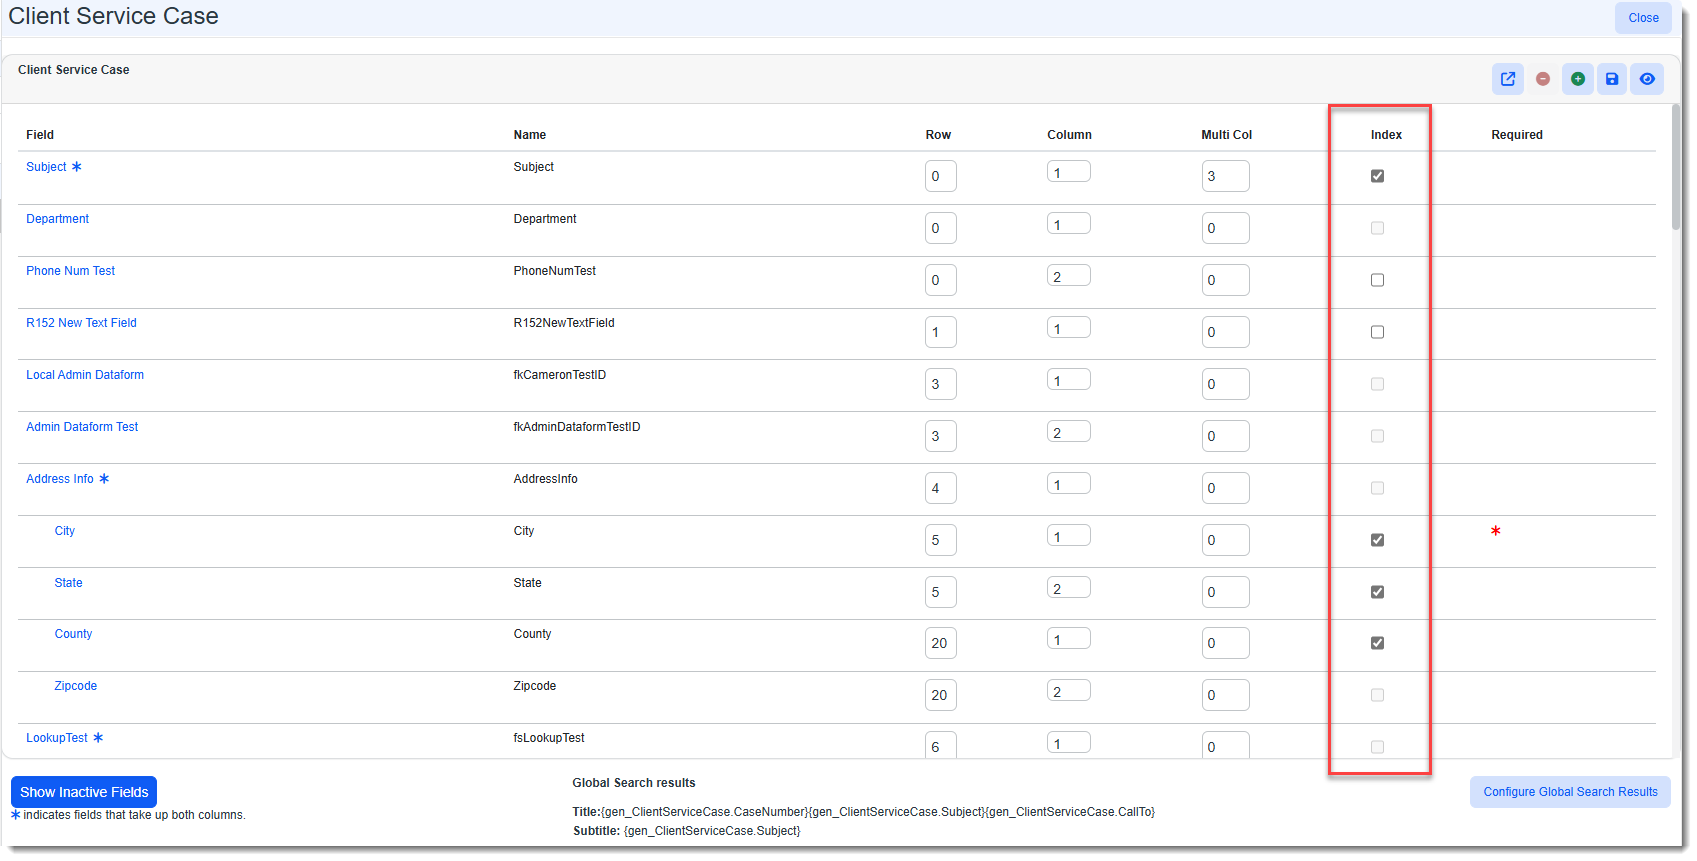
Click the Index column checkbox next to the fields you want to include in the Global Search for this dataform.
Note:
-
If a field cannot be indexed, the Index checkbox appears dimmed (i.e., "grayed out").
-
Employee and Employment dataform fields containing sensitive or personally identifiable information (PII) that should not appear in Global Search results cannot be indexed. The fields also do not display in the list of "replace fields" referenced later in these steps.
Click here to view the list of fields:Employee Dataform:
-
Gender
-
Ethnicity
-
SSN
-
Encrypted SSN
-
Last 4 SSN
-
Citizenship Status
-
Immigration Card #
-
Immigration Card Expire Date
Employment Dataform:
-
Pay Frequency
-
Pay Method
-
Hourly Rate
-
Annual Pay
-
Wage Rate
-
-
The index changes take effect after the Populate Search Index scheduled process runs. Also see Scheduled Processes.
-
Important - Only Active records are indexed.
-
-
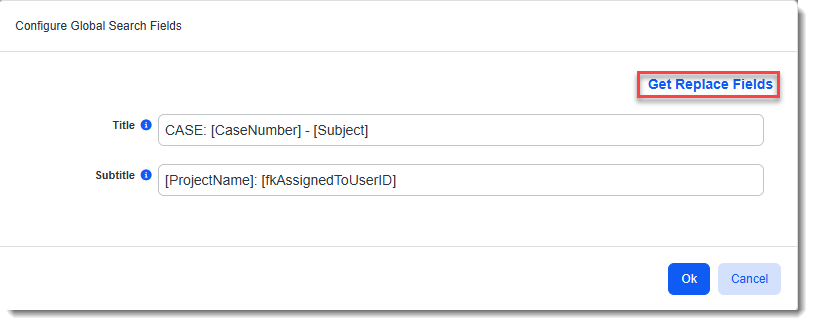
Click the Configure Global Search Results button at the bottom right corner of the Dataform Properties window. The Configure Global Search Fields window displays.
Here, you can specify the data elements to display in the Global Search results which will help users distinguish between findings. The configuration uses replace fields to pull the data values from the record and display them in the search results.
-
Click the Get Replace Fields link on the form to copy a replace field to use. The Replace Fields window displays.
-
On the Replace Fields window, click one or more fields to copy into the Title or Subtitle fields and then click the Copy button.
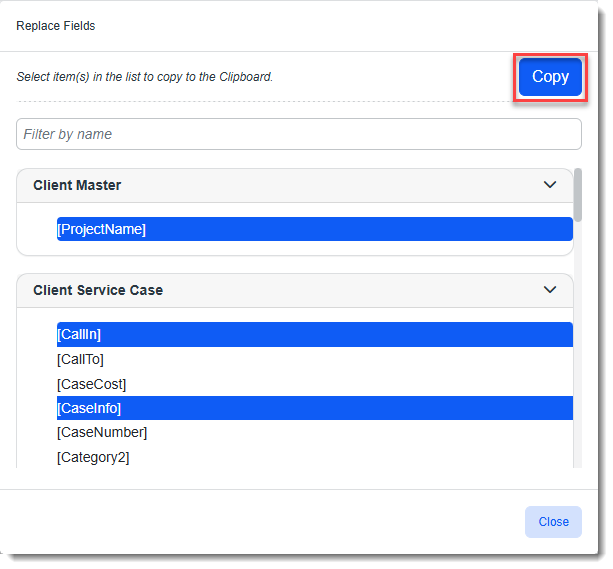
A message briefly displays that the fields have been copied to your clipboard.
-
Paste the replace fields into the Title or Subtitle fields.
Note:
-
You can select replace fields totaling up to 250 characters per line (i., Title, line 1 and Subtitle, line 2). The system only displays up to 100 characters of the actual values from those records.
-
You can type free text, spaces and other symbols before or after a replace field. In the example below, the word "CASE" and separators such as hyphens and colons have been added to make the Replace Field data more legible when it appears in the search results.

-
If you use a lot of replace fields, we recommend adding the ones which are critical for helping a user distinguish between the results first. This, the least important identifiers are cut off if the Title and Subtitle details contain more than 100 characters. For example, in the Global Search Results configuration for the Client Service Case dataform, you might include the Case Number replace field first followed by the Subject so that if a long subject of over 100 characters is present, the main identifier of Case Number displays first.
-
If you add a Subtitle, Title is required. Attempting to save the Configure Global Search Fields form with only a Subtitle value entered results in a "Title is required" error displaying when you click Ok to save the changes.
-
-
When you are finished configuring Global Search Results, click Ok on the window to save the changes.
-
Then click Save
 on the Dataform Properties toolbar to save any index changes you may have made.
Note: If you attempt to save without clicking the Configure Global Search Results button and entering, at minimum, a Title to display in the search results, the following warning message displays:
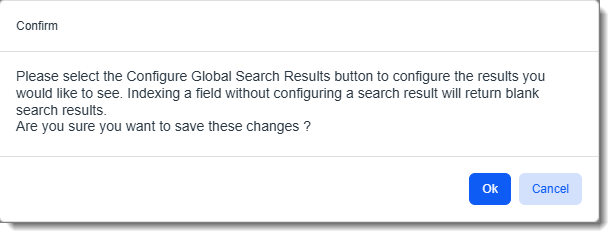
You can select OK to continue saving without making the recommended changes or you can click Cancel to abort the Save process and make the recommended changes.
Global Search PEO Dataform Configuration Example
Let's set up the Global Search Results configuration for the Client Service Case dataform. On line 1 (Title) of the search result, we are displaying the Case Number using Replace Field [CaseNumber] and case Subject using Replace Field [Subject]. On line 2 (Subtitle) of the search result we are displaying the Project Name and Case Assigned To using Replace Fields [ProjectName] and [fkAssignedToUserID]:
Using the test configuration above, when we perform a Global Search, if a Client Service Case is among the results, the Case Number and Subject values display in the results.
Note: If no Case Number was entered, 0 displays.
The Project Name (i.e., workspace name) and the Assigned To User ID display on line two:

Note:
-
If you configure both the Title and Subtitle, a single search result will consist of two lines - a line with a white background displaying the Title and a shaded light blue line displaying the Subtitle. If a user clicks anywhere on the result, the associated record displays.
-
You may optionally try incorporating some free text between the replace fields to make the search results more meaningful as shown in the example where "CASE:" was added before the case number.
Configuring Global Search on CORE Dataforms
Note: The steps in this section are for Developer users only.
An Include in Global Search setting in the table metadata of the following CORE (i.e., CRM) forms allows you to include the form in or exclude the form from Global Search the Global Search index:
-
Activities (tblContactMgmtNotes)
-
Task (Incident)
-
Contact (tblContact)
-
Organization (tblOrganization)
-
Workspace (Projects)
Data from excluded forms will not display in Global Search results. By default, the Include in Global Search checkboxes in the Activities (tblContactMgmtNotes) and Organization (tblOrganization) table metadata are unchecked and will not be included in Global Search indexing unless a developer user re-enables the setting.
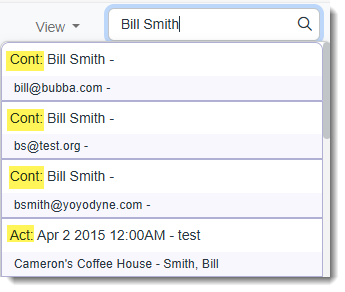
When a CORE form is configured for inclusion, a form type abbreviation is prepended to Global Search results for CORE forms to help users identify results:
|
CRM Form Type |
Prepended Abbreviation |
|---|---|
| Organizations | Org |
| Activities | Act |
| Contact | Cont |
| Workspace | WS |
Here is an example of Global Search results that include Contact and Activities:
To configure Global Search on CORE dataforms:
-
Go to System Admin
. -
In the Advanced section of the System Administration dashboard, click Tables.
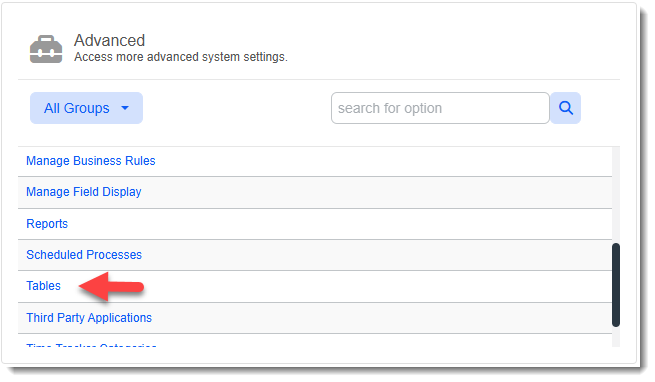
The Table Metadata dashboard opens.
-
Click the desired CORE table metadata record to select it and click Edit.
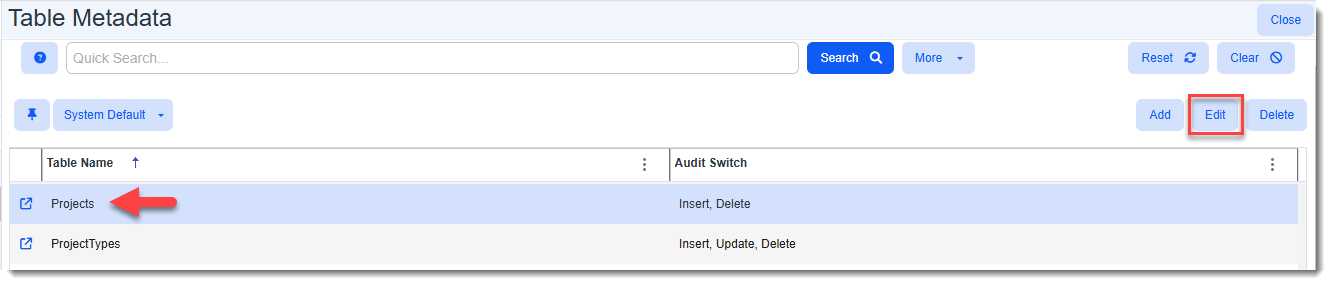
The Table Metadata Detail window opens.
-
Place a check mark in Include in Global Search to include the form in the Global Search index OR remove the check mark to exclude the form from the Global Search index.
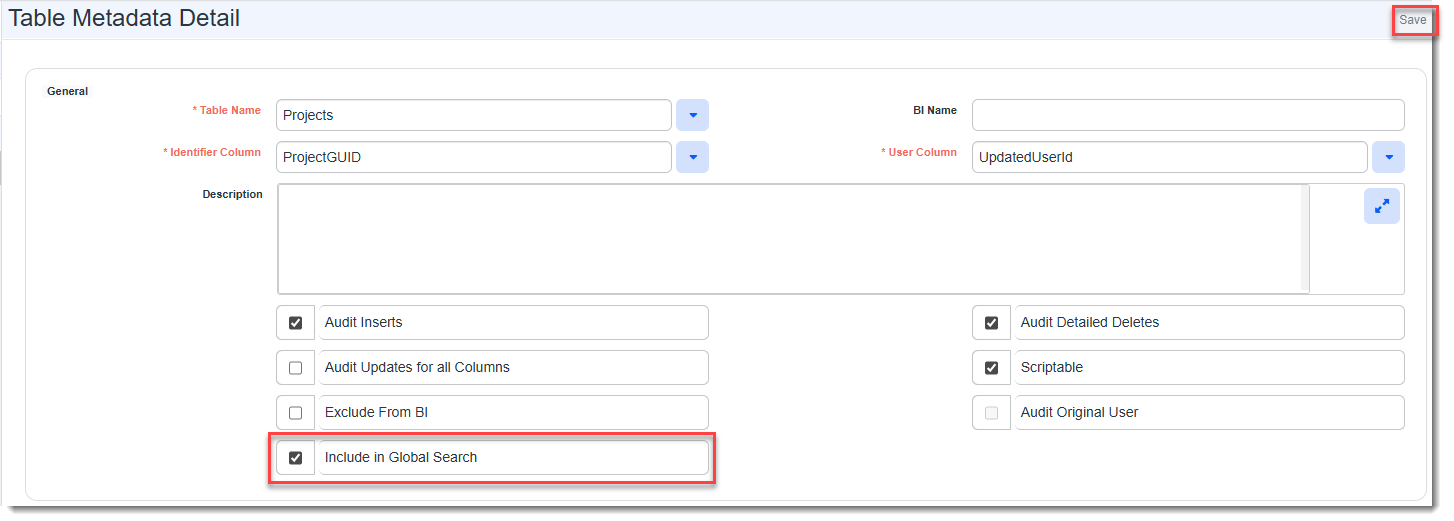
-
Click Save.
Global search indexing changes take effect after the Populate Search Index scheduled process runs. Also see Scheduled Processes.
Preventing Module Dashboards from Appearing in Global Search Results
When conducting a Global Search, any keywords or phrases found on a module search dashboard may also be included in the results. If you want the results to only include records related to the search and not include references to the search string found on various module dashboards, you can prevent module dashboards from appearing in the Global Search. Note that any records that are part of a module will still be available and indexed if you have configured Global Search on the dataform.
To prevent module dashboards from appearing in Global Search:
-
Go to System Admin
. -
In the Advanced section of the System Administration dashboard, click Tables.
The Table Metadata dashboard opens.
-
Click tblDashboard to select it and click Edit.
The Table Metadata Detail window opens.
-
Remove the check mark from Include in Global Search to include module dashboards from the Global Search index.
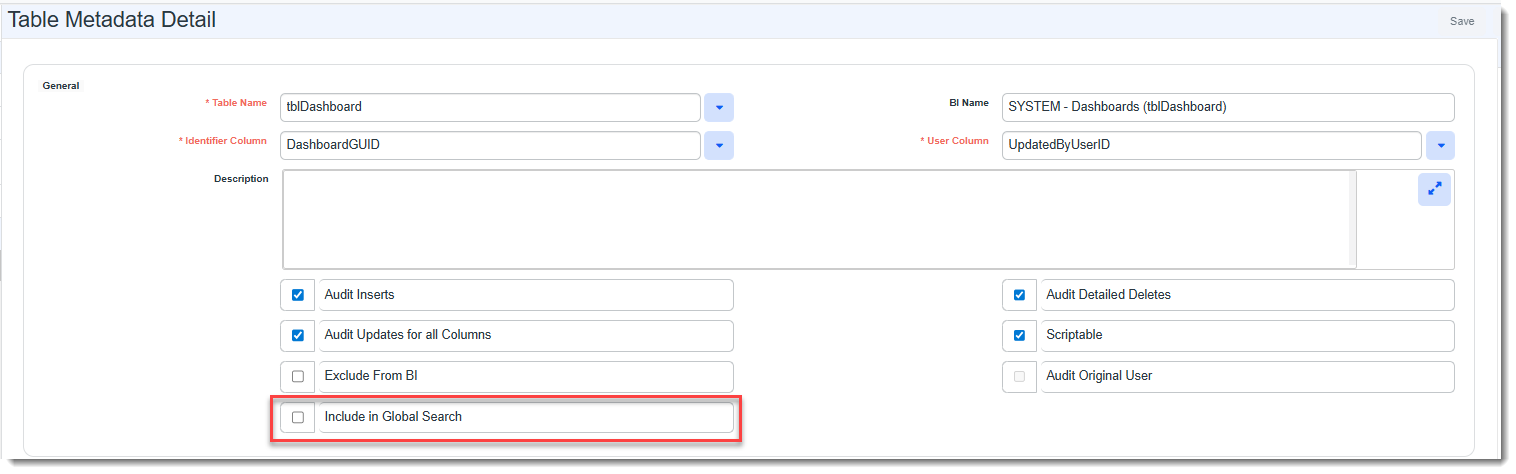
-
Click Save.
Global search indexing changes take effect after the Populate Search Index scheduled process runs. Also see Scheduled Processes.