Configuring Lookups
Lookups are one of the most flexible datatypes in ClientSpace and are easily configurable when you understand how they work. Lookups are predetermined, selectable lists of information to ensure data are recorded consistently, instead of a straight text field, which leaves room for errors in spelling and formatting. When you decide to use lookups, you need a Lookup Group (our example – in the subsequent topics – uses US States) and the associated Lookup values (in our example, the individual states are the values). The following procedures and subsequent topics show you how you can use lookups to get the most out of your ClientSpace system.
Exercise extreme caution when administering Lookup Groups and the corresponding Lookup values. The system uses values, such as CSC_Status, in triggering business logic. Changing or deleting these values can result in system issues, which may require programming to resolve. If you are unsure about changing or deleting a value, please log an Extranet case. It is far better to deactivate a value than delete it, but it is even better to err on the side of caution and ask first.
Before you Begin: Review Existing Lookup Groups
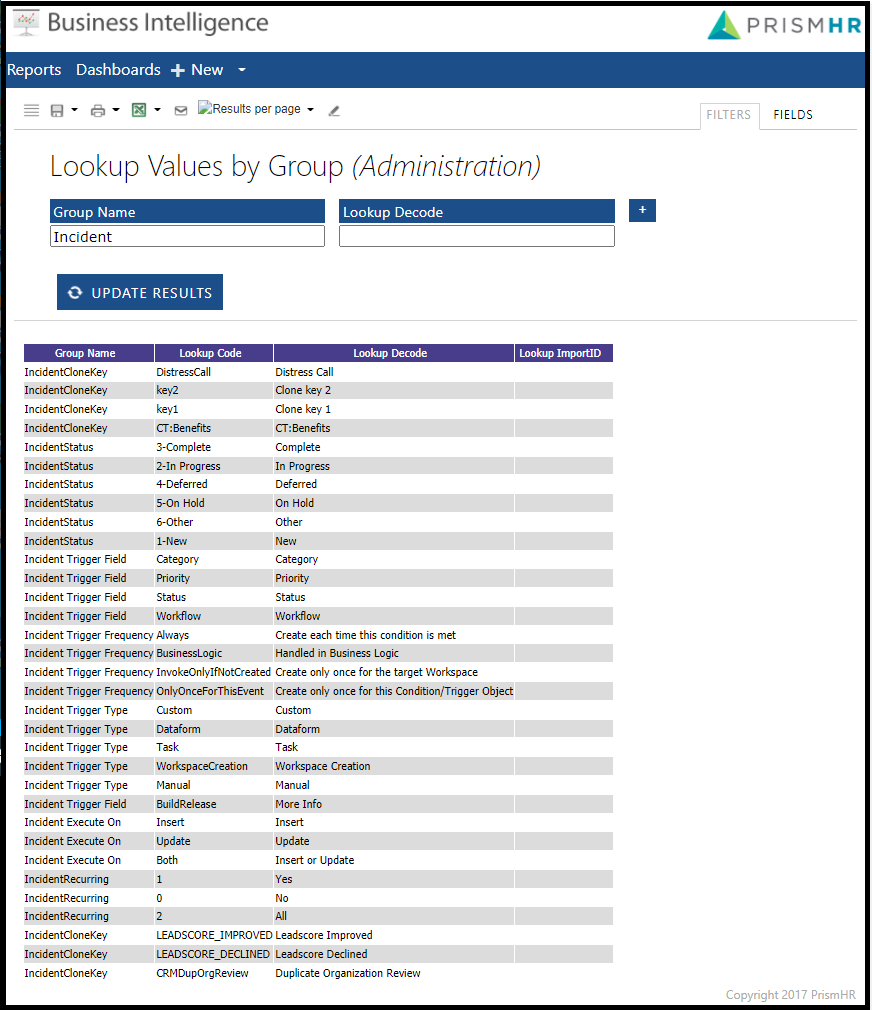
Before you begin adding lookup groups, run the Lookup Value by Group Business Intelligence report and review the existing lookups. Use the Lookup Values by Group to export a list of lookup field values.
The following graphic illustrates the Lookup Value By Group report.
Run the Lookup Value by Group Business Intelligence report
-
From the modules bar, select Business Intelligence.
The list of Business Intelligence reports displays.
-
Select Administration > Lookup Values by Group.
The report displays.
-
(Optional) Enter a value in the Group Name field to filter the results.
-
(Optional) Enter a value in the Lookup Decode field to filter the results.
-
Select the Results Per Page drop-down arrow and select Show all results.
-
Click Update Results.
-
Select the Export drop-down arrow and select one of the following export options.
-
Export to Excel
-
Word Document
-
CSV
-
XML
The system saves the file to your Downloads folder.
-
1. Add a Lookup Group
Lookups consist of a Lookup Group and Lookup values, which contain, at a minimum, a Code and Decode value. For new lookups, first, create the Lookup Group. Then you create the Lookup values.
To add or configure a Lookup Group:
- Go to System Admin
 > Lookups > Manage Groups.
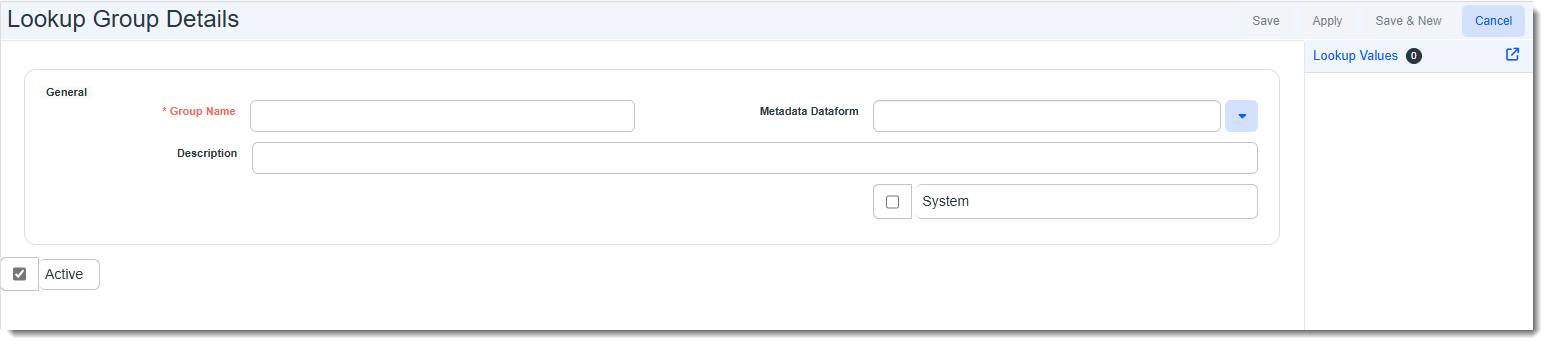
The Lookup Groups dashboard opens. From here, you can manage or add groups or edit the values of an existing group. - To add a new group, click Add.
The Lookup Group Details form opens.
|
Group Name |
Enter a unique group name to avoid confusion when using lookups. |
|
Metadata Dataform |
A lookup can reference associated metadata through another dataform. However, if not configured correctly, it can cause errors. Before you configure lookup metadata, please log an Extranet case. For more information about metadata, see Lookups with Metadata. |
|
Description |
Enter a unique description to avoid confusion. |
|
System |
Indicates this group is a building block of the system. When marked as System, it is locked down and not editable. |
|
Active |
Select this option to activate the new group. |
- Click Apply.
2. Add Values to the Lookup Group
Now let's add values to your group.
To add values to the new group:
-
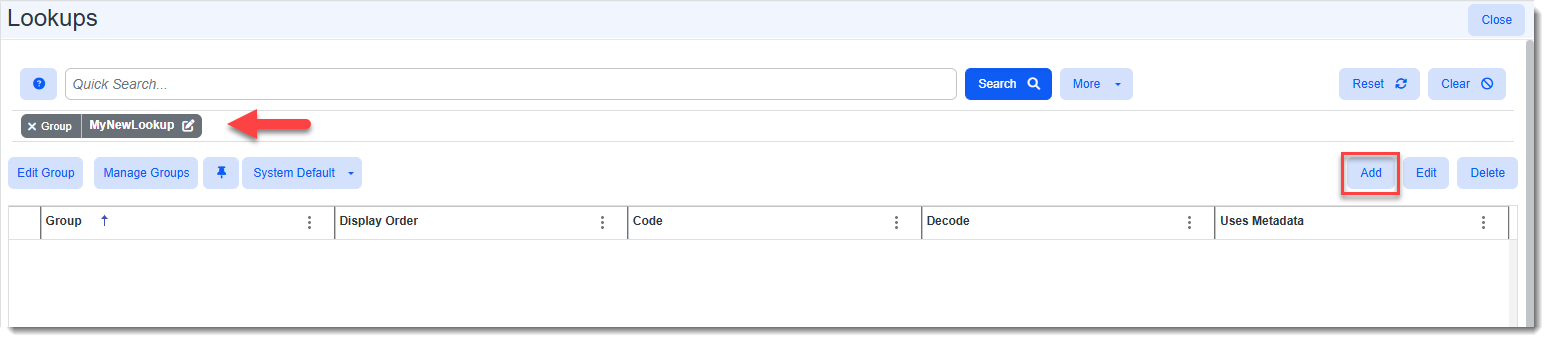
With the lookup group you just added still displaying in the Lookup Group Details window, click the Lookup Values link.

The Lookups dashboard displays and is pre-filtered to the Group you just added. There are no values shown here yet since you are adding a new lookup group and values.
Tip: If you need to edit existing values in the future, before adding any values, review the existing values (Code and Decode columns) shown on the Lookups dashboard to make sure you do not create duplicates. Remember to select More > Show > All when searching because archived values are hidden from the list by default.
-
Click Add.
The Lookup Details form opens with the Group field auto-filled with the new group you just added.

-
Complete the form:
Note: You may see additional fields on the Lookup Details form which are not defined in the table below. These are metadata fields which can vary as they are unique to the Lookup Group.
Group
Auto-fills if the Lookups Detail form was accessed from the Lookup Group. Otherwise, select the group from the drop-down list.
Filter
Filter can further refine the lookups or use a lookup group more flexibly.
Note: Once configured, you can select filter you want to use in the Filter Value field of dataform properties or in the Response Option field on a Survey Design form.
For dataforms, a filter can be a word or single characters that represent what you are filtering.
To specify multiple filter values, enter the list in the Filter field using a comma-separated list with no spaces. For example,
South,SEorPurple,JewelTone. When you specify multiple values, it acts as an OR mechanism. For a list of US States, you might specify a state as South and SE (Southeast). So, when a geographic region is selected, the state is available in two regions.Note: The Filter field will not accept special characters (with the exception of commas used to specify multiple filter values).
For survey ratings, filters represent the rating scale of the Survey Rating Lookup Group. Assign the survey rating lookup values to a filter group by entering the filter group name in the Filter field. In the example below, we have created filters named 1-10, 1-5, and 1-7. We want the lookup value "1" to be included as a rating value in the 1-10, 1-5 and 1-7 filter groups so we add them all to the Filter field separated by commas):

For details on how to configure filters on dataforms, see Basic field filtering: Using the lookup Filter and dataform field Filter Value.
For details on how to set up a case survey, see Configuring a Dataform Survey Email Template.
Code
The Code value is the actual data value stored in the database when a record is saved.
-
You determine the Code value of a lookup that does not have the System check box checked (i.e., a non-system lookup). However, keep in mind that a mistyped Code value cannot be edited once the lookup is saved. If you save a mistyped Code value on a newly added lookup that is not yet being used by the system, you can delete the lookup and re-enter it. If you are unsure about whether it is safe to delete a lookup, please log an Extranet case.
- Remove spaces and special characters from the Code value when creating a new lookup record. Use PascalCase formatting – that is, the first letter of each word is capitalized – for example, WinterMonth and SummerMonth.
Note: If the Import Map detail is set to not allow invalid lookup values when importing, the system will check to see if there is an ImportID to validate against (standard functionality). If the ImportID field is not populated, then the system will validate against the Group/Code value of the lookups to try and import.
Decode
The Decode value is what displays on the dataform. Code and Decode are often the same but are not required to be.
Note: You can add duplicate Decode values to a Lookup Group for filtering purposes. However, the Code values must remain unique within the Lookup Group. When adding a duplicate Decode value (with a unique Code value), the following soft error confirmation message displays upon clicking Apply or Save:
"The chosen Decode value already exists for the specified Lookup Group."
Click Save Anyway to add the duplicate Decode value.
Description
If the Decode value does not provide a logical description of its purpose, then add a description.
Display Order
Display Order assigns how the values display in the list. Lower numbers display before higher numbers. In the example below, we have 5 items in a lookup list and we are using a display order scale of 1 to 5. The "New" lookup value with a Display Order of 1 will display at the top of the lookup list while the"Complete" lookup value with a Display Order of 5 will display at the bottom of the list.
Value
Display Order
New
1
In Progress
2
Deferred
3
On Hold
4
Complete
5
Note:
-
You do not have to use consecutive numbers from 1 to 5 as we did in the scenario above. The numbers just need to reflect a progression from lowest to highest. For example, you could have used 10, 20, 30, 40 and 50 to achieve the same result.
-
If no Display Order is defined, the value does not populate the lookup list.
-
This Display Order is also used to determine the order of values on the Progress Bar widget. Lookup values with no Display Order defined do not display on the Progress Bar. See Widget: Progress Bar.
Default
You can set one value as the default when a dataform field is configured to this lookup. For example, on the Workers’ Comp Claim dataform, the Claim Type field (which is configured as a lookup field) can default to Medical Only (a lookup value). When you add a new dataform, the field defaults to this value instead of blank. You would set Default for commonly used values.
System
Indicates this value is a building block of the system. When marked as System, it is locked down and not editable.
Import ID
After the lookup is saved, the Import ID field displays. This field is in the Administrative fieldset. Import ID is used for translation during imports that are configured with the lookup datatype. By default, this field is blank and must be set for imports.
- This field can either have a single value such as W to match what is exported from your external system or has a pipe-delimited list of optional values that translate to the lookup such as |W|w|Weekly|WEEKLY|WEEK|Week|.
- When passing multiple values, each value is evaluated. The inspection is case sensitive, so W is a different value than w.
- When passing multiple values, use the pipe delimiter between values – for example, |W|Week|.
- When stringing multiple values together, the pipe delimiter | must be the last character in the string.
Note: If the Import Map detail is set to not allow invalid lookup values when importing, the system will check to see if there is an ImportID to validate against (standard functionality). If the ImportID field is not populated, then the system will validate against the Group/Code value of the lookups to try and import.
Active
Select Active to activate the new value.
-
-
Click Save.
What's next? Now you need to configure the dataform targeted to use the new lookups. Go to Configuring Dataform fields to use Lookups.