Configuring Scheduled Email Templates
You can schedule email templates to trigger on a specific date. This topic details how to schedule an email notification or survey to trigger and be automatically sent to a recipient using the Generate Scheduled Email Templates scheduled process.
To configure scheduled email templates:
| 1. | Go to System Admin |
The Email Templates dashboard opens.
| 2. | Click Add. |
The Choose Email Template Type dialog opens with options to select Real Time or Scheduled.
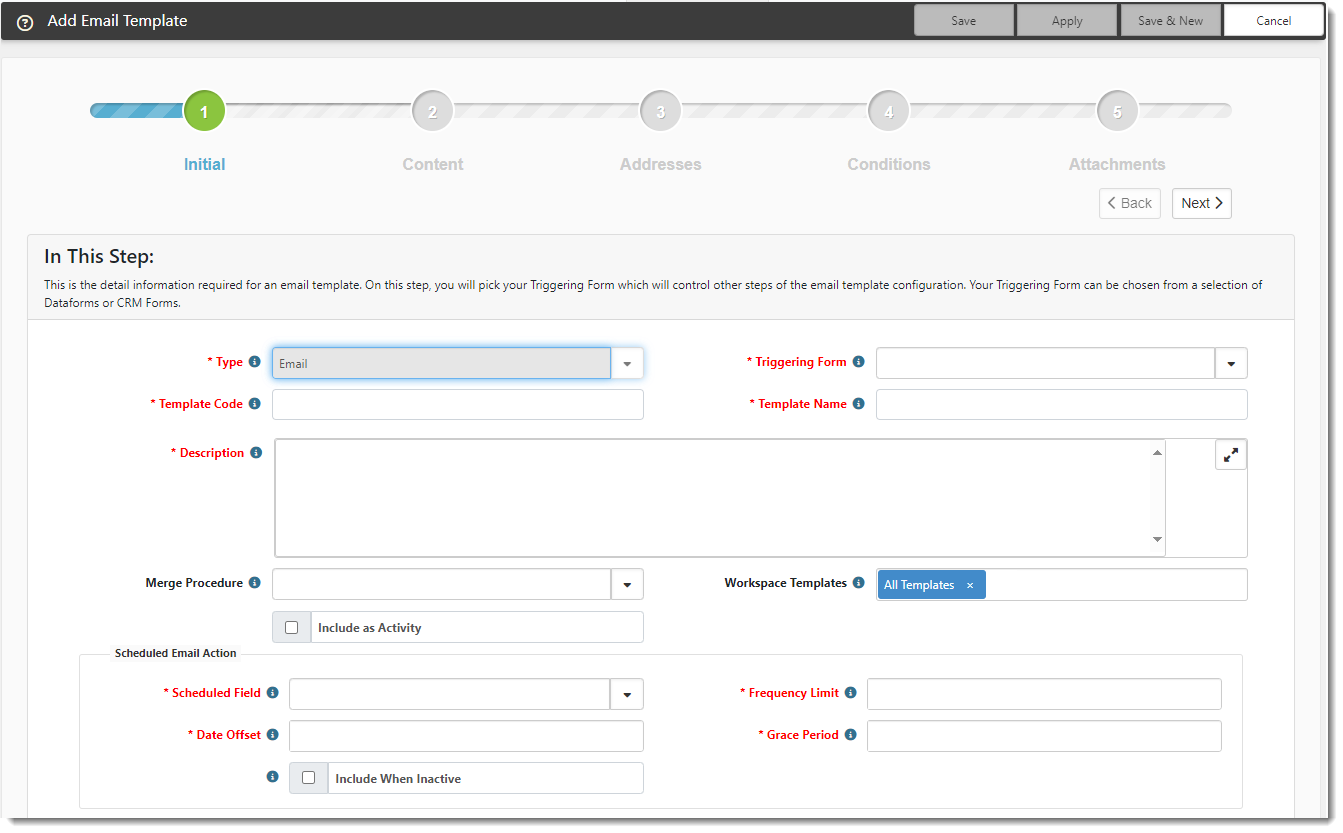
| 3. | When you select Scheduled, the Add Email Template wizard opens with Step 1: Initial. In this step, you configure the date that triggers the scheduled email template. |
| 4. | Configure the following options: |
|
Type |
Email is selected by default for regular scheduled email notifications. Select Survey for scheduled surveys. |
|
Triggering Form |
Select the form that will trigger the email notification or survey to be sent. To add a dataform that is not in the list:
|
|
Template Code |
Must be unique and should be related to the purpose of the email template. Note: Global Admins can only edit codes that begin with CSCRPLY. |
| Template Name | Provide a short, descriptive name for your template. This displays in the email template list. |
| Description | Provide a useful description of the email template. |
| Merge Procedure | Select an optional Merge Procedure here to provide additional system information for field replacement. The procedure can be selected from any stored procedure in the system with a name containing emailtemplate_merge_proc. Merge Procedure also determines the fields that are available to use in field replacement. |
| Workspace Templates | Select the Workspace Templates to receive this email notification or scheduled survey. By default, this field is set to All Templates. |
|
Include as Activity |
Select this option to attach the email or scheduled survey as an Activity. When the template is triggered, the email message attaches to the triggering record. This action preserves the communication of the sent email. By default, the option is cleared, meaning "do not include the email as an activity". If you select this option and the email template includes an attachment, the system uploads any attachments to the activity when it is created. |
|
Scheduled Email Action |
|
|
Scheduled Field |
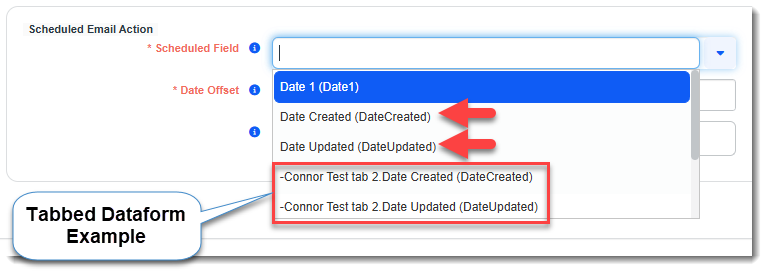
This is the Date or Date/Time field (from the selected Triggering Form) that ClientSpace will check to determine when to trigger the email or survey. In addition to regular form Date fields, you can also trigger your email template by the date a Parent or Tabbed dataform was created (Date Created) or updated (Date Updated). Note: ClientSpace only uses the Date portion of Date/Time fields to determine the trigger date. |
|
Frequency Limit |
The number you enter here limits the frequency that the email or survey is sent. It is triggered once every X days based on the value in this field. This way, even if a change is made to the date field used as the Scheduled Field which makes it eligible for triggering, the recipient will not receive additional emails until the set Frequency Limit has passed. |
|
Date Offset |
The number of days plus (+) or minus the (-) triggering date that the email notification or survey template is triggered. For example, to trigger the email template 5 days before the Date or Date/Time specified in Scheduled Field, type -5 in Date Offset. To trigger the email template 5 days after the Date or Date/Time specified in Scheduled Field, type 5 in Date Offset. |
|
Grace Period |
This is the number of consecutive days you want the system to continue to try to trigger the email or survey if, for some reason, it could not be sent on the first eligible day. |
|
Include When Inactive |
When this field is unchecked, only Active triggering forms are checked when the scheduled email or survey template is run. |
| 5. | After you have configured the Scheduled Email Action section, you receive a brief synopsis of the schedule. |
| 6. | Click Next to go to Step 2: Content. |
Note:
| • | As you proceed with configuration through the various tabs of the Email Templates wizard, you may notice Current User is not available as an option in the Source field of Step 3: Addresses. This option only works with Real Time field analysis to determine the current user. |
| • | The Execute On field in Step 1: Initial as well as No Primary Trigger and Primary Trigger Field in Step 4: Conditions are not displayed. These options only work with Real Time field analysis. |
| • | The Is Dirty trigger Operator is not available when setting conditions in Step 4: Conditions. This option only works with Real Time field analysis to determine if a field has changed. |
| • | Once you complete, save, and publish the scheduled email template, the configured conditions in the Scheduled Email Action section of Step 1: Initial are evaluated by a scheduled process named Generate Scheduled Email Templates to determine if the date or date/time field combined with the other email template schedule options and any additional conditions added in Step 4: Conditions are met. If they are met, the email template will trigger at the set time. |


