Adding or Editing User Accounts from the User Admin Module
All ClientSpace users have a user profile. The user profile record contains the username used to access ClientSpace, along with identification fields, such as Name, Department, Job Title, Phone, and Email. Additionally, the user profile contains administrative and out of office settings.
For some clients, the user profile automatically imports from PrismHR or Salesforce. Administrators can also manually add and edit user profiles. Supervisors who have been assigned access to the User Admin module can edit certain user profile fields.
Users can edit their own user profile (by clicking their user name in the top right corner of ClientSpace and selecting My Profile) to add limited information such as demographic details, enable out of office notifications, or add modules to the topmost banner bar.
Administrators can perform other edits, such as role assignments and managing licenses. (Roles control user access (view, add, edit, delete, and admin) to various entities. Licenses determine the available ClientSpace modules.)
As a supervisor with access to the User Admin module, depending on your assigned access permissions, you can:
-
Add user account records.
-
View and edit the user account records of all Active direct reports and all levels of indirect reports beneath them.
-
View and edit the user account records of all Inactive users who do not have an assigned Immediate Supervisor or where "Current User" is specified in the Immediate Supervisor field on the user record.
Examples of specific changes you can make include:
-
Editing user record fields to set yourself as the Immediate Supervisor on Inactive records with no supervisor assigned.
-
Enabling the "out of office" and backup user settings for a report who is unable to do it themselves due to an emergency or sudden illness.
-
Setting the Change Password Next Login field for a report.
-
Viewing and selecting modules that the user can access.
-
Viewing role and module licenses.
This topic guides you through adding or editing a user account record as a supervisor.
Note: Access permissions are required to add and edit user account records.
To add or edit a user account:
-
Go to Modules
 > User Admin.
The User Admin dashboard opens. The dashboard is filtered to display direct reports and all levels of indirect reports beneath them as illustrated in the image below where three of this supervisor's direct reports are listed as the Immediate Supervisor of three indirect reports: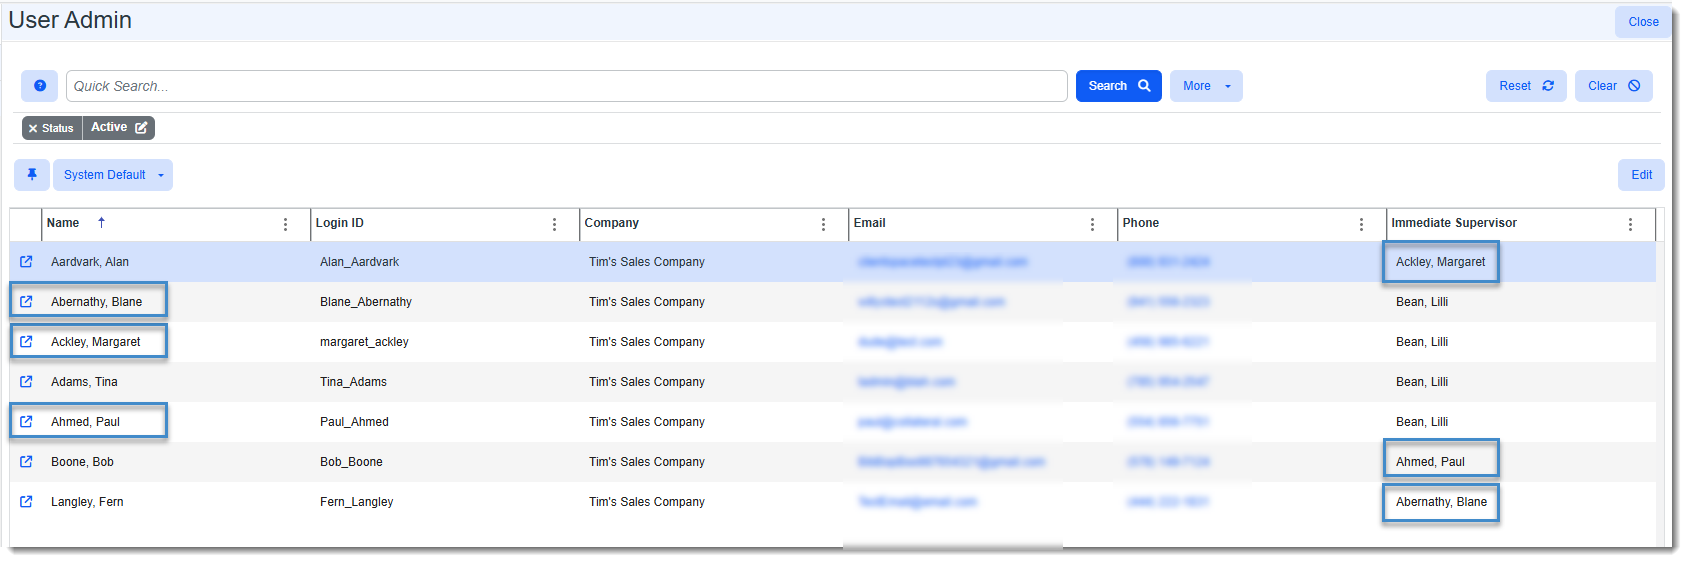
-
What do you want to do?
-
To edit a user account: Highlight the row and click
 (Open) or click Edit in the upper right corner of the dashboard. The User Details form opens.
 -
To add a user account: Click Add in the upper right corner of the dashboard.
The User Details form opens.
-
-
Complete or update fields as necessary.
|
Fieldset |
Field |
Description |
|---|---|---|
|
General: |
|
|
|
Company |
Company name. |
|
|
First, Middle, Last |
Required: First and Last. |
|
|
Prefix, Suffix |
Provide appropriate prefix or suffix to the account. Optional. |
|
|
Job Title |
Type the user's job title. |
|
|
Phone |
Type the user's phone number. You can call the user directly from ClientSpace by clicking the phone icon. |
|
|
|
Required. When you change an Active user to Inactive, the user's email is also inactivated to ensure that system emails are not sent to inactive user accounts. If an account is re-activated, the inactive status is removed from the email address. |
|
|
SMS Email |
Used for Two Factor Authentication Notification. |
|
|
Department |
This field is required .Select a department from the list. |
|
|
Workspace Search |
Auto-filled when using a Template User. For Internal users, sets the Search Type for the Workspace Widget. |
|
|
Immediate Supervisor |
Inactive record: If the Immediate Supervisor field is blank or has "Current User" showing in the field, you can assign yourself as the supervisor, if appropriate and then click the Active checkbox in the lower left corner of the User Details window to activate the record. Note: If you do not see Inactive user records, click the More button at the top of the User Admin dashboard, select a status of Inactive and click Search.
Active record: Once a user is assigned an Immediate Supervisor on an Active user record, both the Immediate Supervisor field and Active chebkbox are locked and can no longer be edited by an Immediate Supervisor user. Contact your Global Admin if changes to these fields are required after they are locked. |
|
|
User Settings: |
|
|
|
|
Enable Email for this account |
Default is enabled. Enables email notifications to external email, such as Gmail or Outlook. |
|
Enable Time Tracking |
When selected, this setting displays the Time Tracker panel on dataforms that allow Time Tracking for this user. SeeAdding Time Tracking to a Dataform.
This setting also enables the Minutes Spent field on the Quick Case form when Time Tracking is also enabled at the Cases dataform level. See Adding a Quick Case. |
|
|
Load Home Page by Default |
Default is enabled (selected). |
|
|
Adjust for DLS |
Adjust the clock for daylight savings time (DLS). |
|
|
ClientSpace Digest |
Select this option for the user to receive a notification for follow-up activities when the system runs the ClientSpace Digest scheduled process. |
|
|
Time Zone |
Select the user's time zone. |
|
|
Upload Email Attachments |
Default is Yes.
Determines if attachments can be uploaded when attaching Activities from the
Email Add-In. |
|
|
External Calendar URL |
Exposes external
calendar events on the ClientSpace calendar. Provide the URL to a shared
calendar. |
|
|
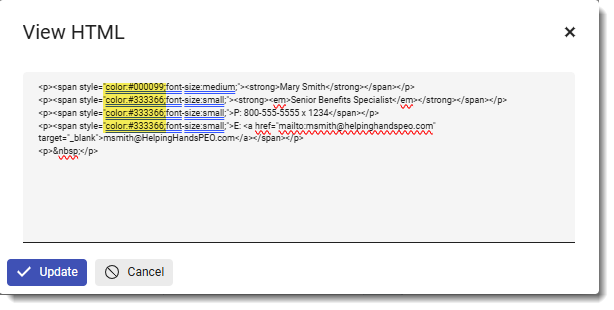
Signature |
Adds a custom signature message to Email Activities. Use the rich text editor toolbar to make customizations according to your branding specifications:
Tips:
Note: You can use the View HTML option to make other changes and apply other custom effects that are not available on the toolbar.
|
|
|
Administrator Settings: |
|
|
|
Change Password Next Login |
Select this option to require the user to change their password on the next login. |
|
|
Can Create Workspaces |
Select this option to allow the user to create workspaces. |
|
|
Send Account Info Email |
When this field is selected, the user receives an email with their username and login instructions. |
|
|
User Type |
Select Internal to create an internal user or External to create an external user. This field is auto-filled when using a Template User. |
|
|
|
Default Workspace |
This field is enabled when User Type is set to External. It determines which workspace an External User will be directed to when they log in. |
|
|
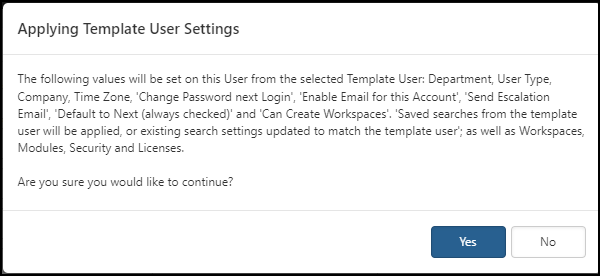
Template User (drop-down) (Available in the Administrator Settings fieldset when editing an existing user) |
From the list, select a template user account to auto-fill values for the account you are editing. The following values are auto-filled from the selected template user:
Additionally, saved searches from the template user will be applied, or existing search settings updated to match the template user; as well as Workspaces, Modules, Security and Licenses. Note: If you select a value in the Template User field, the system displays the Applying Template User Change message. Click Yes to continue and use the template user settings for the current user that you are creating or editing. The following graphic illustrates the Applying Template User Change message.
|
|
Reporting Profile |
Auto-filled when using a Template User. Used for Business Intelligence reports. See Configuring Security in Business Intelligence Reporting. |
|
|
Notes |
Auto-filled when using a Template User. |
|
|
Out of Office: |
|
|
|
|
Enable Out of Office |
Default is
disabled. When you select this option, the other fields in the fieldset
become available. |
|
Back Up User |
Required when Enable Out of Office is selected. Select the user account to receive notifications on behalf of the primary user while the primary user has the Out of Office settings enabled. Notifications are sent for the time range specified by Start Date and End Date. |
|
|
Start Date |
Required when Enable Out of Office is selected. Select a start date for the out of office notifications. |
|
|
End Date |
Required when Enable Out of Office is selected. Select an end date for the out of office notifications. |
|
|
|
||
|
Active |
Default is Active.
When you change an active user to inactive, the user's email is also inactivated to ensure that system emails are not sent to inactive user accounts. If an account is re-activated, the inactive status is removed from the email address. |
|

- To select modules for a user, see Adding and Maintaining User Modules.
- Click Save.
Learning How: User Admin Module
![]() Video
Video
Watch the video User Admin Module.