Adding and Managing Time Tracker Entries from a Dataform
You can add and manage Time Tracker entries from the Action Center of any dataform where time tracking has been enabled in the dataform properties.
Note:
-
You can also add a Time Tracker entry from the Time Tracker module dashboard which displays a list of time tracking entries (i.e., time records). For more details, also see Time Tracker Module Dashboard.
-
If you have an "in progress" time tracking record, the Time Tracker Stopwatch
 icon in the upper right corner of the ClientSpace menu bar changes from blue to red once you click Refresh
  on your browser to update the Stopwatch icon color.
You can click it to view a list of the last ten time tracking records associated with your user name. The first record in the list is the record with the active, running timer on it. Click on an item to open the record associated with the time tracking record. From there, you can view time tracking record in the Action Center where you can stop/start a timer or open the time tracking record and make additional changes. See Time Tracker Stopwatch.
Time Tracking Action Center Panel Options
On any dataform where time tracking is enabled, a Time Tracking panel displays in the Action Center:
![]()
|
Icon |
Tooltip Text |
Description |
|---|---|---|
|
|
Quick Time |
Allows you to quickly add a completed Manual time entry record of time already spent using the default time tracking Category.
Note: Manual time entries are assigned an Entry Method of "Manually Enter Time" on the time record. View or edit time tracking record details by clicking the blue link on the Time Tracking panel entry. Flagging the time record, as Billable or changing the default time tracking Category, for instance, must be done on the time tracking record. When you click the icon, a list of time chip options displays as 15, 30, and 60 minutes.
The list also contains a Custom option at the bottom of the list. When you select Custom, a Quick Time popup window displays, prompting you to add time spent in minutes.
Note: If the minutes entered exceeds 60 minutes, hours and minutes are calculated and displayed under the Minutes Spent field. Clicking Save Clicking Cancel |
|
|
Start/Stop |
Clicking Start creates a new, open Time Tracker entry with a running timer with a default Entry Method on the time tracking record of "Calculate Minutes".
Note: Manual time entries are assigned an Entry Method of "Manually Enter Time" on the time record. View or edit time tracking record details by clicking the blue link on the Time Tracking panel entry. Flagging the time record, as Billable or changing the default time tracking Category, for instance, must be done on the time tracking record.
The Start button then becomes the Stop button. Click Stop to stop the timer and automatically complete the time entry record with the total time spent. |
|
|
Add Time |
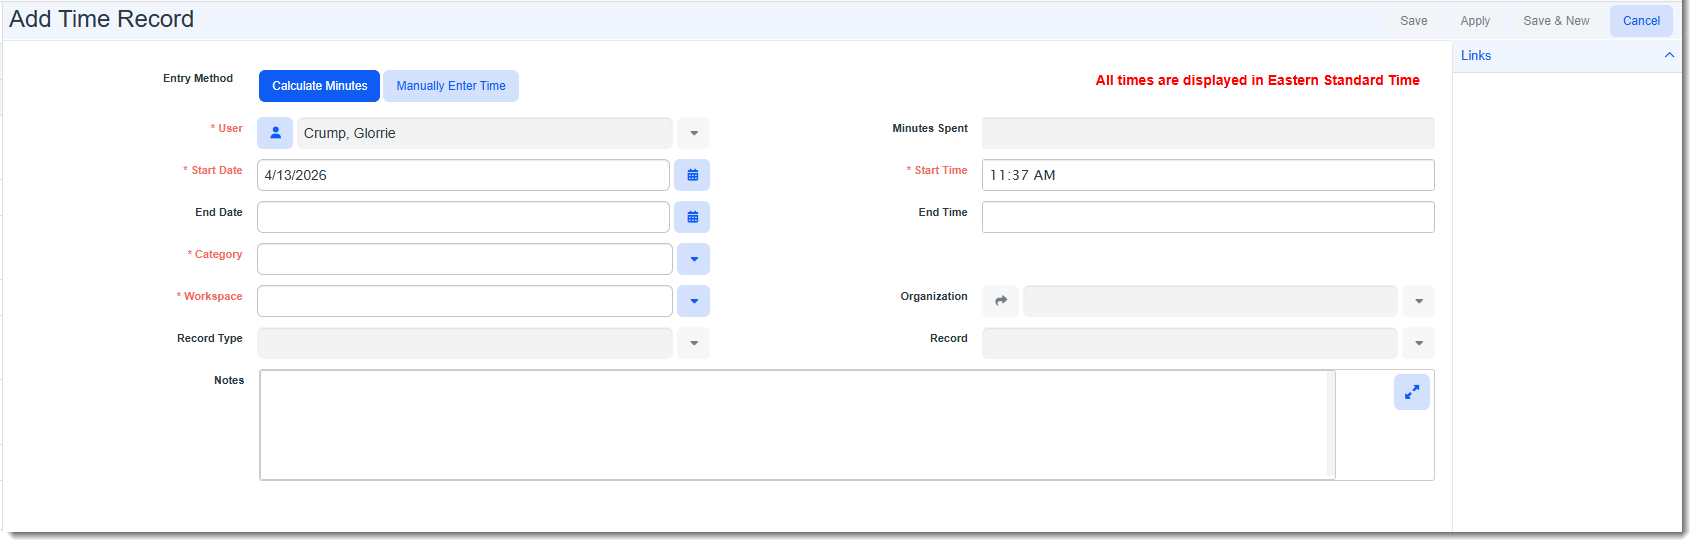
Opens a blank time tracking record where you can select the Entry Method of "Calculate Minutes" or "Manually Enter Time" to create any of the following time tracking records:
Note: Clicking the Add Time icon works the same as clicking Add on the Time Tracker Module dashboard. Both methods open the Add Time Record form.
For field definitions, examples, and detailed steps, refer to theAdding a Time Tracking Record section of the Time Tracker Module Dashboard topic. |
|
|
Open Full Search |
Opens the Time Tracker module dashboard pre-filtered to display the time tracking records of the logged in user for the current record. |
Adding a Time Tracking Record Using Quick Time
Quick Time
![]() allows you to quickly add a completed Manual time entry record of time already spent.
allows you to quickly add a completed Manual time entry record of time already spent.
To add a time tracking entry using Quick Time:
-
On a time tracking-enabled dataform, click Quick Time
 .
.The list of time chip options displays as 15, 30, and 60 minutes.
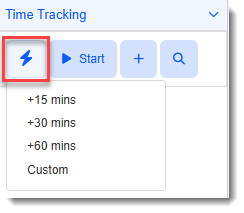
The list also contains a Custom option at the bottom of the list.
-
What do you want to do?
-
To select a time chip option: Select a time chip option from the list. A completed Manual time entry record of time already spent using the default time tracking Category is added. The black Total Time badge is also updated to reflect cumulative time tracked.
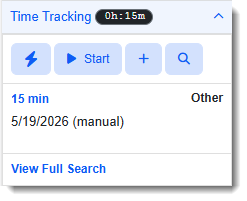
Note: Quick Time entries are assigned an Entry Method of "Manually Enter Time" on the time record. View or edit time tracking record details by clicking the blue link on the Time Tracking panel entry. Flagging the time record, as Billable or changing the default time tracking Category, for instance, must be done on the time tracking record.
-
To enter a custom time: Select Custom at the bottom of the list. A Quick Time popup window displays prompting you to add time spent in minutes.
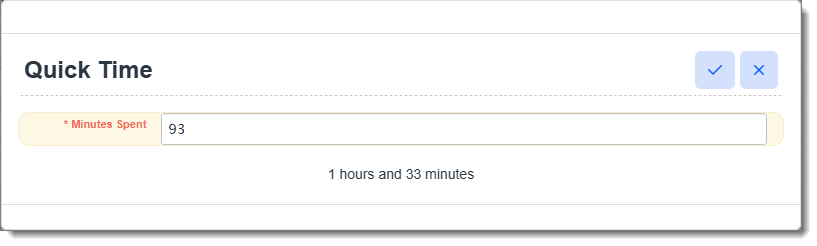
Note: If the minutes entered exceeds 60 minutes, hours and minutes are calculated and displayed under the Minutes Spent field.
Click Save
 on the Quick Time window to save the time record. A completed Manual time entry record of time already spent using the default time tracking Category is added. The black Total Time badge is also updated to reflect cumulative time tracked.
-
Adding a Time Tracking Record Using Add Time
Add Time
![]() opens a blank time tracking record where you can select the Entry Method of "Calculate Minutes" or "Manually Enter Time" to create a completed tracking record of time already spent or open tracking record reflecting an "in progress" time entry.
opens a blank time tracking record where you can select the Entry Method of "Calculate Minutes" or "Manually Enter Time" to create a completed tracking record of time already spent or open tracking record reflecting an "in progress" time entry.
To add a time tracking entry using Add Time:
-
On a time tracking-enabled dataform, click Add Time
 .
.The Add Time Record form displays.
-
Complete the form and then click Save or Apply.
The time entry record is added to the Time Tracking panel. The black Total Time badge is also updated to reflect cumulative time tracked.
Note: Clicking the Add Time icon works the same as clicking Add on the Time Tracker Module dashboard. Both methods open the Add Time Record form.
For field definitions, examples, and detailed steps, refer to theAdding a Time Tracking Record section of the Time Tracker Module Dashboard topic.
Editing a Time Tracking Record from a Dataform
To edit a time tracking record:
-
Click the blue link on the Time Tracking panel entry or click the Open Full Search
 icon to open the Time Tracker Dashboard, select the record to edit and click Edit.
The time tracking record opens in edit mode. -
Make the desired changes and then click Save or Apply.
Deleting a Time Tracking Record from a Dataform
To delete a time tracking record:
-
Click the Open Full Search
icon to open the Time Tracker Dashboard -
Select the time tracking record in the Time Tracker Dashboard and click Delete.
A confirmation message displays. -
To proceed with deleting the record, click Yes on the confirmation message.