Configuration and Process Overview of the Claim Deductible Billing Process
The Claim Deductible Billing process allows you to automatically create a bill from ClientSpace that is imported into PrismHR based on the addition of financial data to a Worker's Compensation (WC) Claim.
Note: If you have a Claim Deductible Bill that is being billed outside of PrismHR that you do not want to export to PrismHR, you can check the Exclude from Prism Export option on the Claim Deductible Bill form to prevent it from exporting. Once the Exclude from Prism Export checkbox is checked, it will not export to PrismHR even if the Status is "Ready to Bill". You can also set the Exclude from Prism Export and/or Status field values option on multiple Claim Deductible Bills at once using the Mass Update feature on the Claim Deductible dashboard. See Using Mass Update from the Claim Deductible Dashboard for more details.
This Claim Deductible Billing process works by having an initial deductible amount set up at client level. Then, when a workers’ compensation claim is created and Worker's Compensation financial details are added to the claim, the system automatically evaluates the deductible amount set at the client level and creates a Claim Deductible Bill in the "Ready to Bill" status with the appropriate amount. The record is then imported into PrismHR via a scheduled process unless the Exclude from Prism Export checkbox is checked on the form.
Note:
-
Multi-tenancy is supported.
-
The process outlined assumes that you are exporting Claim Deductible Bills to PrismHR. If you do not export PrismHR, you can still use the Claim Deductible dashboard and Claim Deductible dataform to enter and manage Claim Deductible Bills. You will just need to set the Exclude from Prism Export checkbox to "checked" on the form on the Claim Deductible dataform.
Example Claim Deductible Billing Calculations
-
The total claim financials amount is $200. The WC Deductible is $250. The Claim Deductible bill is calculated as $200.
-
The total claim financials amount is $400. The WC Deductible is $250. The Claim Deductible bill is calculated as $250.
Note: If the claim amount decreases more than the deductible amount, a credit amount is created.
Prerequisites for Use
To use the Claim Deductible Billing process, you must:
-
Have access to the ClientSpace Risk module.
-
Use the ClientSpace Worker's Compensation Claims (WC Claims) module.
-
Use ClientSpace Worker's Compensation Financials. (This is the Comp Claim Financial form accessed here: WC Claims > Claim Financials).
Configuration and Process Overview
In PrismHR:
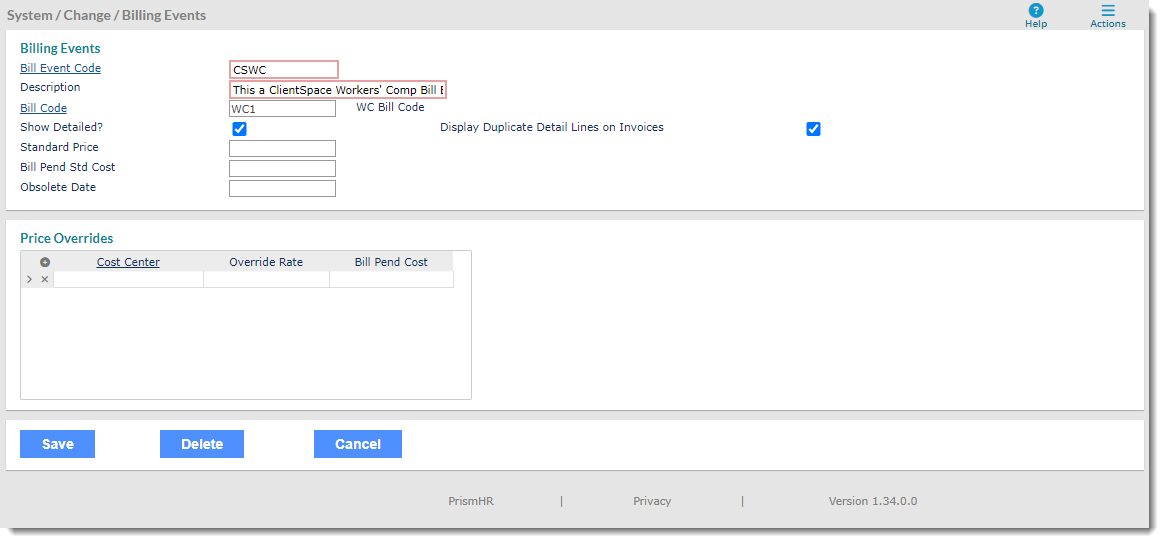
Step 1 of 1: Set Up a Claim Deductible Billing Event and Write Down the Bill Event Code
You will use the Bill Event Code when you configure the PrismHRAPI Configuration settings in a later step so have it handy. You will be adding the Bill Event Code to the EventCode parameter. See an example of a PrismHR Claim Deductible Billing Event below. Note that your EventCode may differ from the example shown.
In ClientSpace:
Note: These steps must be completed by a user with advanced administrative access, such as a Global Administrator, with the assistance of a ClientSpace team member for certain steps. (Steps requiring a ClientSpace team member are clearly marked.)
Step 1 of 8: Activate the PrismHR Bill Records Scheduled Process
The PrismHR Bill Records scheduled process performs the following tasks:
-
Identifies all Claim Deductible Billing records in "Ready to Bill" status (and where the WC Deductible Bill Opt-Out setting on the Client Master record of each associated client workspace is unchecked.)
-
Exports eligible billing records to PrismHR and creates a "Bill Pending" record for each exported bill in PrismHR. (Bill Pending Comment text, if entered, is also exported to the Comments field of the Bill Pending record in PrismHR.)
Note:
-
The Bill Pending Comment field was added to the Claim Deductible Bill form to provide the ability to export billing comments to PrismHR. See Using the Claim Deductible Bill Form for additional details.
-
You can set a parameter named ClaimDeductBillAsMiscInv in the PrismHR API configuration to export eligible billing records as Miscellaneous Invoices instead of "Bill Pending" records. See Step 2 of 8: Set Parameters in PrismHRAPI Configuration below for details.
-
-
Upon a successful export, the scheduled process updates the status of the Claim Deductible Billing records in ClientSpace to "Billed" and writes "Successfully Created Bill Record in Prism" to the Export Log field of the exported Claim Deductible Billing records.
-
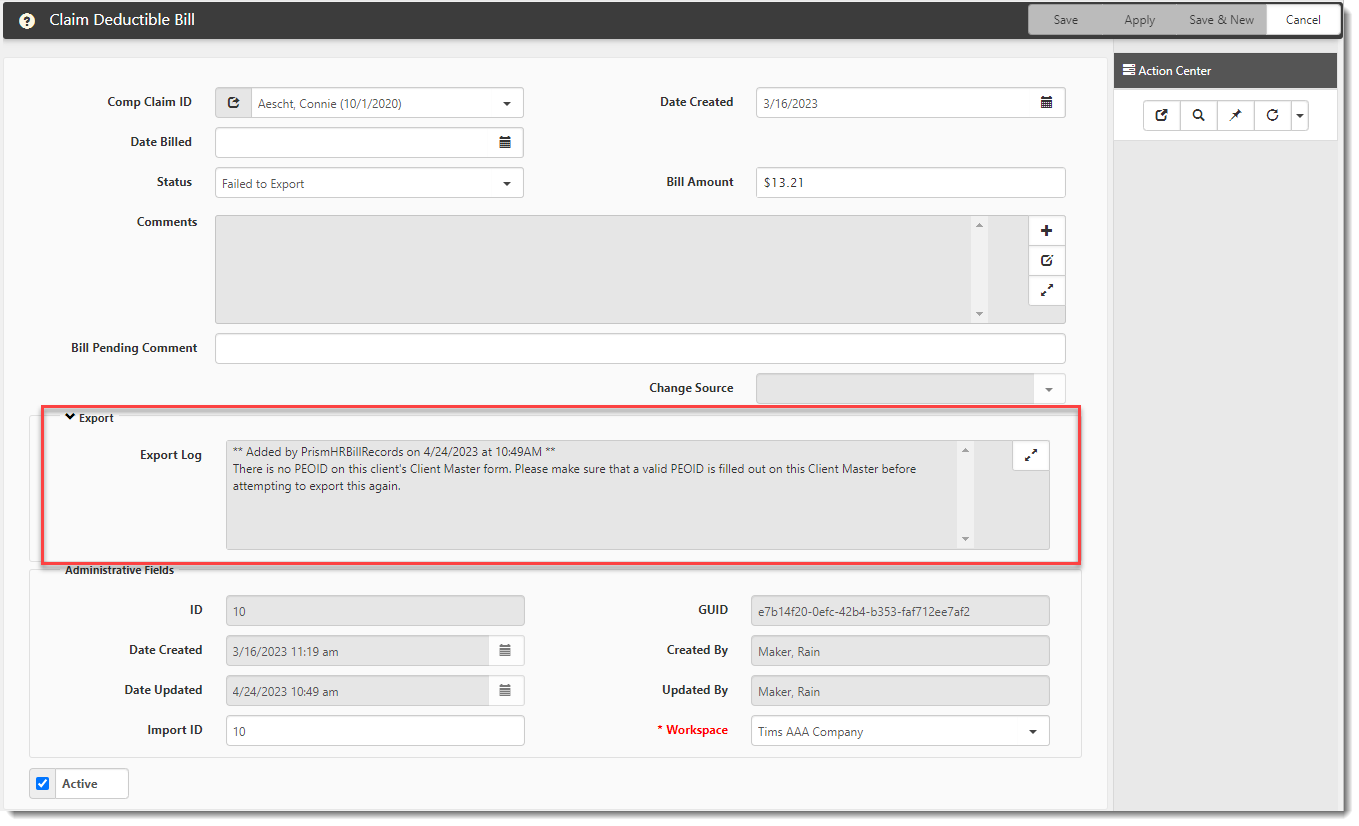
Upon an unsuccessful export, the scheduled process updates the status of the Claim Deductible Billing records in ClientSpace to "Failed to Export" and writes an error message to the Export Log field of the affected Claim Deductible Billing records as shown in the example below:
To activate the PrismHR Bill Records scheduled process:
- Go to System Admin
 > Advanced > Scheduled Processes.
The Scheduled Processes Admin dashboard opens. - Locate the PrismHR Bill Records scheduled process.
- To view the configuration, double-click the selected row or click
 (Open).
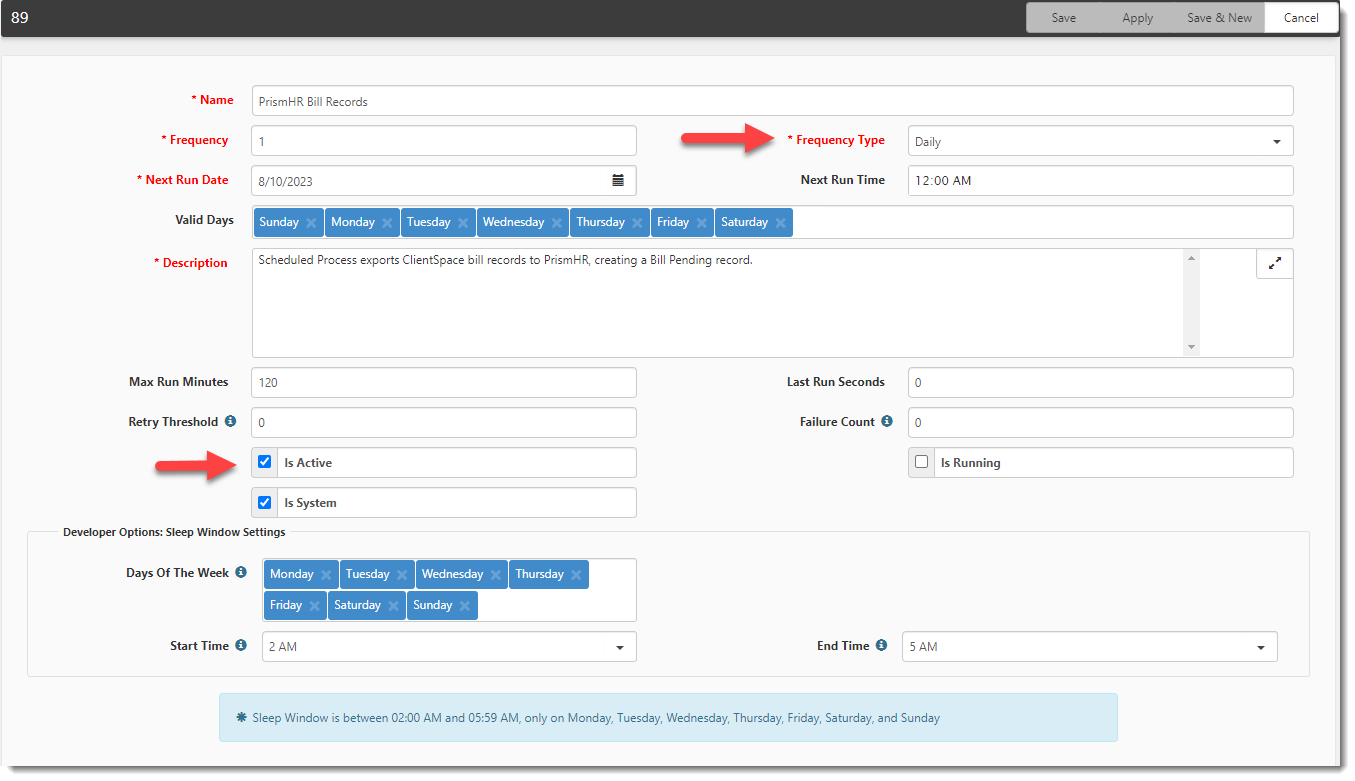
 - Review the settings to ensure that the scheduled process Is Active and adjust the Frequency Type, if necessary.
- Note: By default, the scheduled process is set to run Daily.
5. If you made changes, click Save.
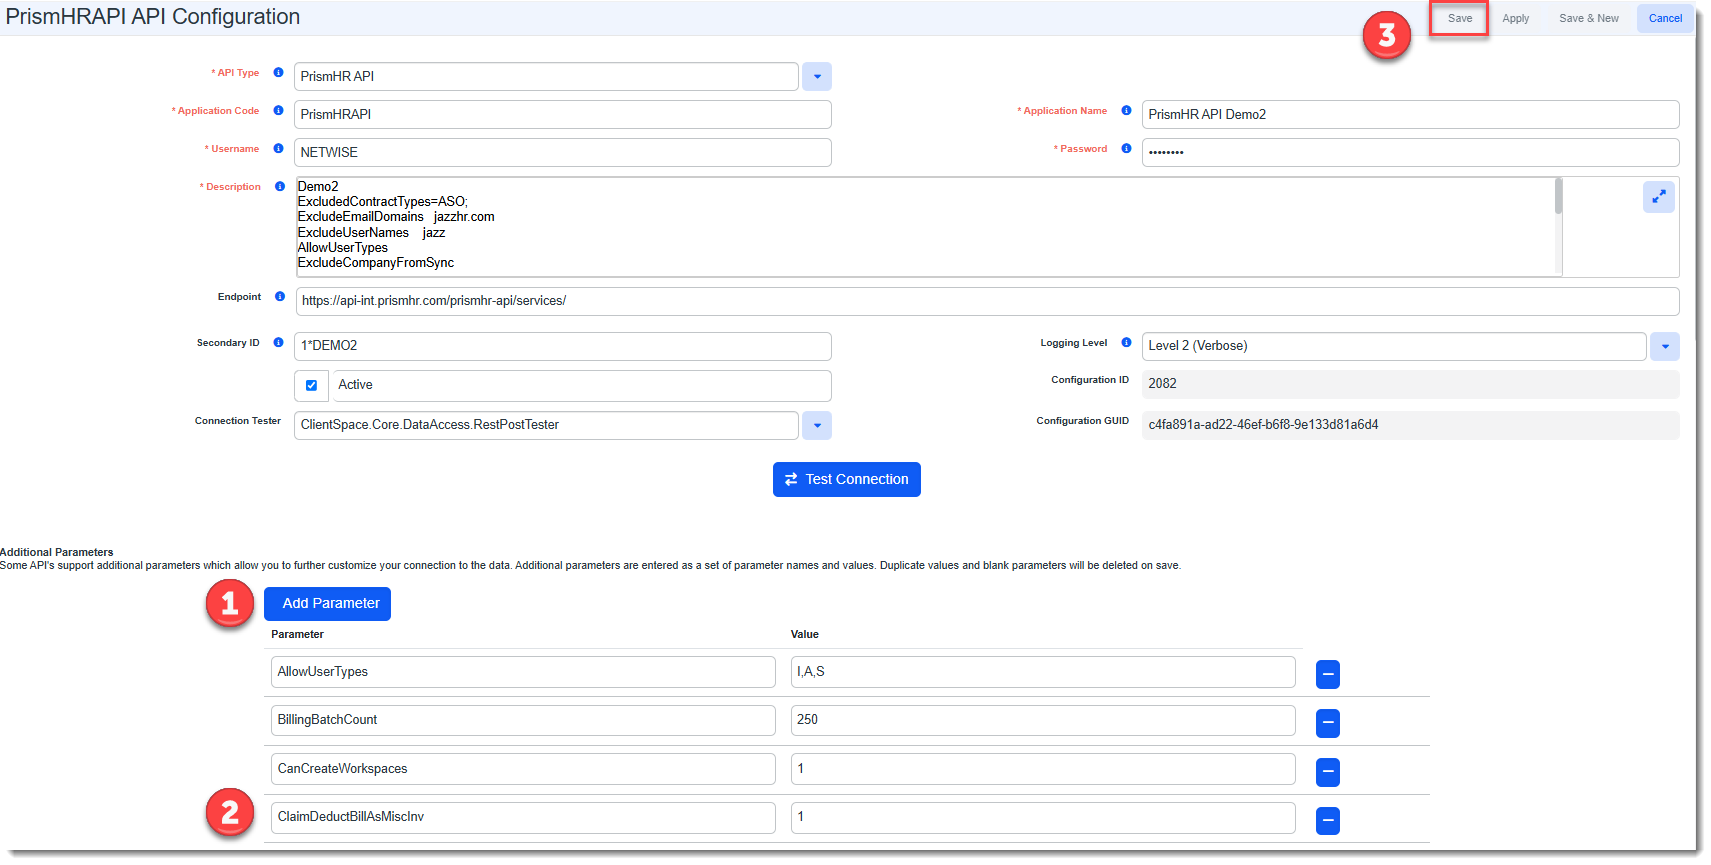
Step 2 of 8: Set Parameters in PrismHRAPI Configuration
Required: Add EventCode Parameter
To add the EventCode parameter:
- Go to System Admin > Advanced > API Configuration.
The Scheduled Processes Admin dashboard opens. - Locate the PrismHRAPI record.
- To view the configuration, double-click the selected row or click (Open).
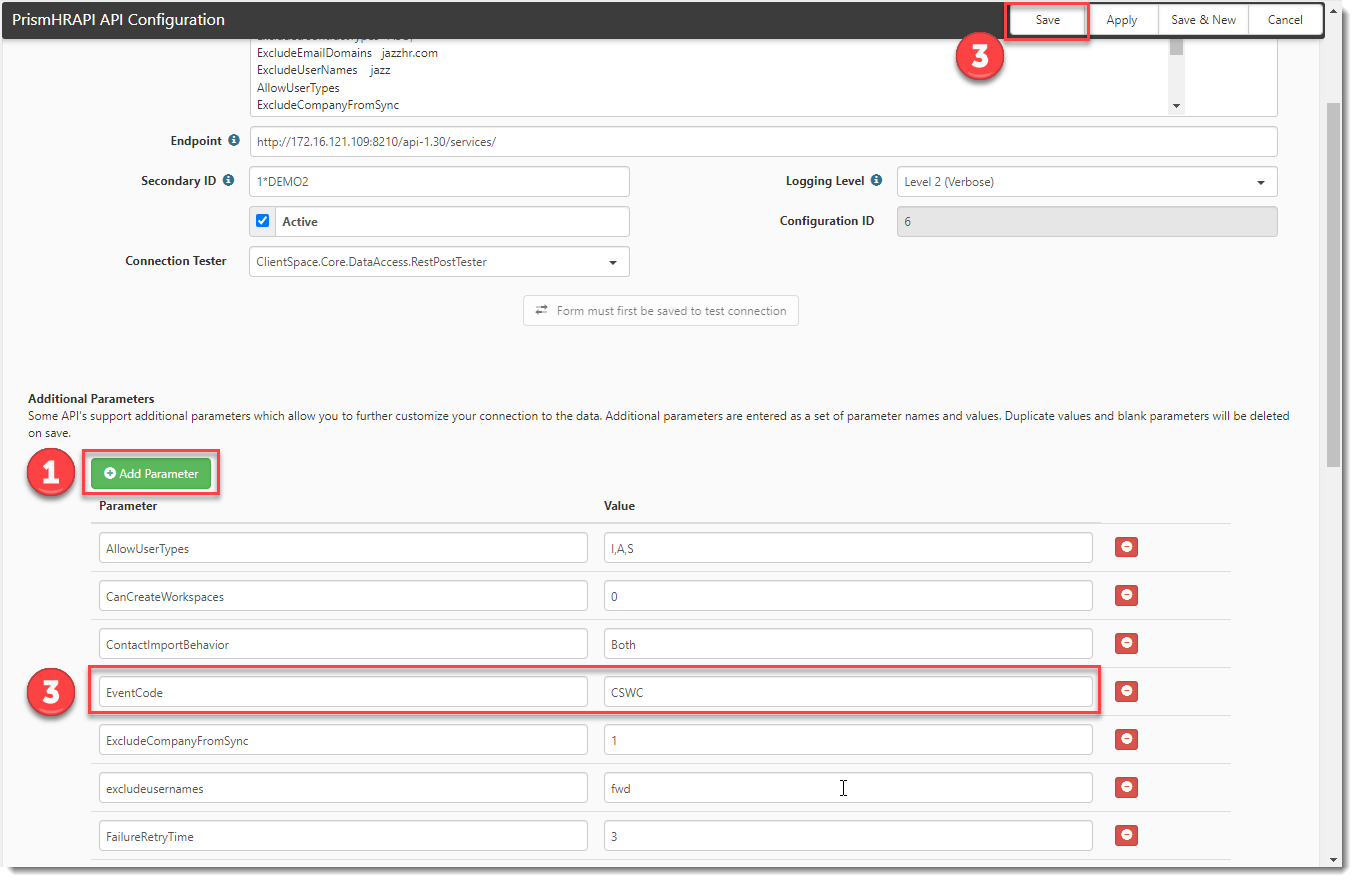
- Scroll to the Additional Parameters section, click Add Parameter.
- Complete the following fields:
- Parameter = EventCode
- Value = The Bill Event Code from the PrismHR Claim Deductible Billing Event referenced previously in the PrismHR configuration step.
- Click Save.
Optional: Add ClaimDeductBillAsMiscInv Parameter
IMPORTANT: You only need to add the ClaimDeductBillAsMiscInv parameter if you want eligible billing records to export to PrismHR as Miscellaneous Invoices instead of "Bill Pending" records.
To add the ClaimDeductBillAsMiscInv parameter:
- Go to System Admin > Advanced > API Configuration.
The Scheduled Processes Admin dashboard opens. - Locate the PrismHRAPI record.
- To view the configuration, double-click the selected row or click (Open).
- Scroll to the Additional Parameters section, click Add Parameter.
- Complete the following fields:
- Parameter = ClaimDeductBillAsMiscInv
- Value = 1.
- Click Save.
Step 3 of 8: (ClientSpace Team Member) Determine if Client is Sales or Non-Sales and Verify the Appropriate Fields Based on the Setting
A ClientSpace team member must review the client implementation group settings to determine if the Sales setting is enabled.
-
If Sales is enabled: The Per Claim Deductible field on the current Pricing Batch must be available in the "Taxes and Other Fees" section.
-
If Sales is not enabled: The WC Deductible and WC Deductible Bill Opt-Out fields must be activated and added to the Client Master in the "Add'l Company Info" section.
Note: The field labels of these fields can be changed if needed.
Step 4 of 8: Verify Fields on the Comp Claim Form
To verify Comp Claim fields:
- On the modules bar, select WC Claims.
The WC Claims dashboard opens. - View a claim by double-clicking any row or clicking (Open).
The Comp Claim form opens. - Verify the following:
- The Claim Deductible field located in the "Claim Details" section is available and accessible.
- The Claim Deductible Bill link in the Action Center is pinned open.
Step 5 of 8: Verify "Set Claim Deductible" Business Rule Details
To verify "Set Claim Deductible" Business Rule fields:
- Go to System Admin > Advanced > Manage Business Rules.
The Custom Logic Rules dashboard opens. - Locate the "Set Claim Deductible" business rule using the Comp Claim Table Name and the SetClaimDeductible Method.
- To view the configuration, double-click the selected row or click (Open).
The Rule Details form opens. - Verify the following:
- The Active checkbox is checked.
- The Default pipeline is set by default in the Execution Pipeline field.
- Click Save if you made changes.
Step 6 of 8: Verify "Claim Deductible Billing" Business Rule Details
To verify "Claim Deductible Billing" Business Rule fields:
- Go to System Admin > Advanced > Manage Business Rules.
The Custom Logic Rules dashboard opens. - Locate the "Claim Deductible Billing" business rule using the Comp Claim Financial Table Name and ClaimDeductibleBilling Method.
- To view the configuration, double-click the selected row or click (Open).
The Rule Details form opens. - Verify the following:
- The Active checkbox is checked.
- The Default and Imports pipelines are set by default in the Execution Pipeline field.
- Review the UseTotalIncurred method parameter and update the value if necessary:
- If you want to create bills in PrismHR and ClientSpace using a Paid Total (the default functionality), leave UseTotalIncurred blank.
- If you want to create bills in PrismHR and ClientSpace using an Incurred Total , enter Yes in the UseTotalIncurred field.
- Note: Refer to Claim Financial Form and Calculation Rules for more information on Paid Total and Incurred Total.
- Click Save if you made changes.
Step 7 of 8: Test Your Settings
To test your settings:
-
In ClientSpace, set up a test Claim Deductible bill and place it in "Ready to Bill" status so that it will be exported to PrismHR. See Using the Claim Deductible Bill Form for more details.
-
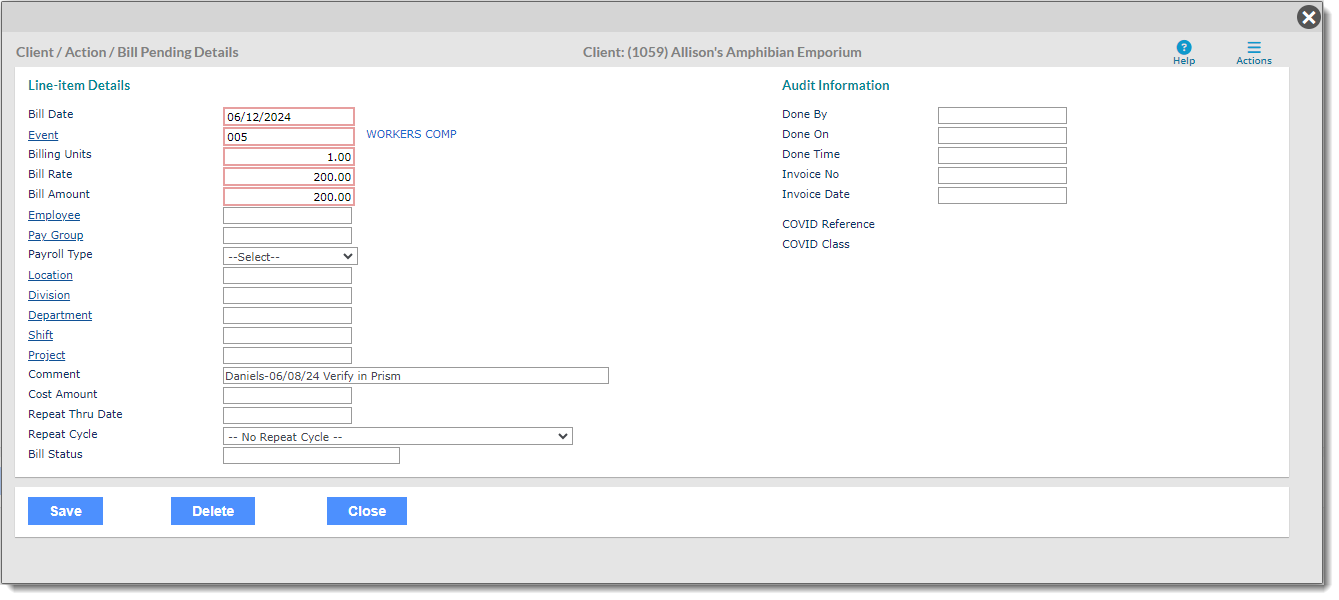
Run the scheduled process manually using a test client and verify the outcomes in both PrismHR and ClientSpace.
If the export was successful, in Prism HR, you should see a new Bill Pending record:
Step 8 of 8: Create Imports to Set Initial Amounts on the Client Master or Pricing Batch As Needed
This step should be completed only after a successful test of the scheduled process.