This topic provides ClientSpace System Administrators with step-by-step instructions for configuring a First Report of Injury (FROI) email notification to send to an insurance carrier, a client, or an internal team member notifying them of a new Worker's Compensation claim.
The FROI email template contains standard employee information necessary for FROI reporting, which makes it immediately usable as it is once you set up your email recipients on the Addresses tab of the email template configuration and publish the template (which is unpublished by default.) However, you can further customize the existing template if necessary.
Note: Once the template is published, you can send a FROI from a Comp Claim by clicking Send FROI under Workflow in the Action Center.
Configuring the First Report of Injury (FROI) Notification
The following procedure guides you through the configuration of the FROI notification using the standard FROI email template we provide. Many of the fields are pre-configured for you but you can edit fields as necessary, such as merge fields and body text.
You also have the option of creating your own template. You can use the same Comp Claim Merge Procedure (peo_merge_compclaim_emailtemplate) used in the standard template to build a fully custom FROI email template.
To configure an FROI notification in ClientSpace:
| 1. | Go to System Admin |
The Email Templates dashboard opens.
| 2. | Click Add. |
The Email Template wizard opens at Step 1 Initial.
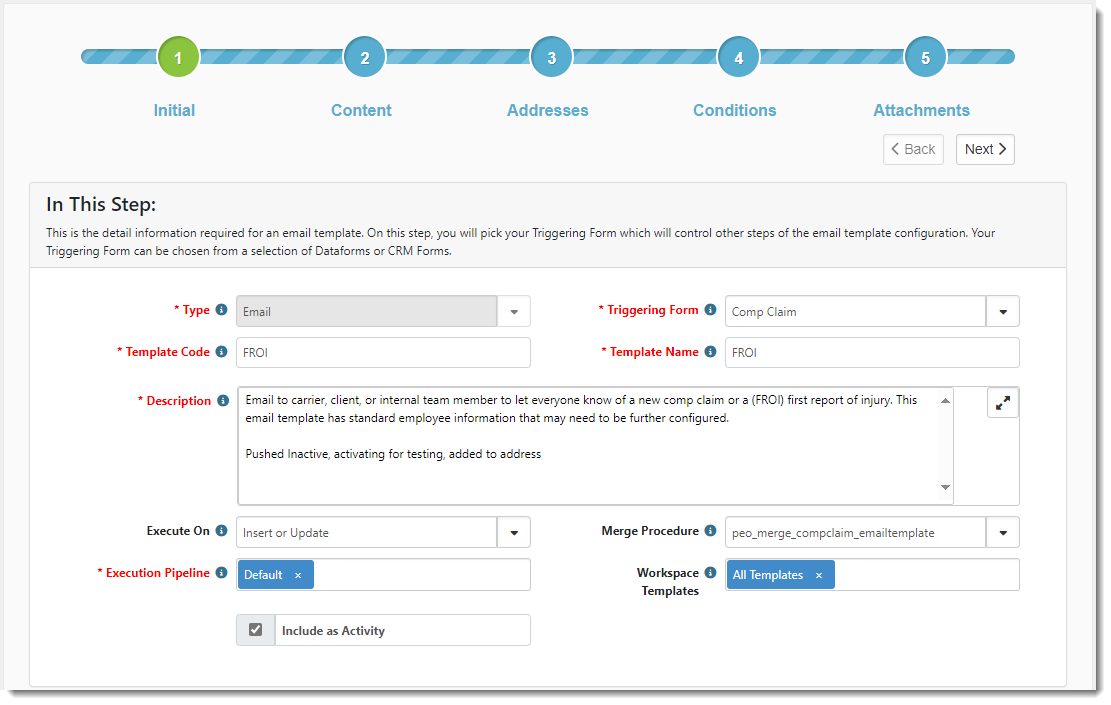
| 3. | Complete Step 1 Initial. |
|
Triggering Form |
This field is set to Comp Claim. |
| Template Code | This field is set to FROI. It is the short descriptive code used to identify the template. |
| Template Name | This field is set to FROI. It is the brief, but descriptive name that displays in any list in ClientSpace where you may be able to select an Email Template. |
| Description | This field is set to a brief description of the FROI and its purpose. |
| Execute On | This field is set to Insert or Update. |
| Merge Procedure |
This field is set to (peo_merge_compclaim_emailtemplate). This adds additional merge replacement information for this email template in Step 2 Content. |
| Execution Pipeline | Indicates how the data enters ClientSpace. This field is set to Default . |
|
Workspace Templates |
Indicates the Workspace Templates that will receive this email. This field is set to All Templates. |
When you have finished configuring the Step 1 Initial tab, your screen should appear similar to the following:
| 4. | Click Next and complete Step 2 Content. |
|
Subject |
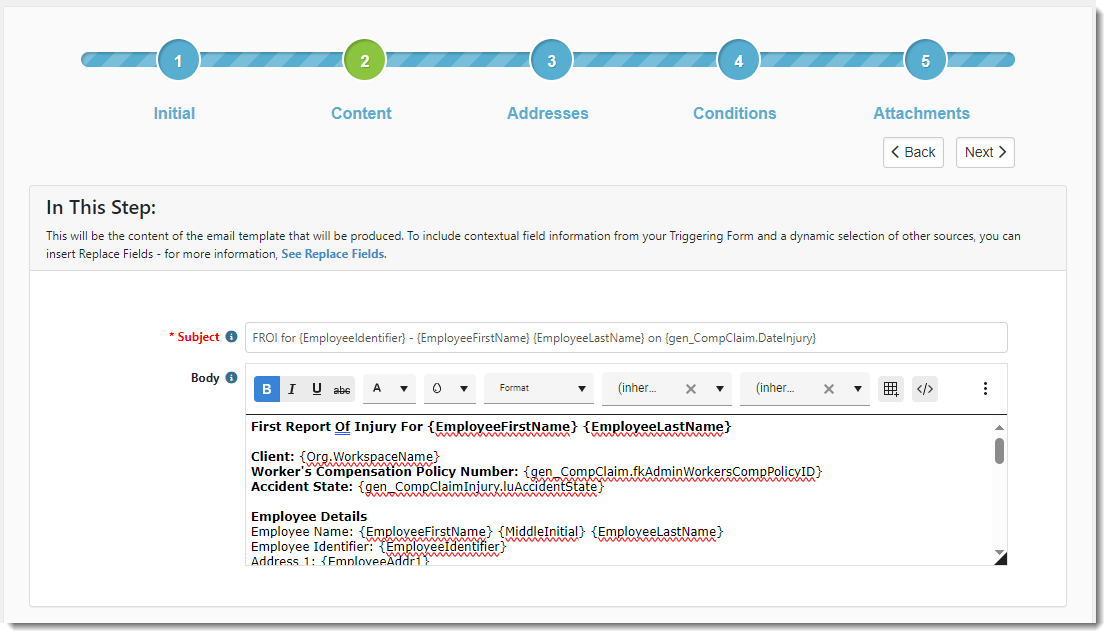
This subject line of the email that is generated. The email recipients see this subject. The subject can include replacement fields from the merge procedure you added on the Step 1 Initial tab.
To add replacement fields, click See Replace Fields. For details about using replacement fields, see Replacement Fields.
Note: If you are creating a new email template, ensure that you have selected a Merge Procedure on the Step 1 Initial tab as outlined in the preceding step so that you can access the replacement fields.
The default subject line for the standard FROI uses merge fields for the employee ID, employee first and last name and the Date of Injury from the Comp Claim: FROI for {EmployeeIdentifier} - {EmployeeFirstName} {EmployeeLastName} on {gen_CompClaim.DateInjury} |
|
Body |
This is body of the email that is generated. This is seen by the email recipients. This field supports rich text. Therefore, you can customize fonts, add a logo, add a signature block, include links, and more. You can use replacement fields to customize the message.
If you are using our standard FROI email template, default content, including replacement fields, has been provided for you but can be edited as necessary.
To add replacement fields, click See Replace Fields. For details about using replacement fields, see Replacement Fields.
Note: If you are creating a new email template, ensure that you have selected a Merge Procedure on the Step 1 Initial tab as outlined in the preceding step so that you can access the replacement fields |
When you have finished configuring the Step 2 Content tab, your screen should appear similar to the following:
| 5. | Click Next and complete Step 3 Addresses. |
| Address Stored Procedure |
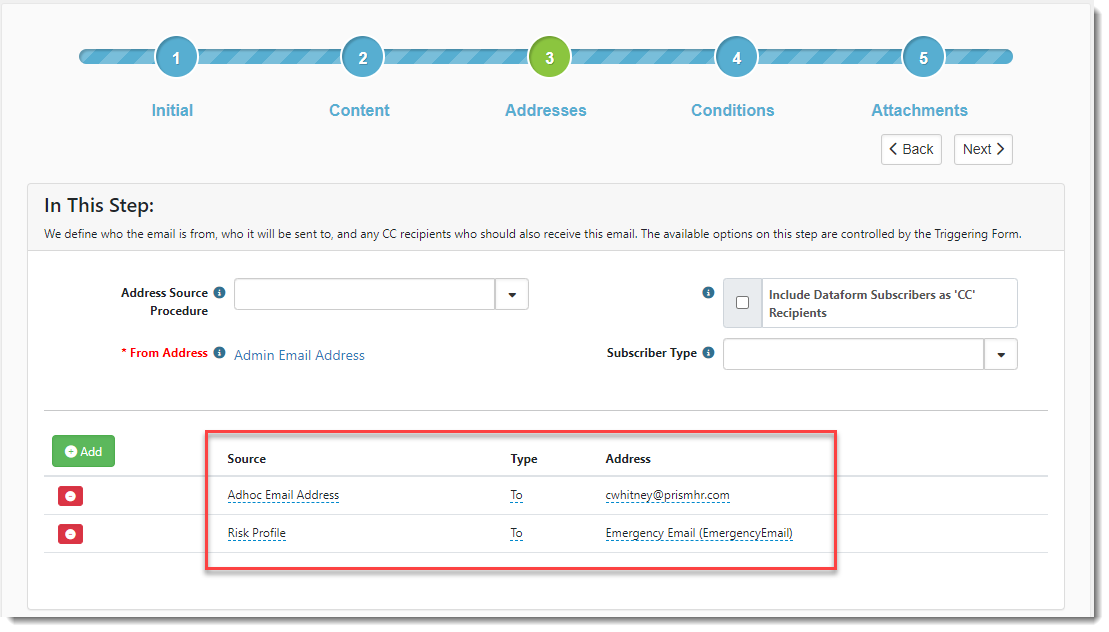
This field is for specifying an optional stored procedure that provides a list of email addresses in addition to the email addresses already associated with the Triggering Form. For the standard FROI, this field is blank. |
|||||||||
|
Include Dataform Subscribers as 'CC' Recipients/Subscriber Type |
Include Dataform Subscribers as 'CC' Recipients adds anyone who has subscribed to the dataform as CC recipients when this notification is sent in addition to any other recipients you configure here. Select from the Subscriber Type drop down list to notify internal, external, or both recipient types:
|
|||||||||
| From Address |
This field defaults to Admin Email Address (the application administrator's email address). This is the default admin email set in System Admin > Advanced > App Settings. To change this setting:
|
| 6. | To recipients, click Add. |
A row opens. This is where you specify the Employee's work or personal email addresses.
| Source |
Select the email source from the drop down list. EX: Select Adhoc Email Address as Source (making sure to type the recipient's email address in the Address field of the row or select another form as the Source (making sure to select an email address field in the Address field of the row). |
| Type | Type can be To or CC. |
| Address |
If Adhoc Email Address is selected as the Source, type the email address here. If a form is selected as the Source, select an email address field from the form to use. |
When you have finished configuring the Step 3 Addresses tab, your screen should appear similar to the following (although your selections will vary from the examples shown here):
| 7. | Click Next and complete Step 4 Conditions. |
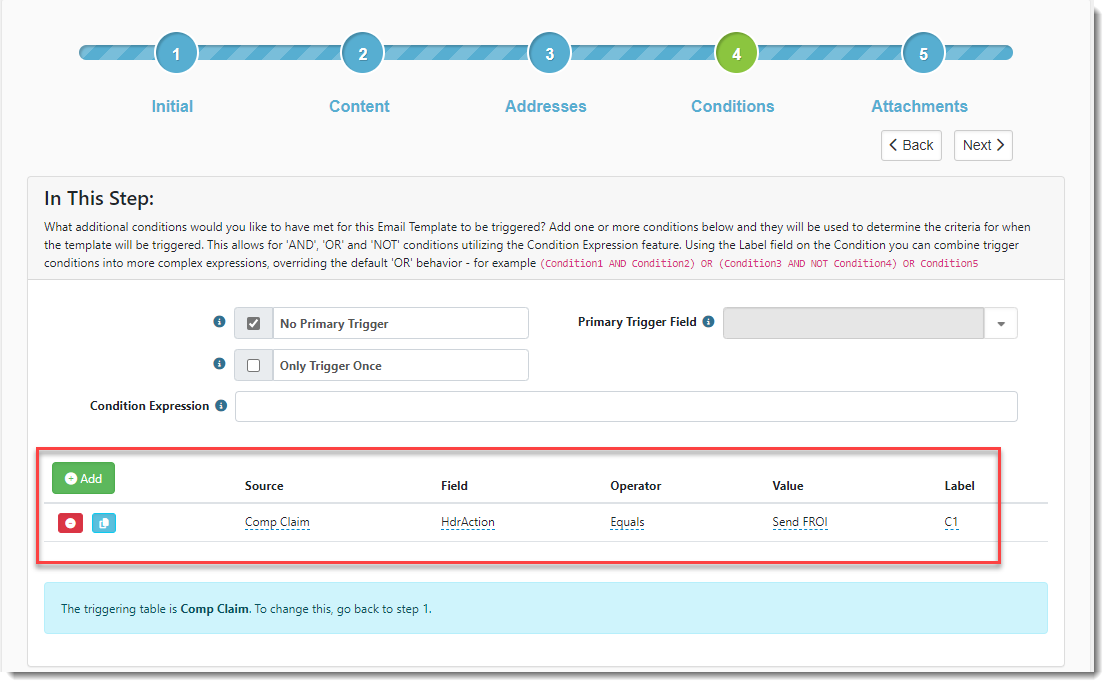
| No Primary Trigger | Enable this option. (Select the option.) |
| Primary Trigger Field | Not used for FROI. |
|
Only Trigger Once |
Not used for FROI. This setting triggers the email template the first time the conditions are met. |
|
Condition Expression |
This field is blank for the standard FROI.
Allows for AND, OR, and NOT conditions using the display conditions (Label) from the Add section. Using the Label field that corresponds to the entries in the Add section, you can combine the conditions into more complex expressions. The Condition Expression field could state, for example (Condition1 AND Condition2) OR (Condition3 AND Condition4) OR Condition5. In the example, the Condition Expression uses the display condition labels 1, 2, 3 and 4. Condition Expressions use AND/OR/NOT across tabbed dataform conditions. For a detailed explanation about conditions, see Condition expressions. |
| 8. | To configure conditions, click Add. |
A row opens for adding conditions to include Source, Field, Operator, Value, and Label. You can add multiple conditions.
| Source | This field is set to Comp Claim. Indicates the dataform or stored procedure that provides the triggering condition. |
|
Field |
This field is set to HdrAction. This is the field or action that is evaluated for the triggering condition. In the case of the FROI, a link has been configured to initiate the email when clicked. The action of clicking the link generates a HdrAction which triggers the email. |
|
Operator |
This field is set to Equals. It is the type of comparison between Field and Value. |
|
Value |
The criteria against which Field is compared. In this case, clicking the link generates the HdrAction in Field which triggers the Send FROI action in Value to send the email. |
|
Label |
The Label for the pre-configured condition is already defined as C1. Should you add other conditions, you can define other labels. The Label is used when constructing Condition Expressions for triggering. Make this label short and representative of the selection in Field. Labels are used in the Condition Expression field. You can also choose to follow our naming convention of C1, C2, C3, etc or use another convent such as 1, 2, 3, etc. |
When you have finished configuring the Step 4 Conditions tab, your screen should appear similar to the following (although some of your selections may vary from the examples shown here):
| 9. | Click Next. |
| 10. | Skip Step 5 Attachments. |
| 11. | Click Finish to save your work. |
After you click Finish, you are returned to the Email Template list. This email template does not work just yet because it is unpublished (inactive). You must publish the new email template to make it active.
If you are ready to publish immediately:
- Select the row for FROI (or the Template Name on the Step 1 Notice tab.)
- Click Publish.
The entry is now published.
If you would like to publish later:
- Navigate to the Email Template list.
- Clear the Published option.
The entry is now unpublished.


