Benefit Plan API Export Prerequisites
The Benefits API export is run from a client workspace. Before that can occur, you must have set up your master plans and set up offered benefits for your clients.
Master Plan Setup
-
Set up or verify the master plans in the Admin Workspace.
Note: The Admin workspace can be accessed by searching for "Admin" in the Workspace Search dashboard. Once you are in the Admin Workspace, enter "Benefits Plan" in the search for dataform field and then click the Benefits Plan tile to view existing master plans or add a new plan. To view an existing plan, double-click the row or click
 (Open) next to the plan.
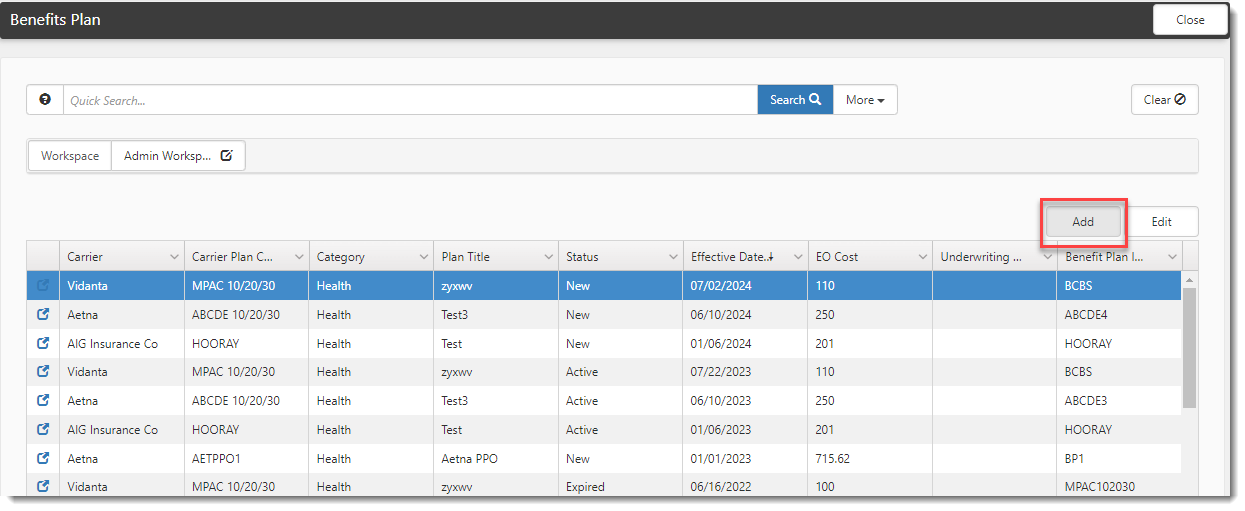
-
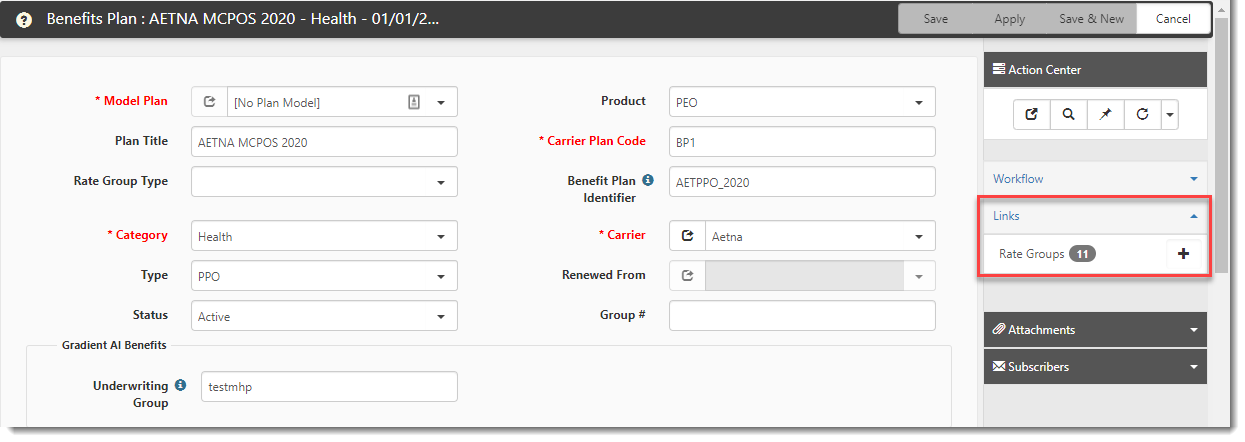
Set or verify the available Rate Groups for each master plan.
-
Set or verify Benefits Tiers.
Note: To access the Benefits Tier Definition window, on the Admin Workspace, enter "Benefits Tier" in the search for dataform field and then click the Benefits Tier Definition tile.
-
Admin level plans must also be created along with their associated premium and billing rates. These items must align so that they can be identified when exported into PrismHR from Clientspace (i.e., Benefit Plan Identifier(UniquePlanCode) = Benefit Plan ID and Rate Group title = Rate Group).
Adding or Updating Offered Benefits
Once master benefit plans are set up and the underwriting and pricing are added, add the plans you will be offering to your clients for the current enrollment period to the Benefits Batch. The Benefits Batch is used to track all the plans you make available to a client in an enrollment year. This is set up at the client (i.e., workspace) level.
To add or update offered benefits on a client's workspace:
- From the modules bar, click
 Workspaces.
The Workspace Search dashboard opens. - Select a workspace and click (Open).
The Workspace page opens. -
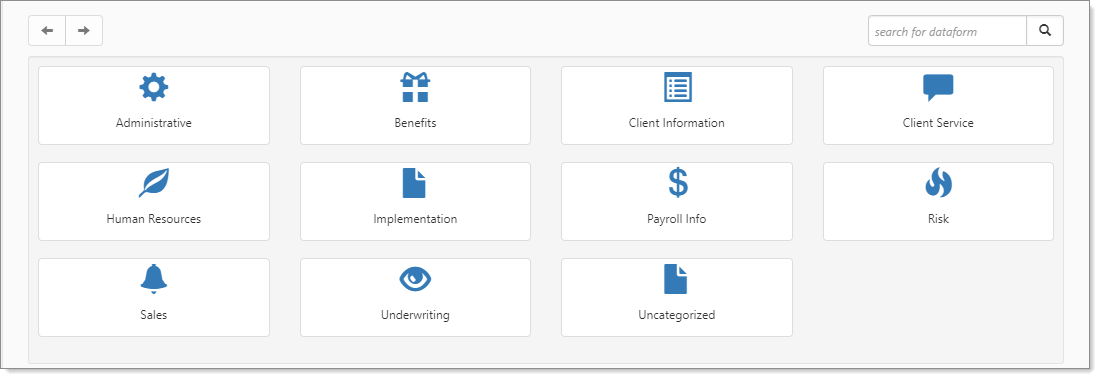
Move down the page to the administrative tiles where you see the dataform categories.
-
Enter "Benefits Batch" in the search for dataform field and then click the Benefits Batch tile.
The Benefits Batch window displays.
-
Click
(Open) next to an existing Benefits Batch OR click Add to add a new Benefits Batch.The Enrollment window displays.
-
In the Action Center, under Links, click the
 next to the Offered Benefit Plans link to add an offered benefit OR click on the link text to select an existing offered benefit plan to edit.
The Offered Benefits Plan window displays.
-
Complete the form as applicable. Minimally, the following fields should be filled in for a successful export:
Benefit Plan, Rate Group, Effective Date, and Benefit Group.
The combination of the Benefit Plan, Rate Group and Benefit Group comprise a unique benefit plan. These fields must match corresponding fields in PrismHR for a Benefit Plan export to occur. For a complete list of all of the Benefit Plan fields and Benefit Plan Rules that export to PrismHR, click the "ClientSpace to Prism Benefit Plan Export Field Mapping and Benefit Rules (Excel file)" link located on the Attachments and Templates article.
Category This is not a data entry field. This is a filter setting used to filter the Benefit Plan lookup to only display a list of benefit plans that match your selection. Benefit Plan This is the master plan that the offered benefit is based on. Rate Group Select the appropriate Rate Group from the associated master plan. Effective Date
Benefit plan data will not export to PrismHR if a plan Effective Date is not entered.
Benefit Group A Benefit Group allows you to add an additional layer of specialization to a plan. Example: You could create a Benefit Group record named "25PLUS" to classify employees who have been with your client's organization for more than 25 years and modify the employer contributions in PrismHR to provide a seniority-based discount to employees in this group.
You also define the enrollment waiting period on the Benefit Group record.

Employer Contributions
Edit the Employer Contributions to indicate how much to contribute to the employee. Modify the monthly premium from the master plan Rate Group for each coverage type only if necessary as this information is cloned from the master plan and should rarely require overriding.
Note: As you make changes to this section, the Employer Contributions section is updated to reflect employer costs while the grid located at the top if the Offered Benefits Plan window is updated to reflect both the Employer and Employee contribution for each coverage type.
To edit Employer Contributions, select an option from the Contribution Method field:
• Contribute EO Premium - This is the default selection. 100% of the employee premium is paid by the Employer up to the Max Dollar Amount. The Max Dollar Amount is set by default as the EO monthly premium for the associated Rate Group. • Manually Set Percentages - Manually adjust the default percentages of employer contribution and/or adjust the specified Max Dollar Amount for all coverage types. • Match EO Contribution - Manually adjust the default percentages of employer contribution and/or adjust the specified Max Dollar Amount for the EO coverage type only. The other coverage types will be recalculated based on these values • Match EO Contribution - Add an employer contribution for an eligible dependent in the Dependent Contrib% field. The system recalculates all of the other coverage types where dependents are being covered. For instance, if you leave the EO% set to 100% and enter 50% in the Dependent Contrib% field, this indicates that in addition to paying 100% of the employee premium, the company will cover 50% of dependent premiums. The employer contribution percentages and the Max Dollar Amount fields of the other coverage types is recalculated to include the total employer contribution with the dependent contribution factored in. Setup Details
Setup Details export to PrismHR. They provide billing and payroll deduction information about the benefit plan to PrismHR.
• One Month Prepay -Determines whether to bill the client and deduct the amounts from the employees for the next month in the current month. For example, bill and deduct in July for August. This is not applicable for weekly plans. • Add One Month for Prepay -Whether the system should check for and use any new rates and rules in the upcoming month. For example, during a July payroll, PrismHR checks if there are rules and rates that go into effect in August. This is not applicable for weekly plans. • Annual Periods -Calculates the employee deduction amount into either 48 or 52 deduction periods. • Coverage Ends On - Indicates the date coverage ends when an employee is terminated. For example, select "Ends at End of Month" to have the coverage end on the final day of the month when an employee was terminated. • Benefits Billing Frequency - Determines when plan billing occurs. If you select one of the monthly options, PrismHR bills the client the whole portion at the beginning of the month, and then gives credits for the other pay periods in that month. If you do not make a selection, the system uses the pay period. Weekly plans always use "Pay Period". • Payroll Deduction Frequency - Determines whether to override the employee's normal payroll deduction frequency. The standard is to deduct each pay period. However, you can change this to "Monthly" for instance. -
Click Apply or Save.
-
Repeat the steps in this topic until all of the offered benefits for this client are set up. Once you have finished setting up offered benefits and the client has reviewed them and picked the ones they want to offer to their employees, you can select and reject offered benefits in ClientSpace. This step is required before you can export benefit plans to PrismHR as only "Selected" plans can be exported. See Selecting, Rejecting or Suppressing Benefit Plans to Export.