Step 2: Content
In this step this is where the rubber meets the road. Information entered into the fields below will be copied to each cloned object created by this item.
Field Replacement
To use Get Replace Fields:
Triggered Form: Task
In Step 1 Triggering, in Triggered Form, when you select Task, the fields in Step 2 are as follows.
![]()
To configure the content:
-
Complete the fields:
|
Item Name |
Provide a short descriptive name for what this workflow object is. |
|
IsMarkedForDeletion |
When this option is selected, the Workflow clones the task with this field selected. Then, when the scheduled process, Delete Marked Tasks, runs, it finds all the tasks with this field select, and deletes the task. |
| Attach To |
This field is available only when a user selects Task in the Triggered Form field. This field indicates the form that the task will be assigned to. Select This Form to indicate that the form that triggered the workflow will be the form to which the task is attached. Note: If a form selected in the Attached To field is inactivated or removed from the workspace at some point in time and the workflow item is not edited to select a different form, then the task will attach to the triggering form. |
|
Subject |
Subject Line that displays on the task. This field supports field replacement. See Step 2: Content. |
|
Body |
Include any instructions that you feel could be helpful. This field should contain information to provide steps to complete the task. This field supports field replacement. See Step 2: Content. |
|
Category |
Choose the appropriate Task Category. |
|
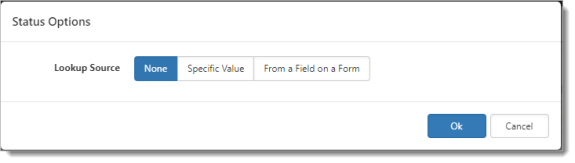
Status |
Select the appropriate Task Status. |
|
Priority |
What is the criticality of this task? |
|
Type |
Within the category, what is the task type? |
|
Stage |
Also called workflow. Where in the process does this task fall? |
|
Assigned To, Owner |
For Assigned To, select the person responsible for accomplishing this task from the following options. For Owner, select an owner. To change Assigned To and Owner:
For details about referencing users from tabbed dataforms (parent and child dataforms), see Workflows and Tabbed Dataforms. |
|
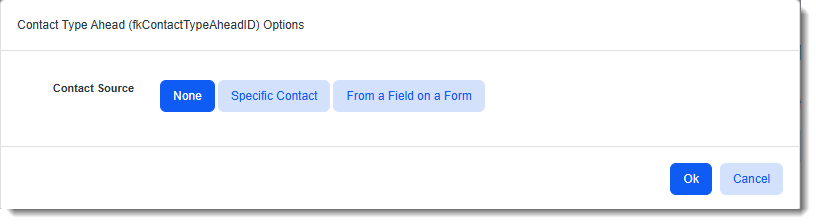
Contact |
You can dynamically clone a contact field value to a Contact field on a Triggered Form or set the field as blank.
Note: Contact datatypes, (i.e., any field with a datatype / dataform field Element Type of Org Contact, Contact, or Contact Typeahead) must be configured in the Dataform Admin field properties as Cloneable and the Triggered Form dataform properties must have the Enable WFC Cloning field enabled (i.e., the dataform must be configured as a clone-configurable dataform.) . To set a contact value:
|
|
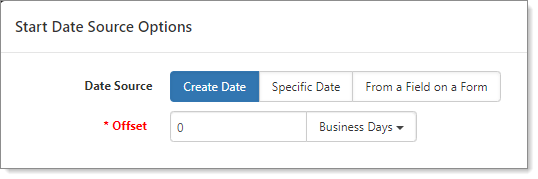
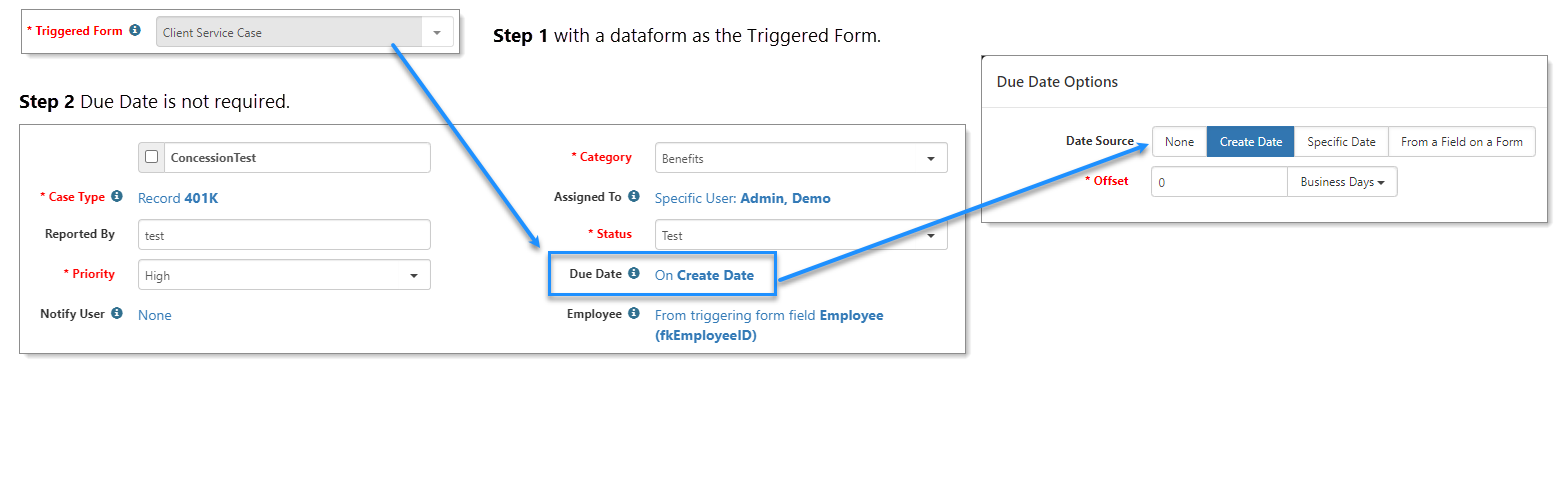
Start Date Source, Due Date Source |
Date Source options are Create Date, Specific Date, and From a Field on a Form. Additionally, you can select the Offset as Days, Weeks, Months, Years, Business Hours, Business Days, Beginning of Month, End of Month, Beginning of Year, or End of Year. For Date/Time fields you have an additional option to set Minutes.
Due Date Source: Tasks created by this workflow can have their due date set by the task create date, or to a specific date from a dataform field. Choose from the create date of the task or a Date type field on the triggering dataform. To configure dates:
For date or date/time fields that are not required, the None option becomes available. For required (red ink) date fields, None is not an option.
You are returned to the Add Workflow form, where the Start and/or Due Date Source fields show (as applicable): nn Business Days after Create Date, nn Business Days after Specific Date, nn Business Days after Field Label (Contract Effective Date). |
|
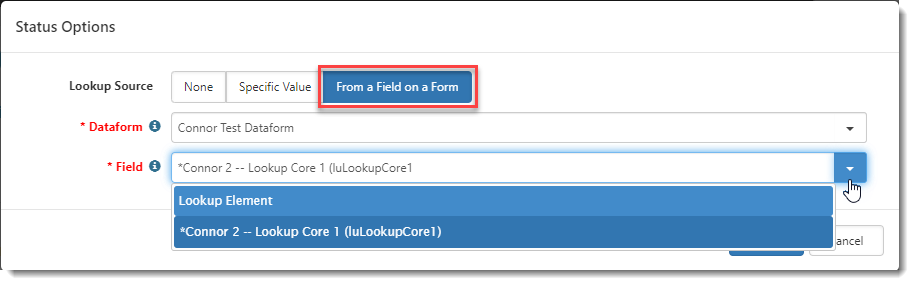
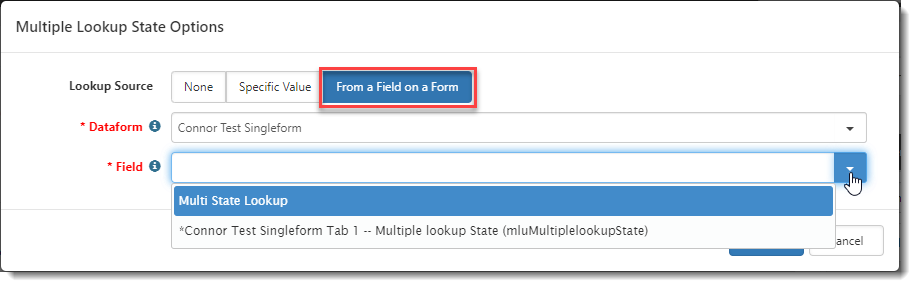
Lookup and Multi-Lookup fields |
Lookup and Multi-Lookup field names vary by dataform. To display as an available field on a workflow item, a Lookup or Multi-Lookup field must be set as a workflow cloneable field. Note: Multi-Lookup fields work the same as a regular Lookups except that users can pick more than one selection from the list of available options. To configure a lookup field:
|
Triggered Form: Dataform
In Step 1 Triggering, in Triggered Form, when you select a dataform, the available fields in Step 2 are variable and dependent on the specific form fields. You will only see fields for the form you are cloning, and the fields have to be marked as cloneable for that form.
Additionally, date fields can vary. Some dataforms may have Date One and Date Two, and others may have Due Date. On Step 1, when the Triggered Form is a dataform, and the date field is not required, you have the option to set the On Create Date to None.
Also, WFC configuration cannot respect field display rule configuration. As a result, there is no validation on required fields. The fields still show the visual indicators of a required field (i.e., red, bold text and an asterisk).
How no validation on required fields during WFC configuration can help:
Let's say you were creating a WFC where you are cloning a dataform that contains a field named Category. A field behavior and a display rule have been set to display a Sub-Type field and make it a required field when Category equals "Benefits-Flex". However, since the field display rules cannot be considered in WFC configuration, you would have to populate the required Sub-Type field — a field which normally would be hidden by a field display rule — to complete configuration. If you had multiple fields like this, it could reduce your efficiency when setting up your WFC.
- In Step 1 Triggering, in Triggered Form, if you selected a dataform, the displayed fields vary, depending on your selections in Step 1. The following table illustrates some of the fields that you might see when using a dataform.
|
Item Name |
Provide a short descriptive name for what this workflow object is. |
|
IsMarkedForDeletion |
When this option is selected, the Workflow clones the task with this field selected. Then, when the scheduled process, Delete Marked Tasks, runs, it finds all the tasks with this field select, and deletes the task. |
| Attach To |
This field is available only when a user selects Task in the Triggered Form field. This field indicates the form that the task will be assigned to. Select This Form to indicate that the form that triggered the workflow will be the form to which the task is attached. Note: If a form selected in the Attached To field is inactivated or removed from the workspace at some point in time and the workflow item is not edited to select a different form, then the task will attach to the triggering form. |
|
Subject |
Subject Line that displays on the task. This field supports field replacement. See Step 2: Content. |
|
Body |
Include any instructions that you feel could be helpful. This field should contain information to provide steps to complete the task. This field supports field replacement. See Step 2: Content. |
|
Category |
Choose the appropriate Task Category. |
|
Status |
Select the appropriate Task Status. |
|
Priority |
What is the criticality of this task? |
|
Type |
Within the category, what is the task type? |
|
Stage |
Also called workflow. Where in the process does this task fall? |
|
Assigned To, Owner |
For Assigned To, select the person responsible for accomplishing this task from the following options. For Owner, select an owner. To change Assigned To and Owner:
For details about referencing users from tabbed dataforms (parent and child dataforms), see Workflows and Tabbed Dataforms. |
|
Contact |
You can dynamically clone a contact field value to a Contact field on a Triggered Form or set the field as blank.
Note: Contact datatypes, (i.e., any field with a datatype / dataform field Element Type of Org Contact, Contact, or Contact Typeahead) must be configured in the Dataform Admin field properties as Cloneable and the Triggered Form dataform properties must have the Enable WFC Cloning field enabled (i.e., the dataform must be configured as a clone-configurable dataform.) . To set a contact value:
|
|
Start Date Source, Due Date Source |
Date Source options are Create Date, Specific Date, and From a Field on a Form. Additionally, you can select the Offset as Days, Weeks, Months, Years, Business Hours, Business Days, Beginning of Month, End of Month, Beginning of Year, or End of Year. For Date/Time fields you have an additional option to set Minutes.
Due Date Source: Tasks created by this workflow can have their due date set by the task create date, or to a specific date from a dataform field. Choose from the create date of the task or a Date type field on the triggering dataform. To configure dates:
For date or date/time fields that are not required, the None option becomes available. For required (red ink) date fields, None is not an option.
You are returned to the Add Workflow form, where the Start and/or Due Date Source fields show (as applicable): nn Business Days after Create Date, nn Business Days after Specific Date, nn Business Days after Field Label (Contract Effective Date). |
|
Lookup and Multi-Lookup fields |
Lookup and Multi-Lookup field names vary by dataform. To display as an available field on a workflow item, a Lookup or Multi-Lookup field must be set as a workflow cloneable field. Note: Multi-Lookup fields work the same as a regular Lookups except that users can pick more than one selection from the list of available options. To configure a lookup field:
|
- When done, click Next. Step 3: Notifications opens.