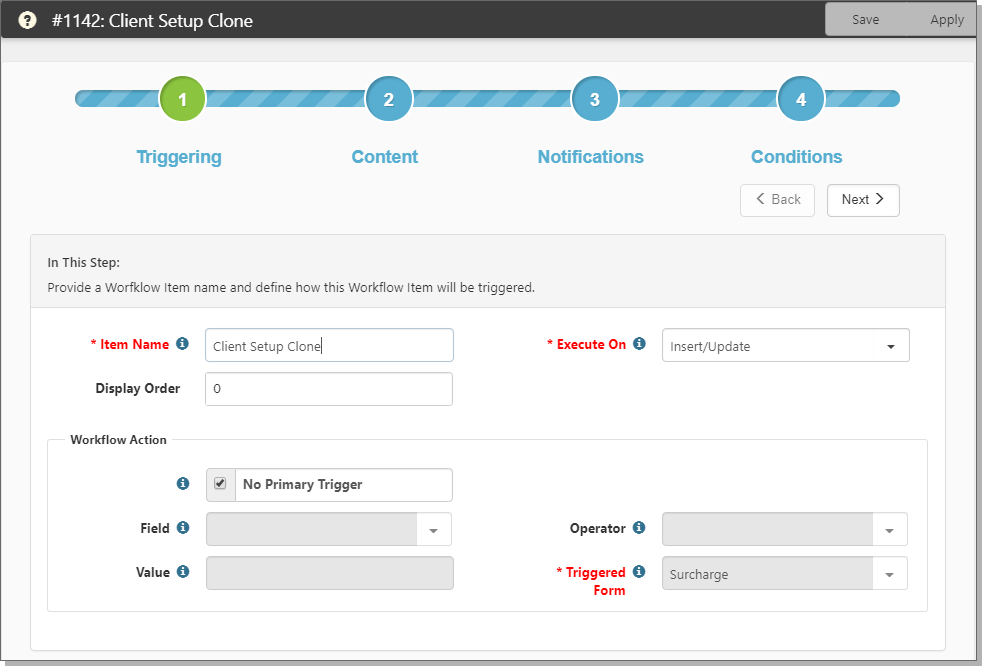
You can clone Surcharges with Workflow Channels with some simple setup configurations. First, you must update the business rules on Surcharges. Next, you must configure a Workflow Channel to clone the Surcharge. This topic guides you through the configuration.
The surcharges clone when you click Generate Quote on the Pricing Console. If there is more than one Surcharge to clone, just add it as another item on the same Workflow Channel. Also, you may want to restrict Surcharges to clone for only certain Contract Types. If so, just configure additional conditions.
Note: Instead of using workflow channels to clone surcharges, the R100 release introduced the option of setting a surcharge type to clone surcharges during the Quick Create of the Pricing Batch. See Surcharge Types and Creating Pricing for more information about using that method to clone surcharges.
Configure the Business Rules
In this step, you want to update Business Rules on Surcharges to run on the Quick Create and Default pipelines. You must configure the following rules: SetSurchargePricingBatchID, SetBillRate, UpdateProfitability, AddSurcharge, RecalPayPeriodSurcharge.
To configure the business rules:
- Go to System Admin
 > Advanced > Manage Business Rules.
The Custom Logic Rules display. - In More, search for Rule Type > Biz Logic, Dataform > Surcharge, to locate the methods (see screenshot).
- Open (
 Jump) a Method Name, such as SetSurchargePricingBatchID.
The Rule Details form opens. - In Execution Pipeline, add Default and QuickCreate (if not present).
- Click Save.
- Repeat this procedure for all 5 rules.
Configure a Workflow Channel to clone the Surcharge
In this section, you will configure a Workflow Channel with Triggering Form = Pricing Batch and Execution Pipeline = QuickCreate. If there is more than one Surcharge to clone, add it as another item on the same Workflow Channel.
Step 1: Initial
In this step, we create the Channel descriptor. In the top section, we define the Channel name and the Dataform from which the Workflow will be triggered, as well as who owns the Channel. The Workflow Action configures the triggering action for the first workflow as well as what form or task will be generated.
To configure a Workflow Channel:
- Go to System Admin
 > Workflow Channels.
The Workflow Channels dashboard opens. - Click Add to begin creating your new workflow.
The Choose Workflow Triggering Type dialog opens with "What type of triggering will the new Workflow use?". - Select Real Time.
- Complete the form fields.
|
Channel Name |
Provide a unique Channel Name. For example, Surcharge Clone from Pricing Batch during Quick Create. |
|
Triggering Form |
Select Pricing Batch. |
|
Execute On |
Select Update. |
|
Execution Pipeline |
Select QuickCreate. |
|
Workspace Template |
Keep the default: All Templates. |
|
Channel Description |
Provide a brief description of this channel. |
|
Channel Owner |
Defaults to the current user. Set it to the owner of this process. |
| Workflow Action | This section is dedicated to the primary triggering condition for the channel. |
| No Primary Trigger | Select this option. |
|
Triggered Form |
Select Surcharge. |
The wizard progresses to Step 2 Content.
Step 2: Content
Information entered into the fields is copied to each cloned object created by this channel.
Let the Business Rules manage the default values on the Surcharge. Ensure that only the Surcharge Type fields are visible on this step. If other fields are exposed, they will be cloned as shown and override the default values usually handled by the Business Rules. To remove the visibility of these extra fields, on Field Properties, set the fields as not triggerable.
- In Item Name, enter a brief description of what this workflow does.
- In Surcharge Type, click the link None.
The Surcharge Type Options dialog box opens. - Select Admin Workspace.
- In Record, select an appropriate Surcharge, such as Client Setup.
- Click Ok.
You are returned to the wizard. - Click Next.
Step 3: Notifications
- Click Next. You can skip this step.
Step 4 Conditions
This is where you add conditions. A Workflow Channel requires at least one condition. A Pricing Batch is always added with the Status set to New, so this is a safe assumption. This is where you configure Pricing Batch = New and any other additional conditions that may be applicable such as Contract Type = X.
- Select Only trigger this workflow once.
- Select Publish.
- Click Add.
A row opens to add a condition.
|
Source |
Select Pricing Batch. |
|
Field |
Select Status (luBatchStatus). |
|
Operator |
Select Equals. |
|
Value |
Select New. |
|
Label |
Leave empty or provide a Label if you need to use Condition Expression. |
- Click Finish.
Note: In Step 1, we do not use a Primary Trigger Condition because a field must be dirty. A Stored Procedure creates the Pricing Batch outside of Biz Logic; therefore, it is not dirty. After created, the Pricing Batch is then saved back through the Dataform Pipeline as an Update and run through Biz Logic. When this happens, the Batch Status is not evaluated as dirty.
- Publish and test your workflow.

