Importing Policy Work Comp Code Rates
When you need to mass update several rates, use the following procedure to import the update rate file. To update a few rates, see Adding and Maintaining Policy Comp Codes. Before you can import mass updates, you must first configure the Import Map Header, review the business rules, create the Import file, edit the file, and upload.
Objective
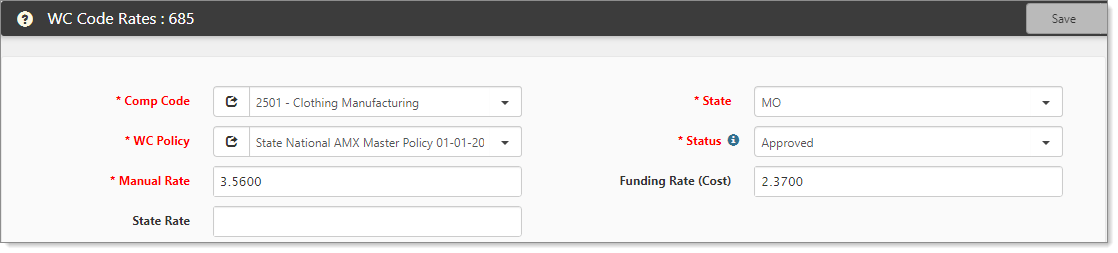
Your primary objective is to create an import file that updates the WC Code Rates dataform. The source file (imported data) must map to the dataform fields as depicted in the following image: Comp Code, State, WC Policy, Status, Manual Rate, Funding Rate (Cost), and State Rate.
Step 1: Configure the Import Map Header and Fields
In this step, configure the Import Map Header and Details (the fields) for the source file admin_wc_rates*.csv. First, determine if you already have the import mapping for the source file.
To locate the import mapping source file:
- Go to System Admin
 > Advanced > Configure Import.
The Import Map Header Search dashboard opens. - Search for the Source File admin_wc_rates*.csv.
- If not found, go to If the Import Map Header does not exist.
If the Import Map Header exists
If the import mapping exists, then you only need to activate it.
To activate the Import Map Header:
- Go to System Admin > Advanced > Configure Import.
The Import Map Header Search dashboard opens. - Locate the Source File admin_wc_rates*.csv.
- Click
 (Open).
The Import Map Header Detail form opens. - Select the option Active, to enable the import map header.
- Go to Step 2: Review Business Rules.
If the Import Map Header does not exist
If the Import Map Header does not exist, use the following procedures to add the mapping.
This procedure does not include all form fields – only the ones applicable to the source file. For complete details on creating the import map header, see Configuring the Import Map Header.
To add the Import Map Header:
- From the Import Map Header Search dashboard, click Add.
The Import Map Header Detail form opens.
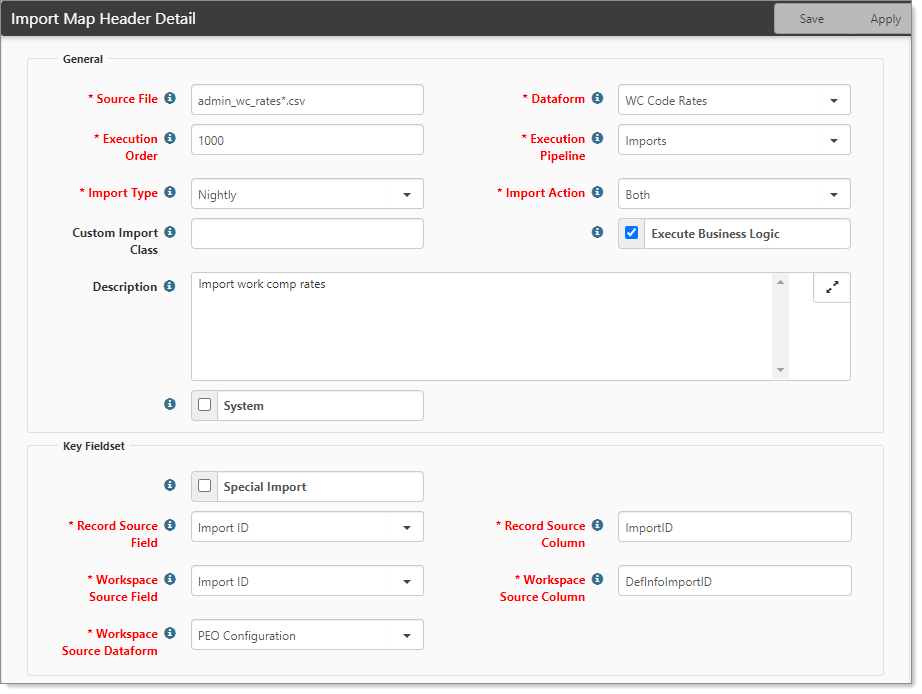
- Complete the fields. This procedure does not include all form fields. For complete details on creating the import map header, see Configuring the Import Map Header.
|
Source File |
Type admin_wc_rates*.csv. |
|
Dataform |
Select WC Code Rates. |
|
Execution Pipeline |
Select Imports. |
|
Import Action |
Select Both. |
|
Execute Business Logic |
Select this option. Enabling Execute Business Logic executes business rules when the imported dataform is saved. |
|
Record Source Column |
Set the value to ImportID. The value in this field must match the column name in the import file, which means that the file you create must have a column named ImportID. During the import process This column determines if an existing WC Rate record exists. If so, that record gets updated with this row's information. If not, a new record is added only if the Import Map Header Detail import action is set to Insert or Both. |
|
Workspace Source Column |
Set the value to DefInfoImportID. The value in this field must match the column name in the import file. The file you create must have a column named DefInfoImportID - AND - the value in the Import File must be set to 1046. |
-
Click Apply.
-
In the right pane, click Fields.
The Import Map Search dashboard opens. Now you are ready to add the mappings that correspond to the dataform WC Code Rates. You must add the following mappings: CompCode, FundingRate, Manual Rate, PolicyNumber, State, StateRate, and Status. -
Click Add.
The Import Map Detail form opens.
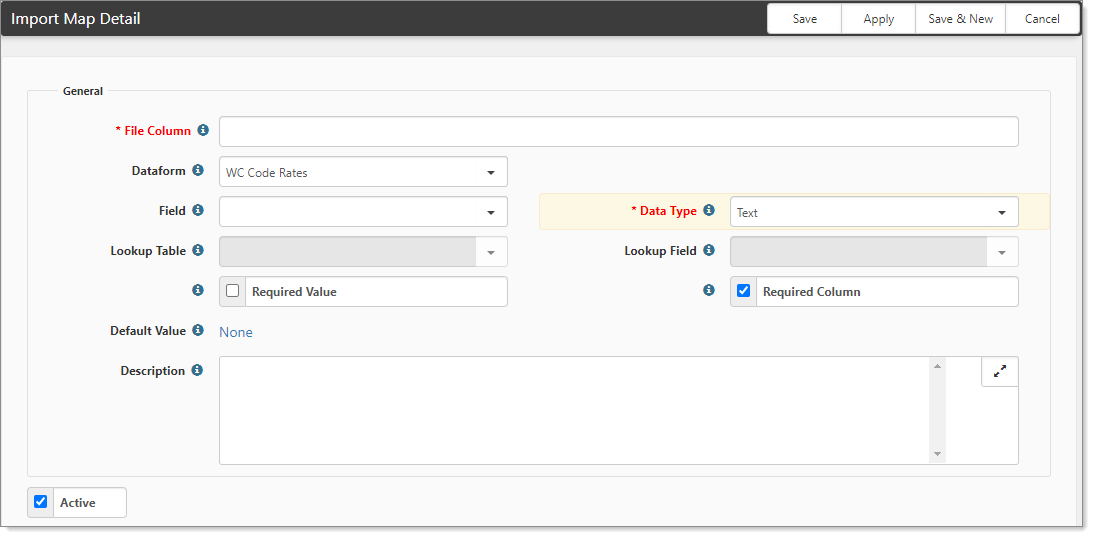
- Complete the mapping for the dataform fields.
The mapping represents the columns in the import file, the column values, and the dataform fields to receive the data.- Across the top of the following table, note the mapping columns that you must add: Comp Code, Funding Rate, WC Policy, State, State Rate, and Status.
- Down the left side are the Import Map Detail form fields.
- The mapping values are specified in their respective columns. The column names and values also reflect the data in the import file.
|
|
Mapping and values to add |
||||||
|
Fields in each record |
CompCode |
FundingRate |
Manual Rate |
PolicyNumber |
State |
StateRate |
Status |
|
File Column |
Type CompCode. |
Type FundingRate. |
Type ManualRate. |
Type PolicyNumber. |
Type State. |
Type StateRate. |
Type Status. |
|
Dataform |
Select WC Code Rates. |
Select WC Code Rates. |
Select WC Code Rates. |
Select WC Code Rates. |
Select WC Code Rates. |
Select WC Code Rates. |
Select WC Code Rates. |
|
Field |
Select Comp Code (fkCompCodeID). |
Select Funding Rate (Cost) (FundingRate). |
Select Manual Rate (RateManual). |
Select WC Policy (fkPolicyID). |
Select State (crState). |
Select State Rate (StateRate). |
Select Status (crPolicyCodeStatus). |
|
Data Type |
Select Foreign Key. |
Select Number. |
Select Number. |
Select Foreign Key. |
Select Text. |
Select Number. |
Select Text. |
|
Lookup Table |
Select WC Code Master. |
|
|
Select WC Policy. |
|
|
|
|
Lookup Field |
Select Comp Code (CompCode). |
|
|
Select Import ID. |
|
|
|
|
Required Value |
Select to enable. |
Select to enable. | Select to enable. | Select to enable. | Select to enable. | Select to enable. | Select to enable. |
|
Required Column |
Select to enable. |
Select to enable. | Select to enable. | Select to enable. | Select to enable. | Select to enable. | Select to enable. |
-
Click Save & New.
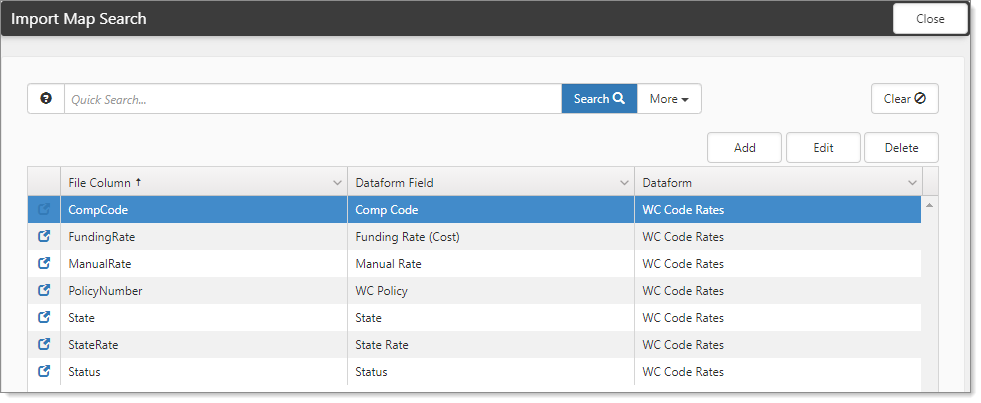
This action saves the mapping and opens the form to add the next one. -
Repeat this action for all mappings: CompCode, FundingRate, Manual Rate, PolicyNumber, State, StateRate, and Status. When complete, you should see the following list on the Import Map dashboard.
Step 2: Review Business Rules
Ensure that the business rules run on the Imports pipeline. You can add it to the list if it is not already there. Do this for Biz Logic and Hard Errors. Soft Errors never execute on imports, even if configured to do so. Additionally, activate the rules if they are inactive.
To review business rules:
-
Go to System Admin
> Advanced > Manage Business Rules.
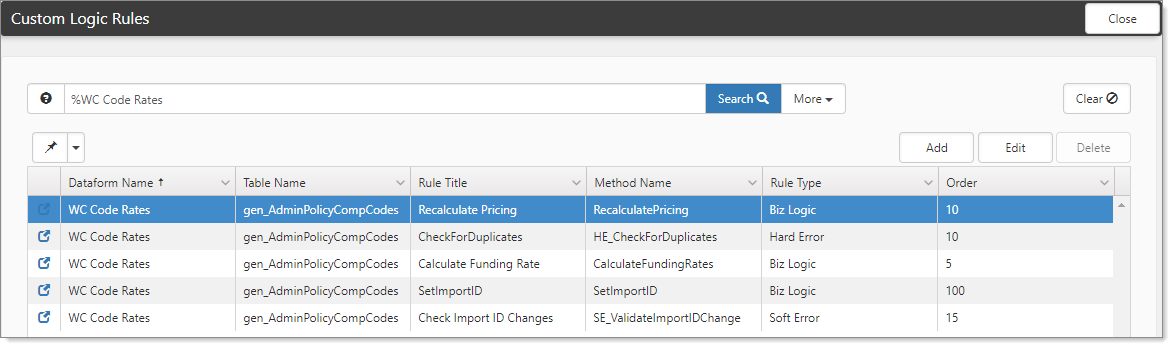
The Custom Logic Rules dashboard opens. -
In Quick Search, type %WC Code Rates.
The list of WC Code Rates rules displays.
-
Open each entry and ensure that Imports is present in Execution Pipeline. If not, in Execution Pipeline, select Imports. Only update entries with the Rule Type of Biz Logic and Hard Error.

-
Ensure that Active is selected.
-
Click Save.
Step 3: Create the Import File
Now you are ready to create the import file. The import file must contain the same column names as the mappings you established in the Import Map Detail forms (Step 1): CompCode, FundingRate, Manual Rate, PolicyNumber, State, StateRate, and Status. The import file needs two additional columns: ImportID and DefInfoImportID.
Your primary tool is a spreadsheet that provides the following:
-
Identifies your existing codes and rates for a workers' comp policy
-
Identifies the existing ImportIDs for these workers' comp code rates
-
Serves as the import template for importing rate updates
You can simply create a spreadsheet that contains the appropriate columns and then add the data. Or you can use Business Intelligence to create the file. The spreadsheet must contain the list of existing WC Rate records and the corresponding ImportIDs. If you use a Business Intelligence report, you can download the data as a CSV file and edit it to update your WC Rates. You must use existing ImportIDs to update existing records; else, you risk creating duplicates.
The first step is to prepare the mapping file, admin_wc_rate*.csv.
To create the BI Report:
-
On the modules bar, click Bus Intelligence.
The Business Intelligence page opens. -
Click New.
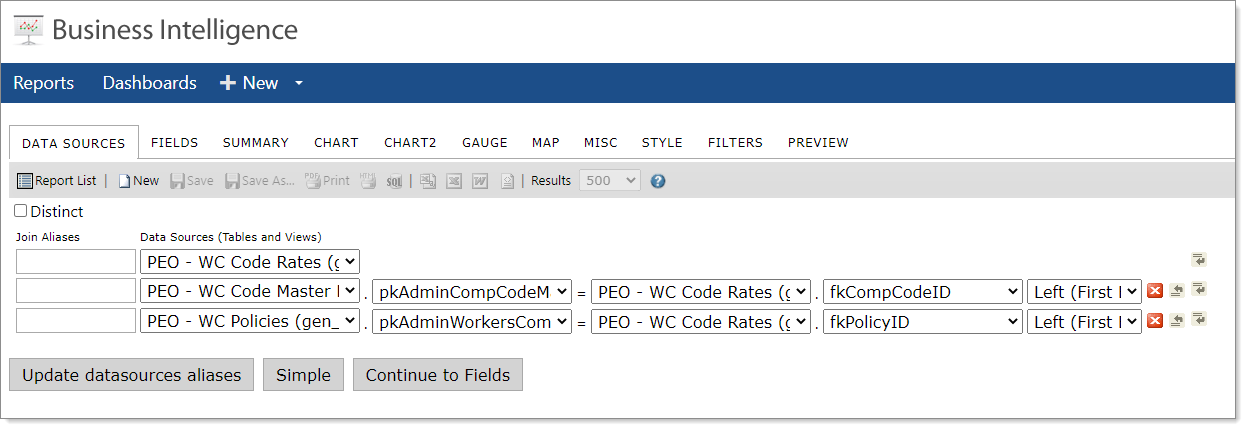
Business Intelligence displays tabs, with the DATA SOURCES tab open, ready for you to begin. We will add 3 Data Sources: PEO - WC Code Rates, PEO- WC Code Master, and PEO - WC Policies. -
In Data Sources:
|
Data Sources (Tables and Views) |
|
The subsequent rows display additional fields to connect to fields and keys.
|
Adjacent to PEO - WC Code Master: |
|
|
Adjacent to PEO - WC Policies: |
|
The report should appear as:
-
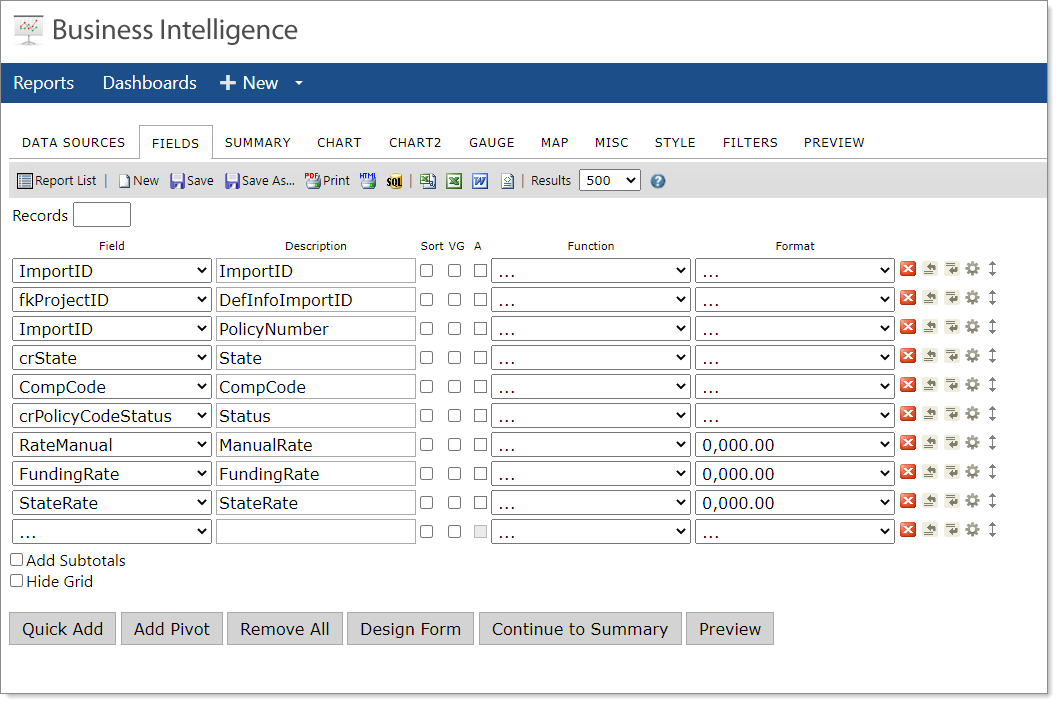
Click the Fields tab.
-
As you select a value in Field, a new row opens for the next selection.
|
In Field |
|
The report should appear as:
-
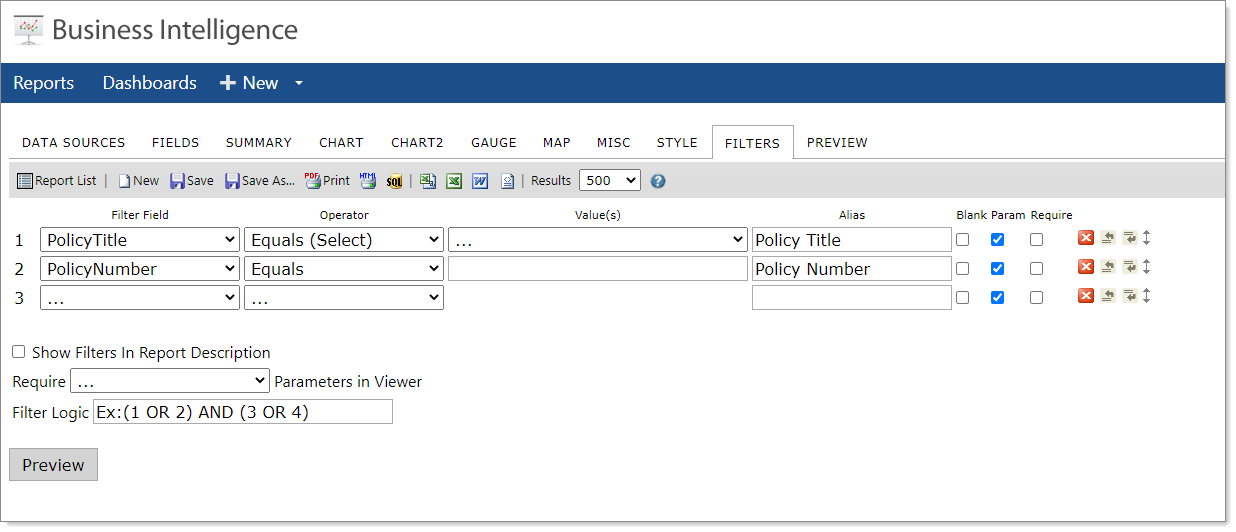
Click the Filters tab.
-
As you select a value in Filter Field, a new row opens for the next selection.
|
Filter Field |
Select PolicyTitle. |
|
Operator |
Select Equals (Select). |
|
Alias |
Type Policy Title. |
-
In the next row:
|
Filter Field |
Select PolicyNumber. |
|
Operator |
Select Equals. |
|
Alias |
Type Policy Number. |
The report should appear as:
-
Click Save As.
A dialog box opens. -
In Input report name, type admin_wc_rates import mapping template.
-
In Category, select Administration.
-
Click OK.
Step 4: Run and export the report
From Business Intelligence, let's run the newly created report.
-
On the banner, click Reports.
A list of Categories displays. -
Select Administration.
A list of Administration reports displays. -
Click the report you just added, admin_wc_rates import mapping template.
The report displays. Now you are ready to export the report data as a CSV file. -
On the report toolbar, click the arrow
 next to (Export to Excel), and select CSV.
The file downloads to your computer.
Step 5: Edit the file
Now you are ready to edit the downloaded file. The objective is to update the existing data. If you need to add new codes, you would add them to this file, being careful to formulate the ImportID with the same pattern.
-
Open the downloaded file.
-
Edit the data to reflect the required updates.
|
ImportID |
Do NOT edit this column.
A rule on the WC Rate table sets the ImportID. If using an ImportID in this file that is different from the system generated one, the system generated one is saved. Therefore it's important to use a BI Report to validate your existing ImportIDs. ImportIDs by the system are generated as follows: [WCPolicy.ImportID]-[StateAbbreviation]-[WCCodeMaster.CompCode]. |
|
DefInfoImportID |
All values in this row should be set to 1046, if not already set from the report. |
|
State |
Edit this data if required. Provide a two-letter state abbreviation. |
|
CompCode |
Edit this data if required. |
|
PolicyNumber |
Edit this data if required. |
|
Status |
Enter one of the following:
When you import the source file, the following values in the import file correspond to the dataform fields as:
|
|
ManualRate |
The PEO manual rate. It is also used as the default manual billing rate for the SMB. |
|
FundingRate |
The PEO cost. The amount paid to the carrier. Sometimes this is referred to as the Net Rate or Effective Rate paid to the Carrier. If the Use Cost Factors on the associated Policy is set to Yes, and the Manual Rate is changed, this field is recalculated after imported. |
|
StateRate |
Seldom used. Leave blank if not using. It is informational and can store what a State Rate is, should it be different from the Manual Rate. |
-
Click Save As.
-
Save the file as an Excel Macro-Enabled Workbook (.xlsm).
Step 6: Importing the file to update WC Code Rates
Now that you have an edited import file, the next step is to import the file to update the WC Code Rates.
Before proceeding, be sure your file is appropriately formatted with comma delimiting and quote wrapping the text. Follow the instructions in the topic CSV Import File Creation Macro to walk through creating a CreateCSV macro. Ensure that the file name begins with admin_wc_rates and ends in .csv.
To import codes:
-
Go to System Admin
> Imports > Manage Import. -
Click Add.
The Upload File dialog box opens. -
Complete the fields and click Save.
-
When the uploaded file is added, click Validate File.
- With the record in Validate Complete status, check the results of your validation. Open the record and use the action item links, and select Log File.
- If there are no validation errors, click Run Import to begin the import process. If there are validation errors, make corrections, and go to Step 2.
The action button reflects that the import process is Running. When complete, the action displays as Completed. - To review the success of your import, open the record and use the action item Links on the right: View File, Log File, Log Data, and Reset Status. Log Data presents any errors during the import.
- To view the log file for import errors, click View Log.