Importing Workers' Compensation Claims
This topic covers configuring and importing Loss Runs/Worker's Comp Claims.
Step 1: Verify Import Configuration
In this step, verify the import configuration of the import mapping source file WC_Claims_CarrierName*.csv. ensuring that it matches the import configuration shown in the sample screenshot.
To locate the import mapping source file:
- Go to System Admin
 > Advanced > Configure Import.
The Import Map Header Search dashboard opens. - Search for the Source File WC_Claims_CarrierName*.csv.
- If not found, go to If the Import Map Header does not exist.
If the Import Map Header exists
If the import mapping exists, review it to make sure it is Active and matches the configuration in the example screenshot.
To review the Import Map Header:
-
Go to System Admin
> Advanced > Configure Import.
The Import Map Header Search dashboard opens. -
Locate the Source File WC_Claims_CarrierName*.csv.
-
Click
 (Open).
The Import Map Header Detail form opens. -
Select the option Active, to enable the import map header.
-
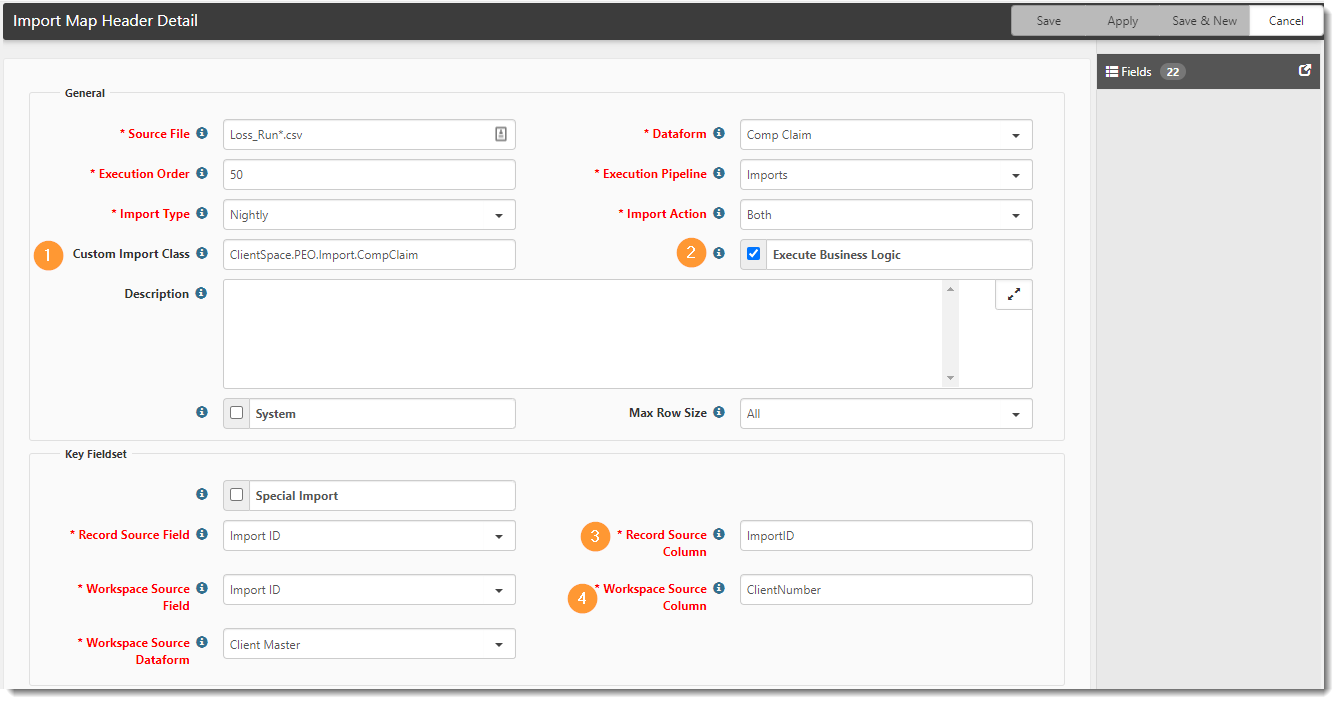
Review the following settings and ensure they are set as follows:
Custom Import Class
Type ClientSpace.PEO.Import.CompClaim.
Note: If the CreateEmployeeFromClaim business rule is Active, the Enable New Employees field is checked on the Client Master record, and the Loss Run (Workers' Comp Claim) import is run using the ClientSpace.PEO.Import.CompClaim custom class, if the employee record does not exist (i.e., the Employee ID cannot be found during the import), ClientSpace inserts a "shell" or "skeleton" employee record. The record contains First Name, Last Name, Employee Identifier and Import ID.
Execute Business Logic
Select this option. Enabling Execute Business Logic executes business rules when the imported dataform is saved.
Record Source Column
Type Import ID. The value in this field must match the column name in the import file, which means that the file you create must have a column named ImportID. The ImportID is the same as the Claim Number.
During the import process
This column determines if an existing WC Claim record exists. If so, that record gets updated with this row's information. If not, a new record is added only if the Import Map Header Detail import action is set to Insert or Both.
Workspace Source Column
Type ClientNumber. The value in this field must match the column name in the import file.
Note: In multi-tenant environments, this field may be set to ImportID instead of ClientNumber.
If the Import Map Header does not exist
If the Import Map Header does not exist, use the following procedures to add the mapping.
This procedure does not include all form fields – only the ones applicable to the source file. For complete details on creating the import map header, see Configuring the Import Map Header.
To add the Import Map Header:
-
From the Import Map Header Search dashboard, click Add.
The Import Map Header Detail form opens. -
Complete the fields. This procedure does not include all form fields. For complete details on creating the import map header, see Configuring the Import Map Header.
Source File
Type WC_Claims_CarrierName*.csv.
Dataform
Select Comp Claim.
Execution Pipeline
Select Imports.
Import Action
Select Both.
Custom Import Class
Type ClientSpace.PEO.Import.CompClaim.
Note: If the CreateEmployeeFromClaim business rule is Active, the Enable New Employees field is checked on the Client Master record, and the Loss Run (Workers' Comp Claim) import is run using the ClientSpace.PEO.Import.CompClaim custom class, if the employee record does not exist (i.e., the Employee ID cannot be found during the import), ClientSpace inserts a "shell" or "skeleton" employee record. The record contains First Name, Last Name, Employee Identifier and Import ID.
Execute Business Logic
Select this option. Enabling Execute Business Logic executes business rules when the imported dataform is saved.
Record Source Column
Set the value to ImportID. The value in this field must match the column name in the import file, which means that the file you create must have a column named ImportID. The ImportID is the same as the Claim Number.
During the import process
This column determines if an existing WC Claim record exists. If so, that record gets updated with this row's information. If not, a new record is added only if the Import Map Header Detail import action is set to Insert or Both.
Workspace Source Column
Set the value to ClientNumber. The value in this field must match the column name in the import file.
Note: In multi-tenant environments, this field may be set to ImportID instead of ClientNumber.
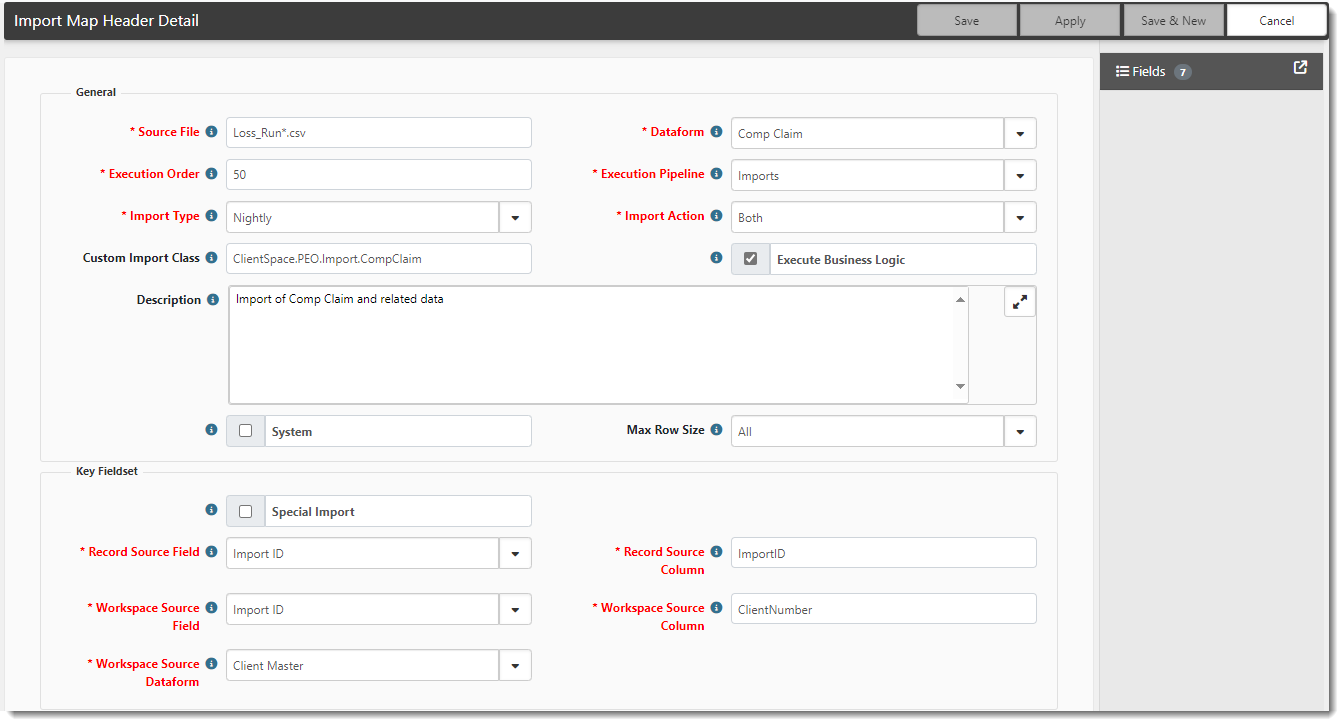
When you are finished completing the fields on the Import Map Header Detail form, the form should appear similar to the following:
-
Click Apply.
-
In the right pane, click Fields.
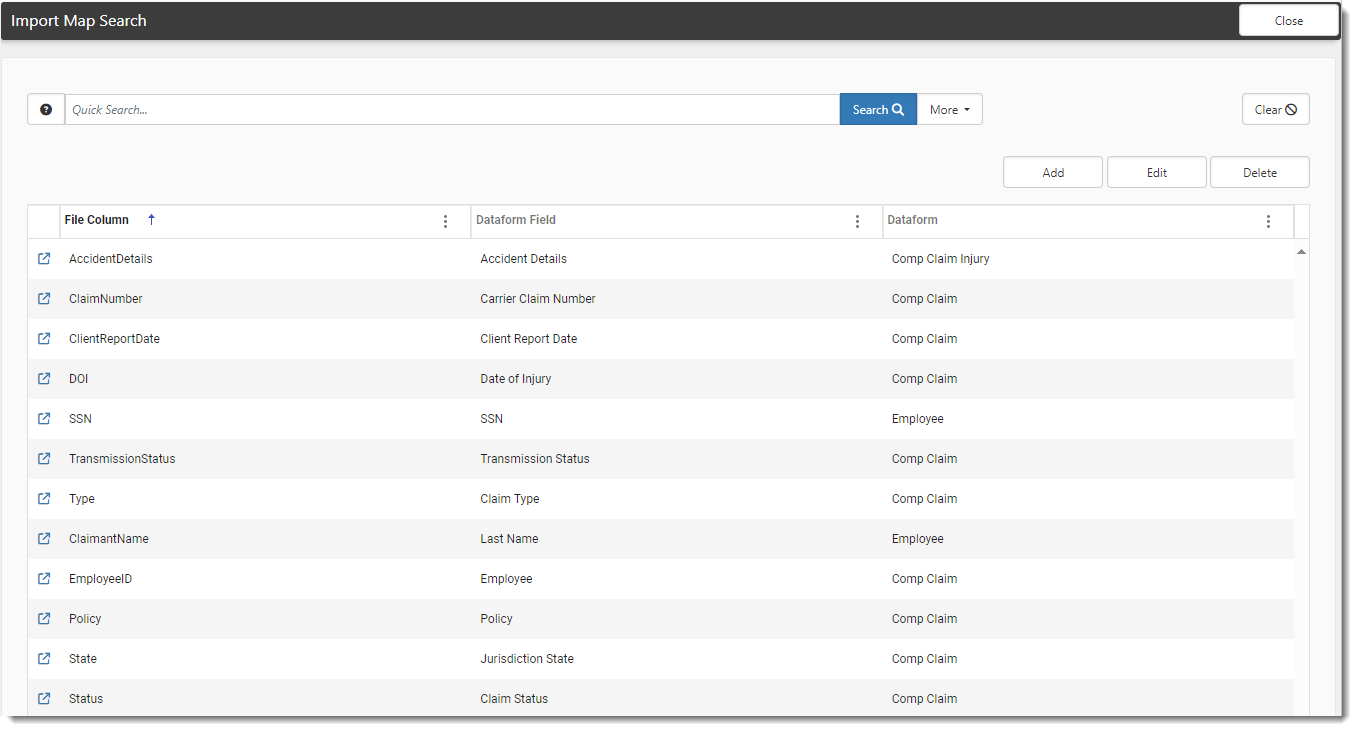
The Import Map Search dashboard opens. Now you are ready to add the mappings that correspond to the following forms/tabs: Employee, Comp Claim, Comp Claim Claimant, Comp Claim Injury, and Comp Claim Financial.You must add the following mappings: AccidentDetails, Claimant Name, ClaimNumber, Client ReportDate, DateReported, DOI, EmployeeID, Policy, SSN, State, Status, TransmissionStatus, Type, Location, WCCode, OSHAClass, AsOfDate, PaidExp, PaidInd, PaidMed, ResExp, RedInd, and ResMed.
-
Click Add.
The Import Map Detail form opens. - Complete the mapping for the dataform fields using the tables below as guidance.
The mapping represents the columns in the import file, the column values, and the dataform fields to receive the data.- As you complete a mapping, click Save & New to save the current form and open a blank form to add until you get to the last mapping.
- Click Save on the last mapping to save the current form, close the current form and return to the Import Map Search Dashboard.
-
File Column
Dataform
Field
Data Type
Lookup Table
Lookup Field
Required Value
Required Column
Default Value
AccidentDetails Comp Claim Injury Accident Details (InjuryAccidentDetails) Text N/A N/A Unchecked Checked None ClaimantName
Employee
Last Name (LastName)
Text
N/A
N/A
Unchecked
Unchecked
None
ClaimNumber
Comp Claim
Carrier Claim Number (Carrier Claim Number)
Text
N/A
N/A
Unchecked
Checked
None
ClientReportDate
Comp Claim
Client Report Date (DateReported)
Date
N/A
N/A
Unchecked
Checked
None
DOI
Comp Claim
Date of Injury (DateInjury)
Date
N/A
N/A
Checked
Checked
None
EmployeeID
Comp Claim
Employee (fkEmployeeID)
Note: Must be employee SSN. SSN can be with or without dashes.
Text
N/A
N/A
Checked
Checked
None
Policy
Comp Claim
Policy (fkAdminWorkersCompPolicyID)
Note: This is the policy number.
Text
N/A
N/A
Checked
Checked
None
SSN
Employee
SSN (SSN)
Note: This is also an employee SSN. It is required even though it has already been specified in the Employee ID mapping above. SSN can be with or without dashes.
Foreign Key
Employee
SSN (SSN)
Unchecked
Checked
None
State
Comp Claim
Jurisdiction State (Jurisdiction State)
Text
N/A
N/A
Checked
Checked
None
Status
Comp Claim
Claim Status (luClaimStatus)
Text
N/A
N/A
Unchecked
Checked
None
TransmissionStatus
Comp Claim
Transmission Status (luTransmissionStatus)
Text
N/A
N/A
Unchecked
Unchecked
None
Type
Comp Claim
Claim Type (luClaimType)
Text
N/A
N/A
Unchecked
Checked
None
Location
Comp Claim Claimant
Location (fkClientLocationID)
Note: File will not import without a location. The location must be the Location Code value.
Foreign Key
Client Location
Location Code (LocationCode)
Checked
Checked
None
WCCode
Comp Claim Claimant
WC Code (CompCode)
Foreign Key
WC Code Master
Comp Code (CompCode)
Unchecked
Checked
None
OSHAClass
Comp Claim Injury
OSHA Classification (luOSHAClassification)
Text
N/A
N/A
Unchecked
Checked
Injury
AsOfDate
Comp Claim Financial
VAO (DateVAO)
Date
N/A
N/A
Unchecked
Unchecked
None
PaidExp
Comp Claim Financial
Paid-Expense (PaidExpense)
Number
N/A
N/A
Unchecked
Checked
None
PaidInd
Comp Claim Financial
Paid-Indemnity (PaidIndemnity)
Number
N/A
N/A
Unchecked
Checked
None
PaidMed
Comp Claim Financial
Paid-Medical (PaidMedical)
Number
N/A
N/A
Unchecked
Checked
None
ResExp
Comp Claim Financial
Reserved-Expense (ReservedExpense)
Number
N/A
N/A
Unchecked
Checked
None
ResInd
Comp Claim Financial
Reserved-Indemnity (ReserveIndemnity)
Number
N/A
N/A
Unchecked
Checked
None
ResMed
Comp Claim Financial
Reserved-Medical (ReservedMedical)
Number
N/A
N/A
Unchecked
Checked
None
- When complete, you should see the mappings you added on the Import Map dashboard.
Step 2: Review Business Rules
Ensure that the business rules run on the Imports pipeline. You can add it to the list if it is not already there. Do this for Biz Logic and Hard Errors. Soft Errors never execute on imports, even if configured to do so. Additionally, activate the rules if they are inactive.
To review business rules:
-
Go to System Admin
> Advanced > Manage Business Rules.
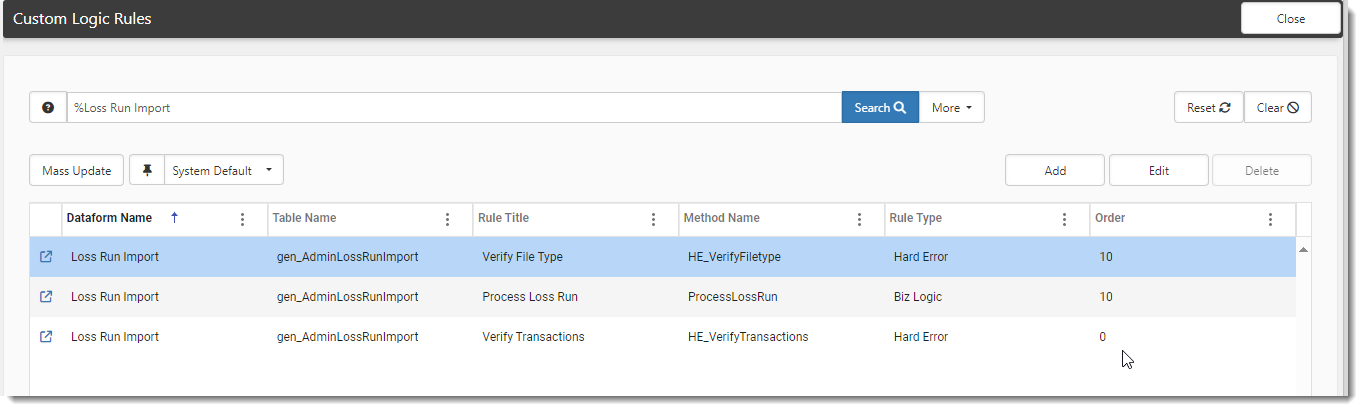
The Custom Logic Rules dashboard opens. -
In Quick Search, type %Loss Run Import.
The list of rules related to the Loss Run Import displays.
-
Open each entry and ensure that Imports is present in Execution Pipeline. If not, in Execution Pipeline, select Imports. Only update entries with the Rule Type of Biz Logic and Hard Error.

-
Ensure that Active is selected.
-
Also search for and review the CreateEmployeeFromClaim business rule and make sure it is Active. This enables ClientSpace to create a "shell" or "skeleton" employee record containing basic employee details from the Claim if the Employee ID is not found during the import. The record contains First Name, Last Name, Employee Identifier and Import ID.
Note: This functionality also requires the following:
-
The Loss Run (Workers' Comp Claim) import must be run using the ClientSpace.PEO.Import.CompClaim custom class (as documented in Step 1: Verify Import Configuration of this article.)
-
The Enable New Employees field must be checked on the Client Master record.
-
-
Click Save.
Step 3: Importing the File to Update WC Claims
Before proceeding, be sure your file is appropriately formatted with comma delimiting and quotes wrapping the text. Follow the instructions in the topic CSV Import File Creation Macro to walk through creating a CreateCSV macro. Ensure that the file name begins with WC_Claims_CarrierName* and ends in .csv.
To import WC Claims:
-
Go to System Admin
> Imports > Manage Import. -
Click Add.
The Upload File dialog box opens. -
Complete the fields and click Save.
-
When the uploaded file is added, click Validate File.
- With the record in Validate Complete status, check the results of your validation. Open the record, use the action item links, and select Log File.
- If there are no validation errors, click Run Import to begin the import process. If there are validation errors, make corrections, and go to Step 2.
The action button reflects that the import process is Running. When complete, the action displays as Completed. - To review the success of your import, open the record and use the action item Links on the right: View File, Log File, Log Data, and Reset Status. Log Data presents any errors during the import.
- To view the log file for import errors, click View Log.