Importing Tasks
You can import tasks, also known as incidents, from another application (other than Salesforce as Salesforce imports tasks and other information using the Salesforce API.) New tasks or updated existing tasks are updated in the correct ClientSpace workspaces.
Before you can import mass updates, you must first configure the Import Map Header, review the business rule, create the Import file, and upload/run the import file.
Step 1: Configure the Import Map Header and Fields
In this step, configure the Import Map Header and Details (the fields) for the source file CRM_Incident*.csv. This file should already exist but please verify the configuration and add field mapping.
Locating the Import Mapping Source File
To locate the import mapping source file:
- Go to System Admin
 > Advanced > Configure Import.
The Import Map Header Search dashboard opens. - Search for the Source File CRM_Incident*.csv.
Verifying the Import Map Header and Mapping Fields
To verify the Import Map Header and Map Fields:
- From the Import Map Header Search dashboard, click
 (Open) next to the CRM_Incident*.csv Source File.
The Import Map Header Detail form opens.
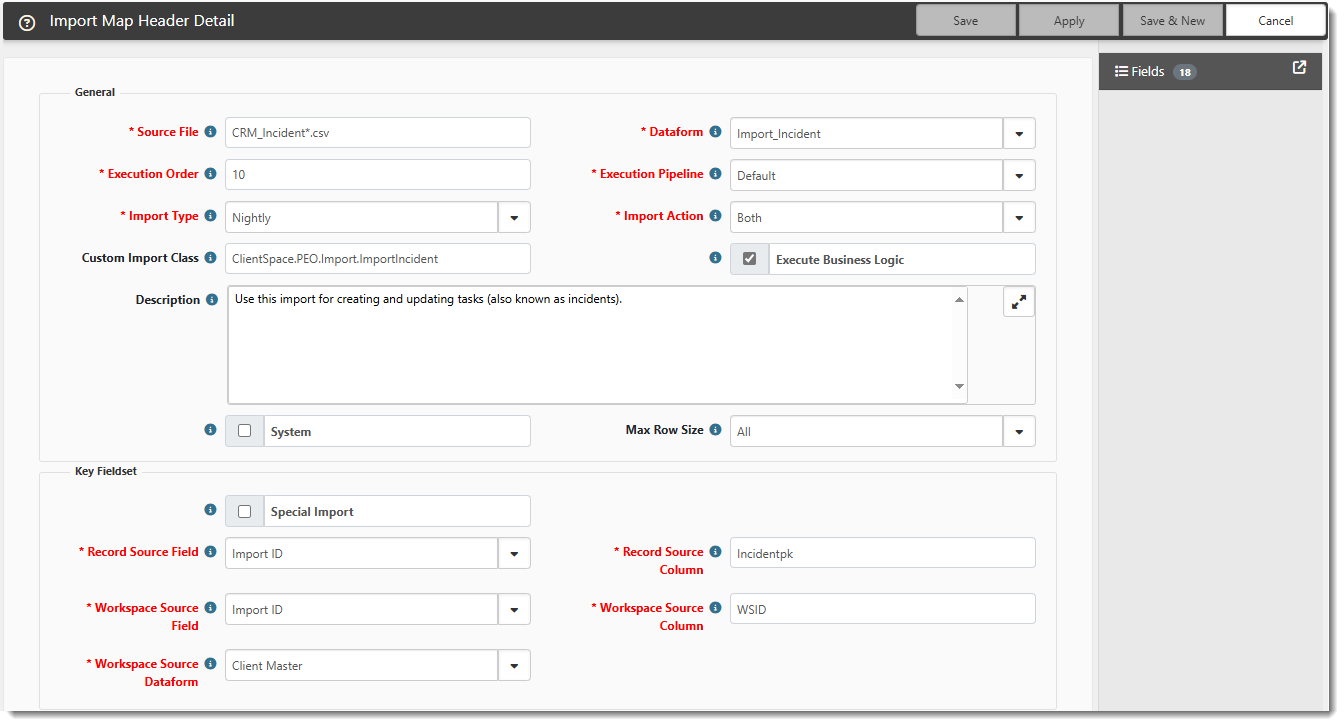
- Verify the fields and edit if necessary. Note: This procedure does not include all form fields. It only includes fields relevant for the setup of this import. For a complete list of definitions of all import map header fields, see Configuring the Import Map Header.
|
Source File |
Type CRM_Incident*.csv. |
|
Dataform |
Select Import_Incident. |
|
Execution Pipeline |
Select Default. |
|
Execution Order |
10 is the default setting. It may need adjusting if you have multiple imports and dataform dependencies. |
|
Import Type |
Select Nightly. This means that the import will either be run manually from System Admin Note: The automatic option is dependent on several factors, including the state of the import data from the external application. If the file requires "clean up" prior to import, automatically kicking off the file may not be possible. Please log an extranet case for assistance making the determination. Please also see the article on CSV Import File Creation Macro which outlines steps for developer users who want to create a properly formatted import file using a macro. For additional assistance, log an Extranet case. |
|
Import Action |
Select Both. |
|
Custom Import Class |
Type ClientSpace.PEO.Import.ImportIncident. |
|
Execute Business Logic |
Select this option. Enabling Execute Business Logic executes business rules when the imported dataform is saved. |
|
Custom Import Class |
Type ClientSpace.PEO.Import.ImportIncident. |
|
Record Source Field |
This is the field on the form used to locate the record. Select Import ID. |
|
Record Source Column |
Set the value to IncidentPK. The value in this field must match the column name in the import file, which means that the import file you create must have a column named IncidentPK. During the import process This column determines if an existing task record exists. If so, that record gets updated with this row's information. If not, a new record is inserted. |
|
Workspace Source Field |
Set the value to Import ID. This field is used to locate the correct workspace. |
|
Workspace Source Column |
Set the value to WSID. The value in this field must match the column name in the import file, which means that the import file you create must have a column named WSID. |
|
Workspace Source Dataform |
Select Client Master. |
-
Click Apply.
-
In the right pane, click Fields.
The Import Map Search dashboard opens. Now you are ready to add the mappings from your import file (represented by File Column ) that correspond to the fields on the Import_Incident dataform (represented by Dataform Field). Add mappings for the following Incident_Import Dataform Fields, taking note of the Datatype as this must be specified on the Import Map Detail record:Import_Incident Fields and Datatypes Dataform Field Datatype Body Text More Info Text Category Text Completed Date Due Date Date External Object Text Completed By Text Created By Text Owner Text Assigned To Text Delete Text Priority Text Start Date Date Send Notification Text SourceID Text Status Text Subject Text -
Click Add.
The Import Map Detail form opens.
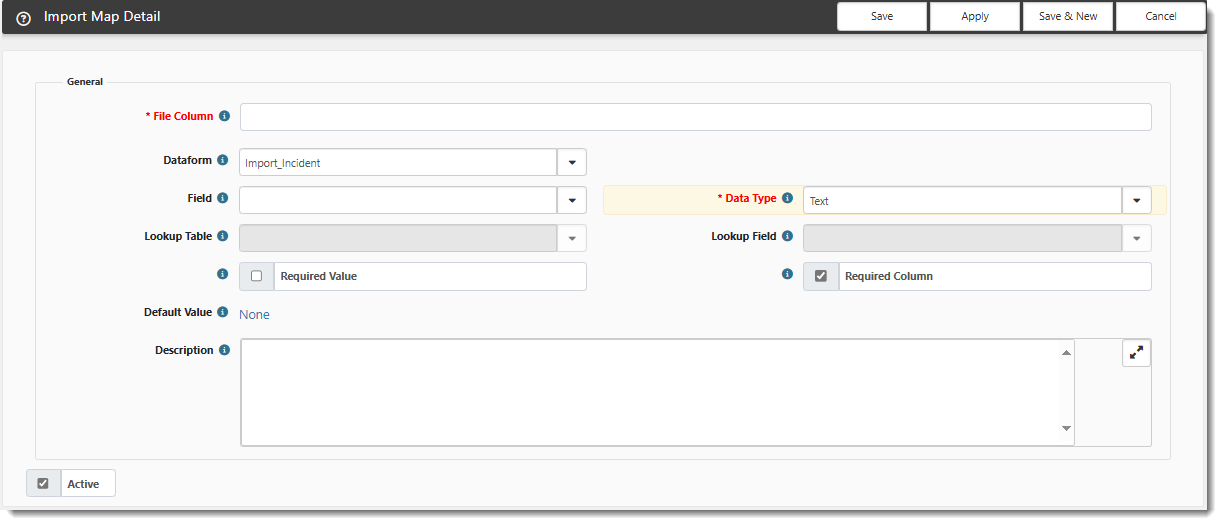
- Complete the mapping for the dataform fields.
-
Click Save & New.
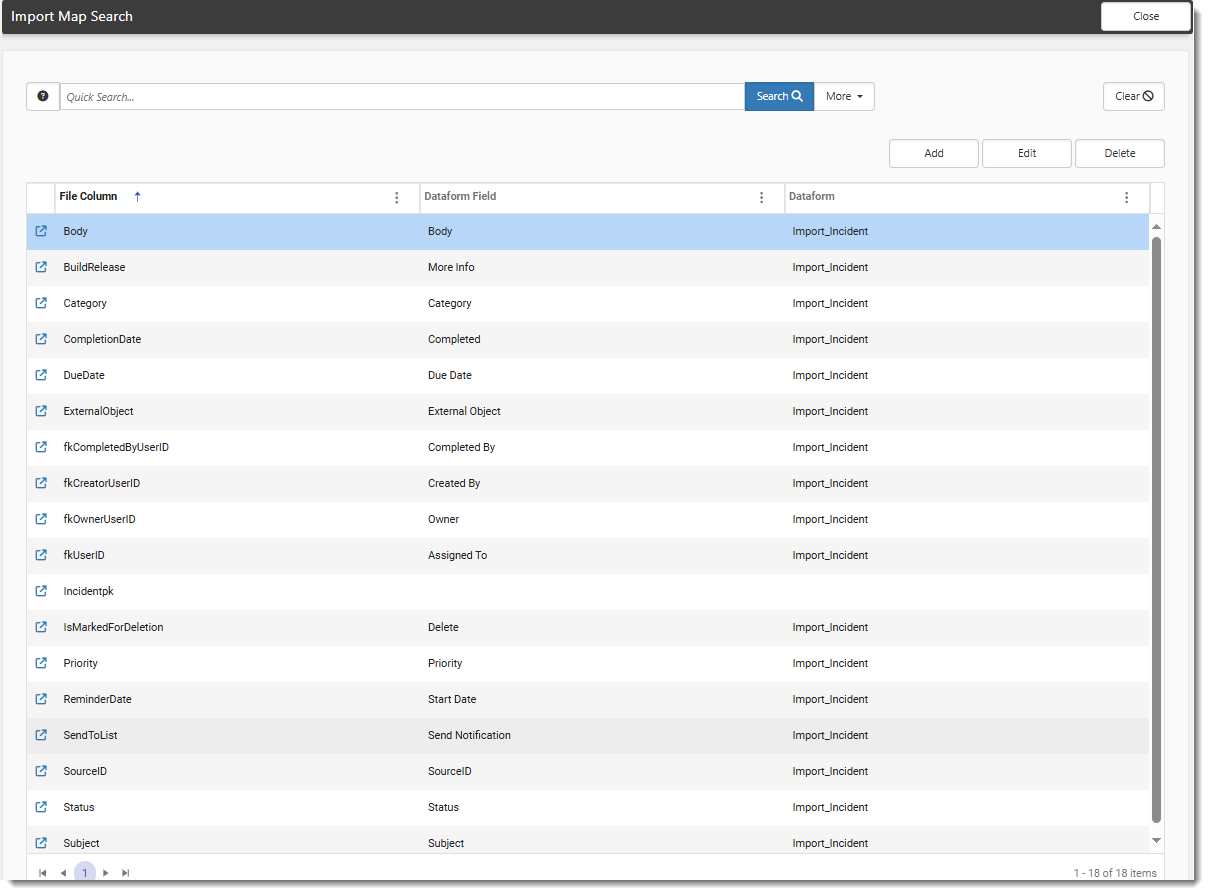
This action saves the mapping and opens the form to add the next one. -
When complete, you should see a list similar to following on the Import Map dashboard.
Step 2: Review the Business Rule
Ensure that the Create Incident/Task business rule runs on the Default pipeline. Additionally, verify that the rule is Active.
To review the Create Incident/Task business rule:
-
Go to System Admin
> Advanced > Manage Business Rules.
The Custom Logic Rules dashboard opens. -
In Quick Search, type %Incident/Task.
The Create Incident/Task rule displays on the dashboard.
-
Click
(Open) next to the entry.The rule details display.

-
Ensure that Default is present in Execution Pipeline.
-
Ensure that Active is selected.
-
Click Save.
Step 3: Create the Import File
Now you are ready to create the import file. The import file must contain the same column names as the mappings you established in Step 1: Configure the Import Map Header and Fields.
The import file must be a CSV file containing the appropriate mapped columns plus the WSID and IncidentPK columns used to locate the correct workspace and record when inserting/updating.
Step 4: Importing the Task Data
The next step is to import the file to insert and update task data. This can happen as part of a nightly import or you can import manually. The steps in this section detail a manual import.
Before proceeding, be sure your file is appropriately formatted with comma delimiting and quote wrapping the text. Follow the instructions in the topic CSV Import File Creation Macro to walk through creating a CreateCSV macro. Ensure that the file name begins with CRM_Incident and ends in .csv.
To import task data:
-
Go to System Admin
> Imports > Manage Import. -
Click Add.
The Upload File dialog box opens. -
Complete the fields and click Save.
-
When the uploaded file is added, click Validate File.
- With the record in Validate Complete status, check the results of your validation. Open the record and use the action item links, and select Log File.
- If there are no validation errors, click Run Import to begin the import process. If there are validation errors, make corrections before continuing.
The action button reflects that the import process is Running. The file is processed, and each row is read and stored in the Import_Incident dataform until the task is generated. Then, the dataform is deleted. Any errors encountered during file processing are stored in the Log File (without any disruption to Import_Incident file processing). Finally, the imported task information is imported into new ClientSpace task records within the correct Workspaces. When complete, the action displays as Completed. - To review the success of your import, open the record and use the action item Links on the right: View File, Log File, Log Data, and Reset Status. Log Data presents any errors during the import.
- To view the log file for import errors, click View Log.