This topic provides ClientSpace System Administrators with step-by-step instructions for configuring a customized direct deposit email notification. The notification helps worksite employees and service providers to be more proactive in detecting and preventing fraud attempts.
When a worksite employee’s direct deposit account number or transit number is added or changed, a notification is sent to the employee. If the employee did not add, edit, or authorize a change to their direct deposit information, the employee can contact their service provider.
To learn more about configuring an Email Template for missing Employee records, see Configuring Direct Deposit notifications for missing Employees.
Watch the video about Creating a Direct Deposit Notification.
Condition for: Has Direct Deposit Changed?
System administrators want to ensure that the Direct Deposit notifications are only sent when a true Direct Deposit change occurs. The objective is to avoid alerting users when changes are applied to an HSA account or during a pre-notification process.
On the email template, in the Conditions step, you can add a condition that is configured for Direct Deposit notification. In the Add section, the selected Source is PrismHR Event, and the Field is set to Additional Information (xmlAdditionalInformation) Has Direct Deposit Changed?:

Review the following procedure (see To configure conditions, click Add.) to learn how to add this condition.
Condition for: Who made the change to data in Prism?
System administrators want to identify the source of who made the change to data in Prism. This information aids in configuring workflows based on if an internal or external user changed data.
On the email template, in the Conditions step, you can add a condition to identify the source of the change. In the Add section, the selected Source is PrismHR Event, and the Field is set to Additional Information (xmlAdditionalInformation) and then User Type or Username.


Review the following procedure (see To configure conditions, click Add.) to learn how to add this condition.
Configuring the Direct Deposit Notification
The following procedure guides you through the steps to configure a direct deposit notification using email templates.
To configure a direct deposit notification in ClientSpace:
| 1. | Go to System Admin |
The Email Templates dashboard opens.
| 2. | Click Add. |
The Email Template wizard opens at Step 1 Initial.
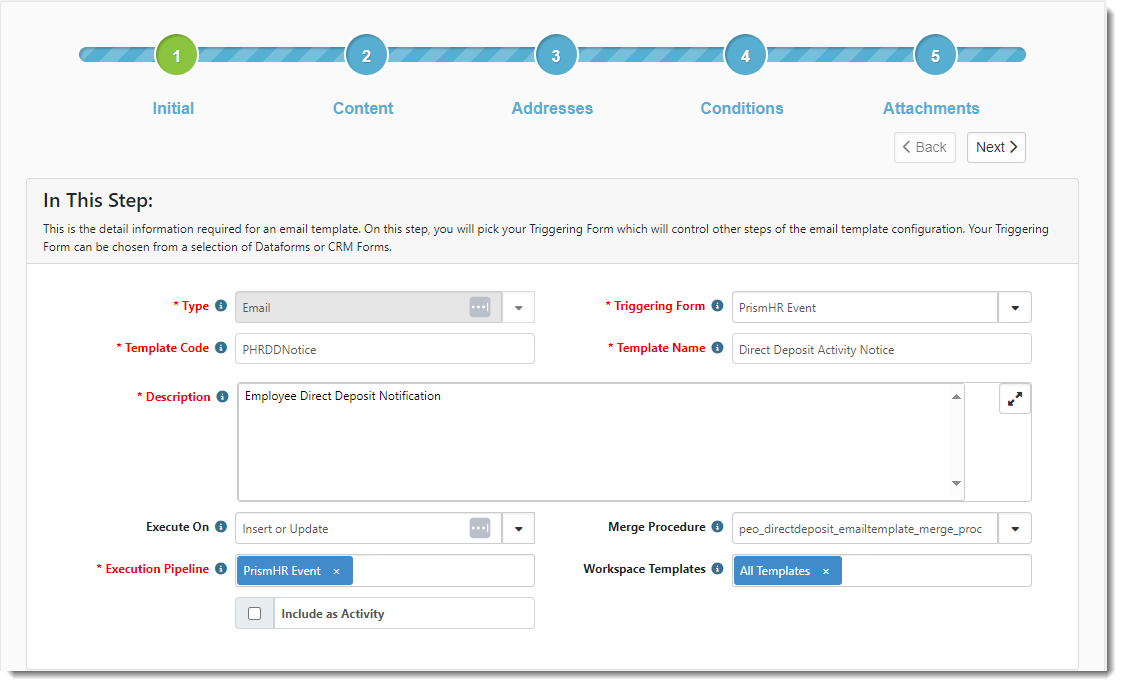
| 3. | Complete Step 1 Initial. |
|
Triggering Form |
Select PrismHR Event. |
| Template Code | Add a short descriptive code to identify this template, such as DDNotice. |
| Template Name | Add a brief, but descriptive name to display in any list in ClientSpace where you may be able to select an Email Template. EX: Direct Deposit Activity Notice |
| Description | Include a brief description of the template, such as Employee Direct Deposit Notification. |
| Execute On |
Select "Insert or Update". Important: This must be set to "Insert or Update" as shown in the example image below. Otherwise, you may not receive important direct deposit update notifications.
|
| Merge Procedure |
Select an optional Merge Procedure to provide additional system information for Field Replacement. For instance, if you want to merge information such as the employee's name at the top of the body of the email, you can select the peo_directdeposit_emailtemplate_merge_proc option. This adds additional merge replacement information for this email template in Step 2 Content. Alternatively, you can select peo_directdeposit_emailtemplate_recipient_v2_proc which contains similar fields but also includes the following additional fields: Previous Personal Email , Previous Work Email, ManagerPersonalEmail. |
| Execution Pipeline | Indicates how the data enters ClientSpace. Remove the option for Default and select PrismHR Event. |
|
Workspace Templates |
Select the Workspace Templates that will receive this email. Default is All Templates. |

When you have finished configuring the Step 1 Initial tab, your screen should appear similar to the following:
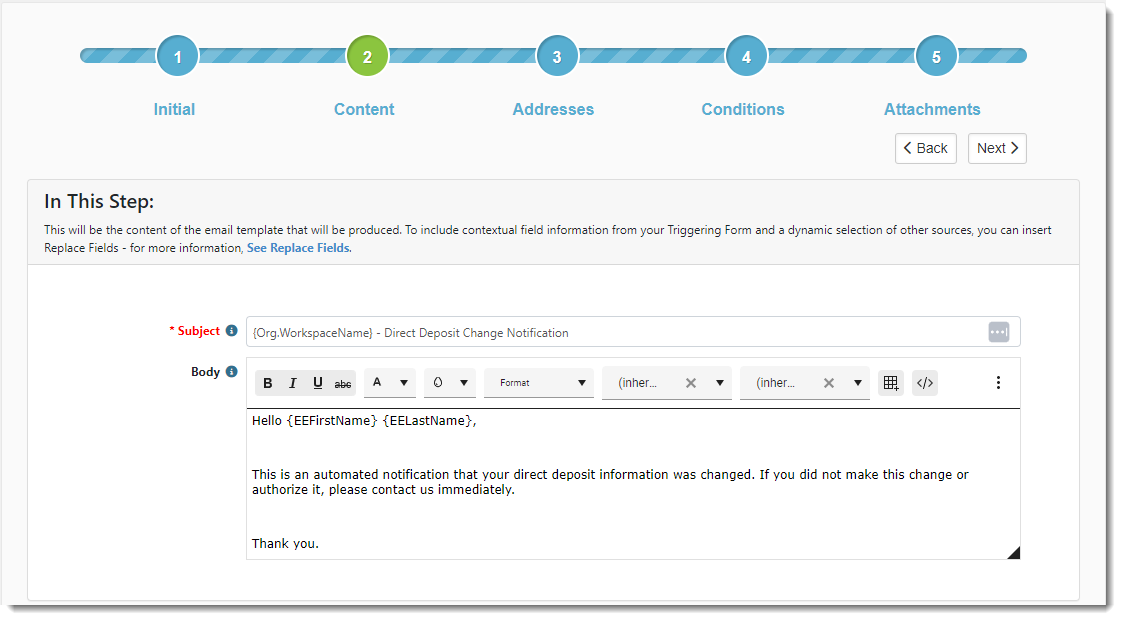
| 4. | Click Next and complete Step 2 Content. |
|
Subject |
The subject line of the email that is generated. The email recipients see this subject. EX: Direct Deposit Change Notification. |
|
Body |
The body of the email that is generated. This is seen by the email recipients. This field supports rich text. Therefore, you can customize fonts, add a logo, add a signature block, include links, and more. You can use replacement fields to customize the message.
To use replacement fields, click See Replace Fields. For details about using replacement fields, see Replacement Fields. Note: Ensure that you have selected a Merge Procedure on the Step 1 Initial tab as outlined in the preceding step so that you can access the replacement fields. |
When you have finished configuring the Step 2 Content tab, your screen should appear similar to the following:
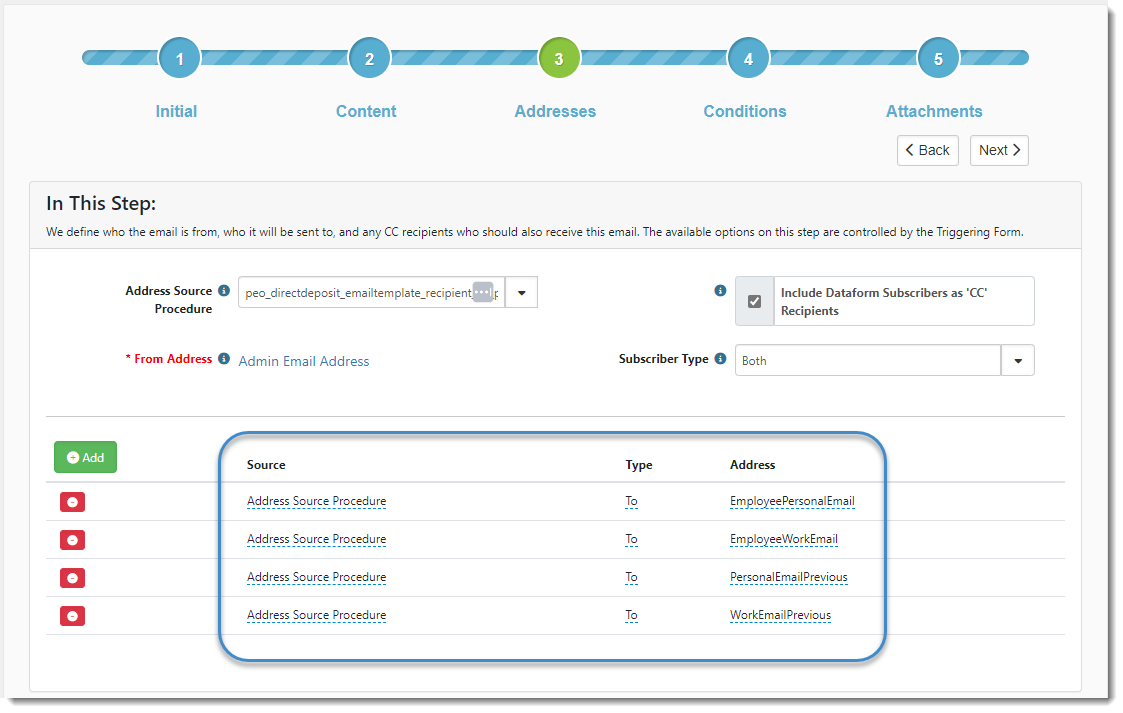
| 5. | Click Next and complete Step 3 Addresses. |
| Address Stored Procedure |
While you can use peo_directdeposit_emailtemplate_recipient_proc for this email template, the peo_directdeposit_emailtemplate_recipient_v2_proc also includes the additional fields PreviousPersonalEmail, PreviousWorkEmail and ManagerPersonalEmail. The ManagerPersonalEmail field is useful if you want to add the employee's manager as a To or CC recipient. |
|||||||||
|
Include Dataform Subscribers as 'CC' Recipients |
Adds anyone who has subscribed to the dataform as CC recipients when this notification is sent in addition to any other recipients you configure here. When enabled (selected), this option presents a list to notify internal, external, or both recipient types:
|
|||||||||
| From Address |
This field defaults to Admin Email Address (the application administrator's email address). This is the default admin email set in System Admin > Advanced > App Settings. To change this setting:
|
| 6. | To add the Employee as a recipient, click Add. |
A row opens. This is where you specify the Employee's work or personal email addresses.
| Source |
For this email template, select Address Source Procedure. This selection makes the Employee's email address available in the Address column. To include additional team members as recipients, you can select Client Team or Adhoc Email Address. When you select Adhoc Email Address as the Source, you type a specific email address in Address. |
| Type | Type can be To or CC. |
| Address |
You can select the employee's personal or work email address. This address triggers the employee notification when their direct deposit information changes. |
When you have finished configuring the Step 3 Addresses tab, your screen should appear similar to the following (although some of your selections will vary from the examples shown here):
| 7. | Click Next and complete Step 4 Conditions. |
| No Primary Trigger | Enable this option. (Select the option.) |
| Primary Trigger Field | Not used. |
|
Only Trigger Once |
Not used. This setting triggers the email template the first time the conditions are met. This setting is not for use with an ongoing notification email template such as the Direct Deposit Notifications email template. |
|
Condition Expression |
Allows for AND, OR, and NOT conditions using the display conditions (Label) from the Add section. Using the Label field that corresponds to the entries in the Add section, you can combine the conditions into more complex expressions. The Condition Expression field could state, for example (Condition1 AND Condition2) OR (Condition3 AND Condition4) OR Condition5. In the example, the Condition Expression uses the display condition labels 1, 2, 3 and 4. Condition Expressions use AND/OR/NOT across tabbed dataform conditions. For a detailed explanation about conditions, see Condition expressions. |
| 8. | To configure conditions, click Add. |
A row opens for adding conditions to include Source, Field, Operator, Value, and Label. You can add multiple conditions.
| Source | Indicates the dataform or stored procedure that provides the triggering condition. Select PrismHR Event. |
|
Field |
This is the field that is evaluated for the conditions. Select Class Name. This field captures the classification of event records that come through the API.
|
|
Operator |
The type of comparison between Field and Value. For the condition Has Direct Deposit Changed? or who made the change (i.e., Username or User Type), select Equals. |
|
Value |
The criteria against which Field is compared.
|
|
Label |
The label to be used when constructing Condition Expressions for triggering. Make this label short and representative of the selection in Field. Labels are used in the Condition Expression field. You can also choose to use the default labels of C1, C2, C3, etc or shorten them to 1, 2, 3, and 4 as we've done in our example. |
When you have finished configuring the Step 4 Conditions tab, your screen should appear similar to the following (although some of your selections will vary from the examples shown here):

| 9. | Click Next. |
| 10. | Skip Step 5 Attachments. |
| 11. | Click Finish to save your work. |
After you click Finish, you are returned to the Email Template list. This email template does not work just yet because it is unpublished (inactive). You must publish the new email template to make it active.
If you are ready to publish immediately:
- Select the row for DDNotice (or the Template Name you entered on the Step 1 Notice tab.)
- Click Publish.
The entry is now published.
If you would like to publish later:
- Navigate to the Email Template list.
- Clear the Published option.
The entry is now unpublished.
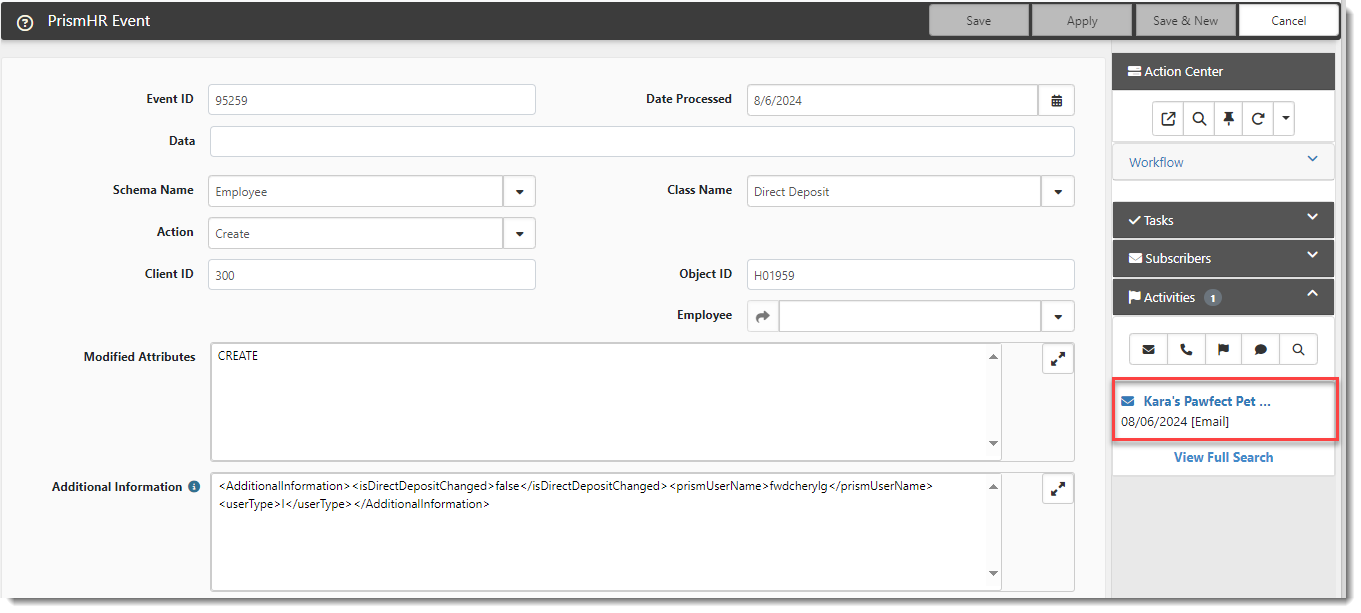
Activity Tracking
ClientSpace maintains a history of Direct Deposit Notification activity on the PrismHR Event dataform. This can help you prove that notification of a change to an employee's direct deposit information was sent if the receipt of a notification is disputed. To support Activity tracking of Direct Deposit Notifications, the following fields are set on the PrismHR Event dataform properties (System Admin![]() >Advanced > Dataform Admin):
>Advanced > Dataform Admin):
-
The Enable Activities checkbox is checked by default.
-
The Enable Attachments checkbox is checked by default.
Additionally, the Include as Activity checkbox is checked by default on the Direct Deposit Active Notice email template (Template Code = PHRDDNOTICE).
Note: This template is predefined in ClientSpace. If you have custom Direct Deposit Notifications and you want Activity tracking on those as well, apply the same settings outlined here to those templates.
With these settings in place, when a direct deposit notification is triggered, an Email activity record (which includes an attachment of the generated email) is added to the PrismHR Event dataform in the correct workspace.

When you open the Prism HR Event record, the generated email is located in the Action Center under Activities.