Creating, modifying, or deleting Email Integration credentials
The Email Integration login credentials are stored in the API Credentials table (tblAPICredentials) and are maintained from System Admin > Email Integration. For existing credentials, the Password field is hidden. To change the password for an existing credential, see Edit a credential.
ALERT: Multi-factor authentication (MFA) must be disabled on the Email Integration account.
Add a credential
To add a credential:
- Go to System Admin
 > Email Integration.
The Email Integration dashboard opens. From here, you can add, edit details, and delete records. - Click Add.
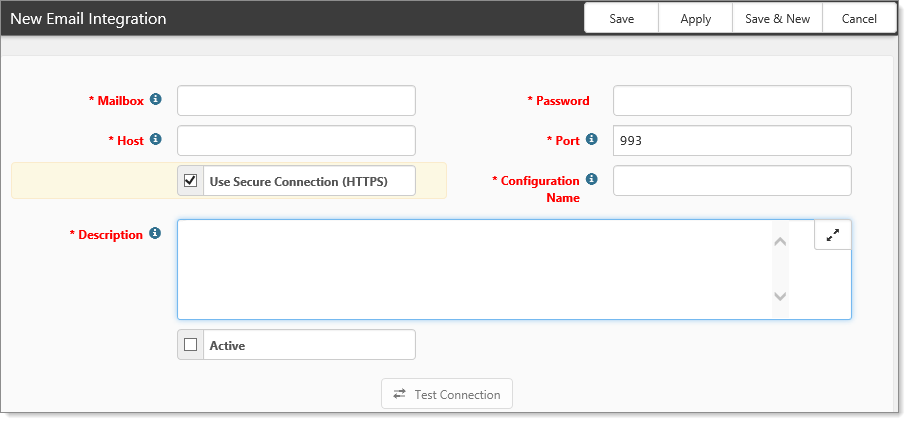
The New Email Integration form opens.
- Complete the following fields:
|
Mailbox |
Required. The email address for the email account with which you would like to integrate. Email addresses are case insensitive and must be in a valid format. This address must be attached to a supported email provider (such as Gmail, AOL). The address must be an actual email address associated with this mailbox and not an alias for the mailbox.
Later in the configuration process, an email alias is created using this email address. The alias provides to ClientSpace the default values for the workspace, project type, and client. |
|
Password |
Required. The user account password. Depending on the email provider, this field may be case sensitive, so ensure that you use the appropriate case when you enter the value.
When editing an existing credential, the Password field is hidden. To change the password, see Edit a credential. |
|
Host |
Required. The IMAP or Graph API mail host for the mail client. This setting is used when connecting to the mailbox. For information on your IMAP or Graph API host settings, contact your mail provider.
Note: Though IMAP is being deprecated by Microsoft and we recommend switching to Microsoft Graph API, a supported and more secure authentication method, you can continue to use IMAP until you are ready to switch. |
|
Port |
Required. The secured firewall port used by your provider to allow access to the mailbox. For IMAP, most IMAP providers use Port 993, so we default the field to this. There is no port setting requirement for Graph API. |
|
Use Secure Connection (HTTPS) |
Connect to the mail provider over the internet via unsecured (HTTP) or secured (HTTPS) access. Defaults to selected (secured). |
|
Configuration Name |
Required. Should contain the application name associated with the application code. This name will appear in Lists, so it should provide a hint at the mailbox association. |
|
Description |
Required. Should contain a brief description of this credential. |
|
Test Connection |
Test Connection is disabled until all required fields are completed, at which point the button color indicates it is ready for use. Select Test Connection to ensure the connection information connects to the mailbox successfully before proceeding to the next step. A successful test presents the message: We were able to connect to your mailbox. Unsuccessful tests yield an error message. Some examples of common errors and their causes:
Before deleting a credential, you must ensure that it is not associated with any email aliases, else an error will be logged. |
- Click Save.
Edit a credential
To edit the password for an existing credential:
- Go to System Admin
 > Email Integration.
The Email Integration dashboard opens. From here, you can add, edit details, and delete records. - Select the credential and click
 (Open) or Details.
The Email Integration form opens. - In the Action Center, click
 (Change Password).
The Change Password dialog box opens. - Complete the fields:
|
New Password |
Enter the new password. |
|
Confirm Password |
Enter the new password again. |
- Click Ok.
- On the Email Integration form, click Test Connection to test the password.
- If the new password matches the password for the mailbox, a green-shaded Connected Successfully message dialog box opens. To close, click Ok.
- If the password does not match, an Invalid Password security error appears.
What's next
Proceed to the next topic Creating Email Integration aliases to continue the process.
Learning How: Setting Up Advanced Email Integration Security
This video details how to set up advanced email integration security.
![]() Video
Video
Watch the video Setting Up Advanced Email Integration Security.
