The Reply Above This Line functionality is an optional method for replying to case discussion messages. The reply is through the email mailbox Reply button, as you would normally reply to any email message. When you type the response and send it, the message is integrated with the ClientSpace case discussion thread.
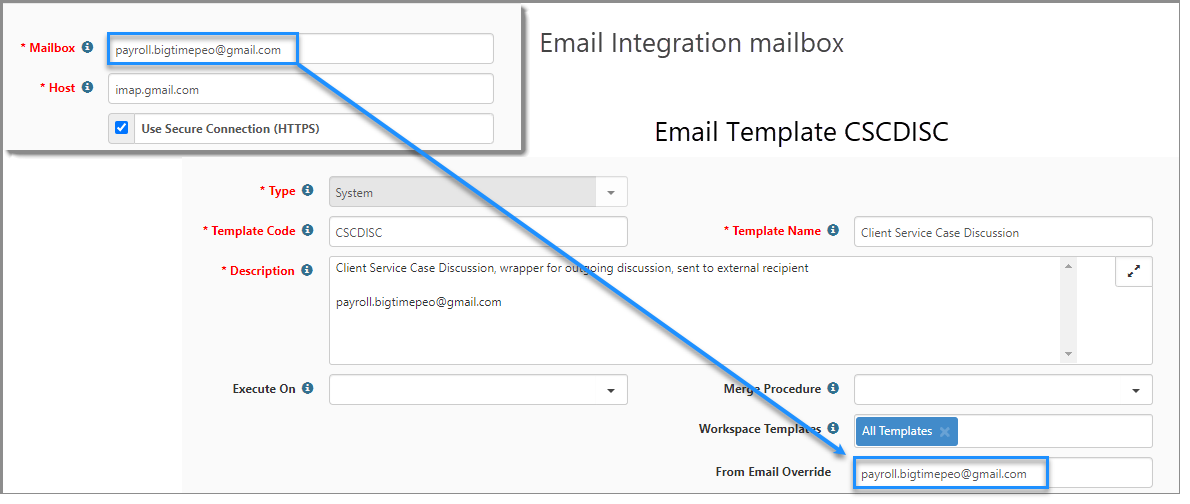
The Reply button method is more direct than that of the original method, Send a Reply link, which is embedded in the email message. Both methods are shown in the accompanying image. The Send a Reply link is always available and does not require additional configuration. However, using the Reply button requires an Email Integration record with a mailbox address that matches the From Email Override address in the CSCDISC and CSCDISCNEW email templates.
The accompanying diagram illustrates an overview of the configuration steps for using the Reply button. The first step is to activate a rule and disable an older rule. Next you will configure the Email Integration mailbox. Then you add the Email Override address. The configuration steps for using the Reply button follow.
In this step, let's activate SendReply and disable SendEmailIntegrationReply. SendEmailIntegrationReply is an older rule that has been replaced by SendReply.
To activate SendReply:
- Go to System Admin
 > Advanced > Manage Business Rules.
The Custom Logic Rules dashboard opens. - Filter the list for the Table Name Case Discussion Message with the Rule Title SendReply and click
 (Jump).
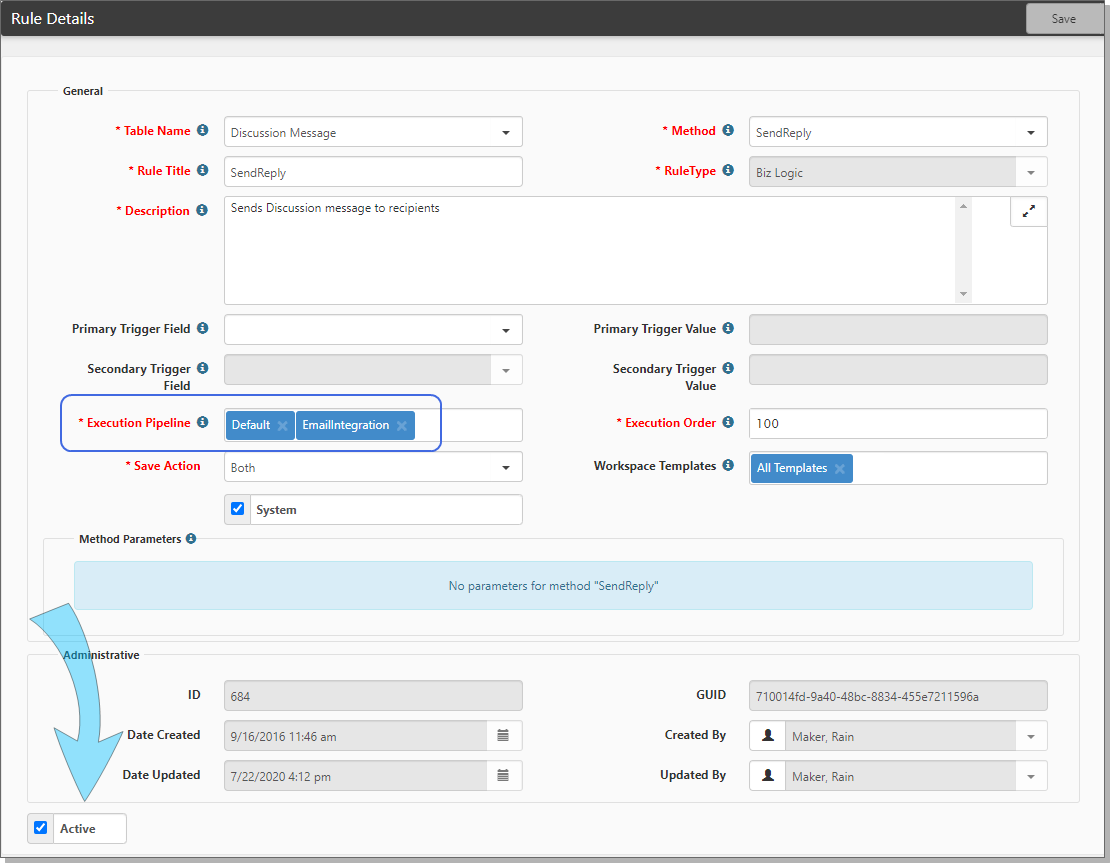
The Rules Detail form opens. - Complete the fields:
|
Execution Pipeline |
Select Default and EmailIntegration. |
|
Active |
Select this option to enable the rule. |
- Click Save.
Next, you must disable SendEmailIntegrationReply.
To disable SendEmailIntegrationReply:
- Go to System Admin
 > Advanced > Manage Business Rules.
The Custom Logic Rules dashboard opens. - Filter the list for the Table Name Case Discussion Message with the Rule Title SendEmailIntegrationReply and click
 (Jump).
The Rules Detail form opens. If you cannot find the rule, it may be archived. In More Search, select All and click Search. - Clear the Active option (disables the rule). See the following image.
- Click Save.
The Email Integration record is where you configure the mailbox for routing the discussion messages. The email address for the mailbox is also set in the case discussion email templates CSCDISC and CSCDISCNEW.

Our example shows a mailbox with a Username payroll.bigtimepeo@gmail.com. We will refer to this email address in the next step.
To configure the mailbox:
- Go to System Admin
 > Email Integration.
The Email Integration dashboard opens. - Click Add.
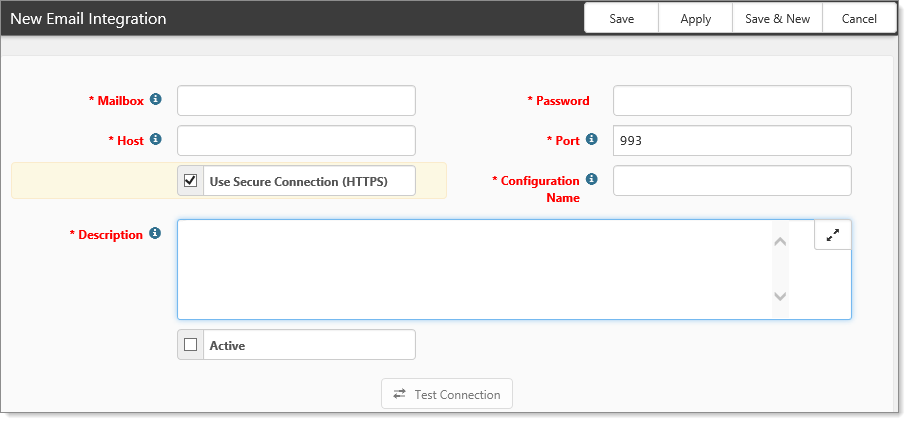
The New Email Integration form opens.
- Complete the form fields.
|
Mailbox |
Required. The email address for the email account with which you would like to integrate. Email addresses are case insensitive and must be in a valid format. This address must be attached to a supported email provider (such as Gmail, AOL). The address must be an actual email address associated with this mailbox and not an alias for the mailbox.
Later in the configuration process, an email alias is created using this email address. The alias provides to ClientSpace the default values for the workspace, project type, and client. |
|
Password |
Required. The user account password. Depending on the email provider, this field may be case sensitive, so ensure that you use the appropriate case when you enter the value.
When editing an existing credential, the Password field is hidden. To change the password, see Edit a credential. |
|
Host |
Required. The IMAP or Graph API mail host for the mail client. This setting is used when connecting to the mailbox. For information on your IMAP or Graph API host settings, contact your mail provider.
Note: Though IMAP is being deprecated by Microsoft and we recommend switching to Microsoft Graph API, a supported and more secure authentication method, you can continue to use IMAP until you are ready to switch. |
|
Port |
Required. The secured firewall port used by your provider to allow access to the mailbox. For IMAP, most IMAP providers use Port 993, so we default the field to this. There is no port setting requirement for Graph API. |
|
Use Secure Connection (HTTPS) |
Connect to the mail provider over the internet via unsecured (HTTP) or secured (HTTPS) access. Defaults to selected (secured). |
|
Configuration Name |
Required. Should contain the application name associated with the application code. This name will appear in Lists, so it should provide a hint at the mailbox association. |
|
Description |
Required. Should contain a brief description of this credential. |
|
Test Connection |
Test Connection is disabled until all required fields are completed, at which point the button color indicates it is ready for use. Select Test Connection to ensure the connection information connects to the mailbox successfully before proceeding to the next step. A successful test presents the message: We were able to connect to your mailbox. Unsuccessful tests yield an error message. Some examples of common errors and their causes:
Before deleting a credential, you must ensure that it is not associated with any email aliases, else an error will be logged. |
- Select Active. This enables the Email Integration.
- Click Apply.
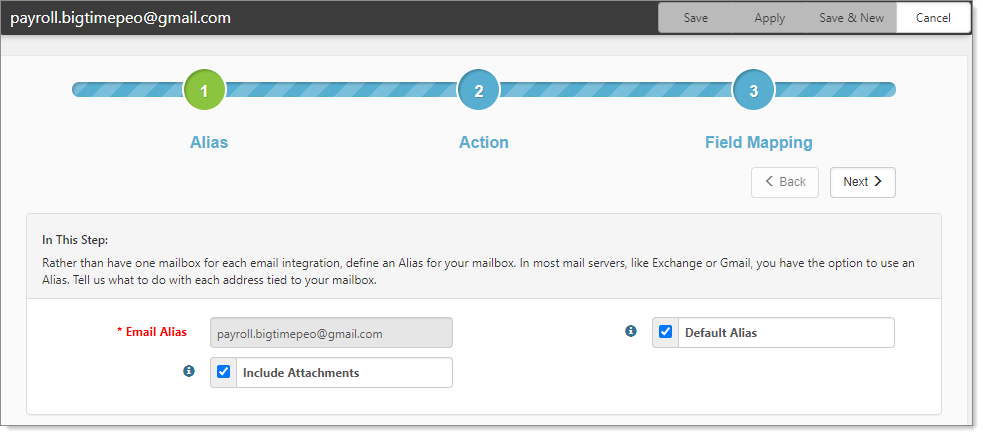
The Alias step opens. An Email Integration record can have multiple aliases on a mailbox. The email address is how it connects to the mailbox. The alias defines what it does with the mailbox. In this step, specify the email address to match an email mailbox, such as payroll.bigtmepeo@gmail.com. You will use this email address in the email template configuration (next topic).
- Select both options: Default Alias and Include Attachments.
- Click Next.
The Action step opens.
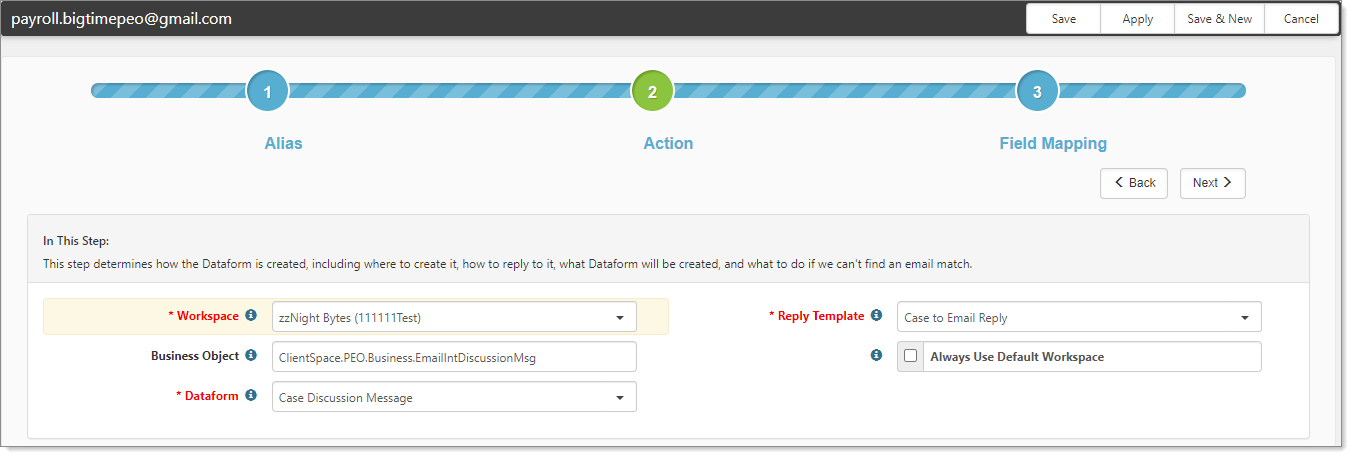
- Complete the form fields.
For Business Object, ensure that you specify ClientSpace.PEO.Business.EmailIntDiscussionMsg.
|
Workspace |
Required. Contains the workspace that will be used by this email alias for the dataform creation if no matches for the sender's address are found. This is the default workspace used during the processing of the email. This value may be overridden by including the workspace in the body of the email. The override value must contain a valid workspace ID and be formatted as WSID=# with no spaces between the WSID= and the workspace ID.
|
|||
|
Reply Template |
Required. Must contain the reply template to be used to send the process complete notification. Select a Reply Template from the list. This can be an existing triggered template, or you can create one just for this reply. See Configuring the Email Integration Reply Template.
|
|||
|
Business Object |
Required when implementing Reply Above This Line functionality. Set the value as ClientSpace.PEO.Business.EmailIntDiscussionMsg.
The ClientSpace.PEO.Business.EmailIntDiscussionMsg business object reads the inbound email and connects it to the appropriate discussion thread. This business object performs the heavy lifting, so it is important it is properly configured.
If Always Use Default Workspace is not selected and the business object is configured, the system checks the body of the email for the CSID / WSID information. If no match is found, the system uses the Email Integration Processing hierarchy to determine which workspace is used when creating the new dataform. |
|||
|
Always Use Default Workspace |
When selected, this option forces the system to use the default workspace set in the Workspace field, regardless of the other methods of workspace selection. |
|||
|
Dataform |
Required. Contains the project type associated with this email alias. This determines what type of dataform to create. Select the Project Type from the list.
|
- Click Save. You do not need to complete the Field Mapping step.
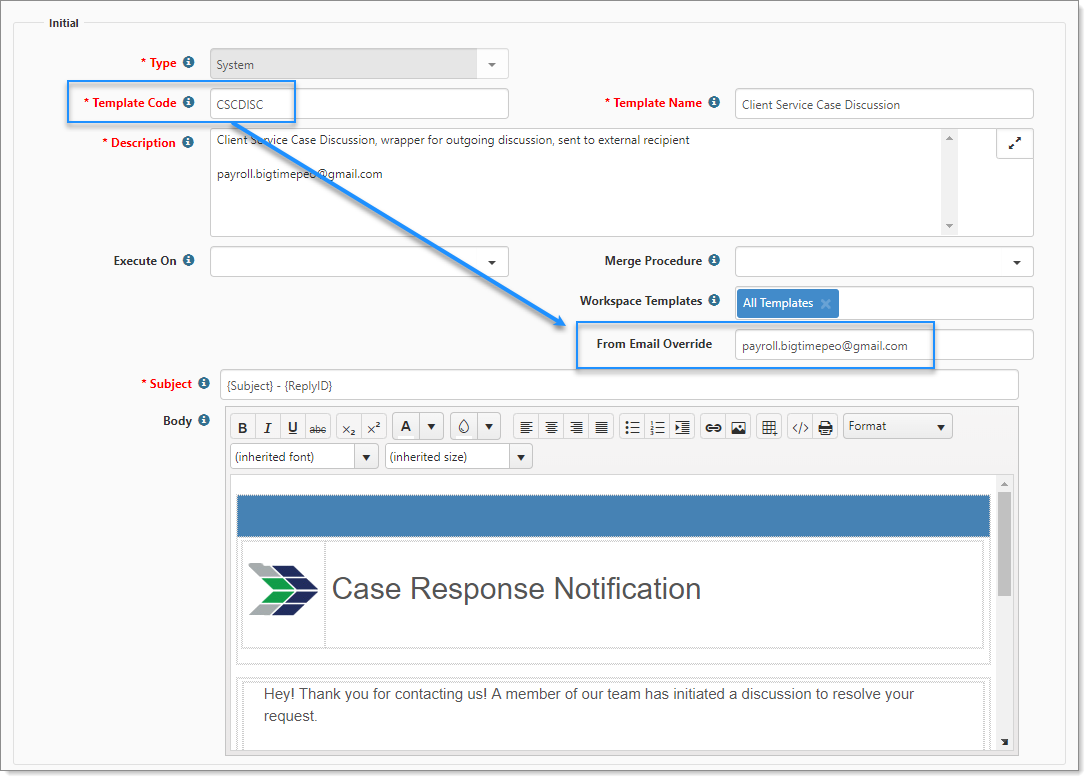
The email templates for case discussions are CSCDISC: Case Discussion, CSCDISCNEW: Case Discussion New, and CSCRPLY: Case Discussion Reply. These templates are already configured for case discussions. However, you need to set a value in CSCDISC and CSCDISCNEW for the From Email Override address, which is the connection to the Email Integration Mailbox (see the accompanying image). The From Email Override address in the email template CSCDISC and CSCDISCNEW must match the Mailbox address that you specified in the Email Integration record. Our example uses payroll.bigtimepeo@gmail.com. In this topic, you will edit From Email Override in the email templates CSCDISC and CSCDISCNEW.
To configure the From Email Override:
- Go to System Admin
 > Email Templates.
The Email Templates dashboard opens. - Locate and open CSCDISC Client Service Case Discussion (click
 (Jump)).
The email template opens. - In From Email Override, enter the email address that you set in the Email Integration record. Our example uses payroll.bigtimepeo@gmail.com.
- Click Save.
- Repeat the procedure for CSCDISCNEW and Save.
The scheduled process for email integration is named Process Email Integration. When the scheduled process runs, it sweeps through the mailbox looking for unread messages, grabs the information such as the From and To address, and the body of the email. It then uses the Email Integration record that is related to the email address, such as payroll.bigtimepeo@gmail.com. It references the Alias and Action parts of the Email Integration record (as shown) and processes accordingly.

For case discussions, it creates a Case Discussion Message. The Business Object logic directs it to look for a ReplyID that already exists and then updates that case discussion.
Note: ReplyID is a hidden text field within the body of the email. It is used to keep replies related to a discussion linked to the original discussion thread and case.
When a user responds, it uses the Reply Template Case to Email Reply.
To review the scheduled process configuration:
- Go to System Admin
 > Advanced > Scheduled Processes.
The Scheduled Processes Admin dashboard opens. - Open Process Email Integration (click
 (Jump)).
The Process Email Integration form opens. - Review the Frequency, Frequency Type, and Valid Days.
Typically, you want this to run every minute, every day of the week.
- For any changes, please log an Extranet case.


