Adding a Quick Case
Use the Quick Case ![]() feature to quickly add a case using a minimum number of required fields.
feature to quickly add a case using a minimum number of required fields.
Once a Quick Case is saved, it displays in the Cases dashboard with the Communication Method field on the Client Service Case record auto-populated as "Quick Case". It also displays in the Client Service Cases widget. You can open an active case to add more information as you receive it.
The Quick Case feature can be accessed from three locations in ClientSpace:
-
The Cases (Cases 2.0) dashboard
-
The Quick Case link in the Workspace Action Center
Note: The Quick Case Workspace Action Center link must be enabled by a global administrator.
-
The Client Services Cases widget on the Workspace landing page
Note: To access Quick Case from any of these locations, a user must be in a role with the biz_ClientServiceCase_QuickCase security entity.
Cases Dashboard or Action Center
To add a Quick Case from the Cases dashboard or the Workspace Action Center:
-
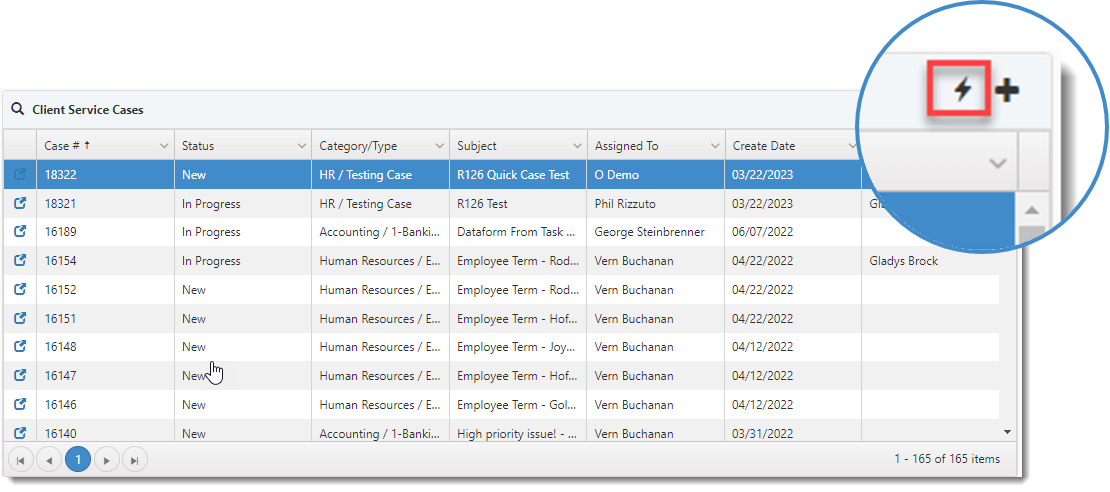
From the Cases Dashboard: In the modules bar, select Cases and click the Quick Case
 button.
OR
From a Workspace landing page: In the Action Center under Links, select the Quick Case link:
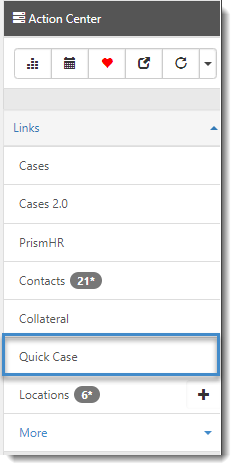
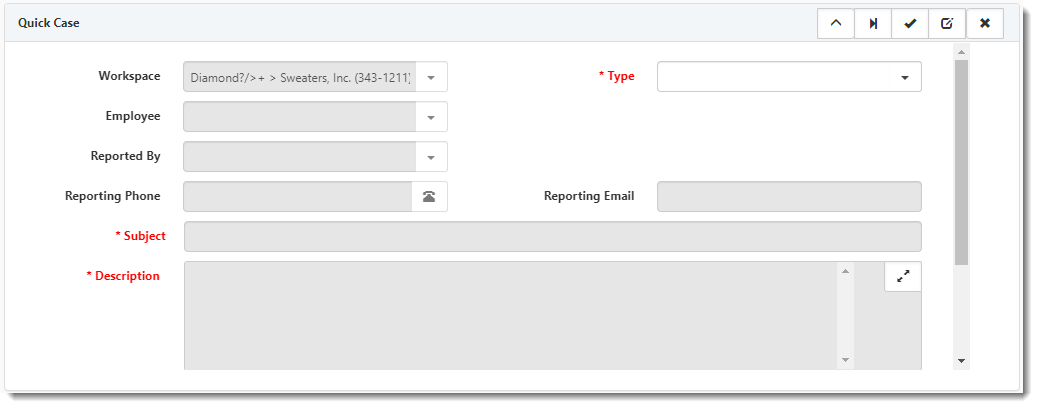
The Quick Case popup window displays.
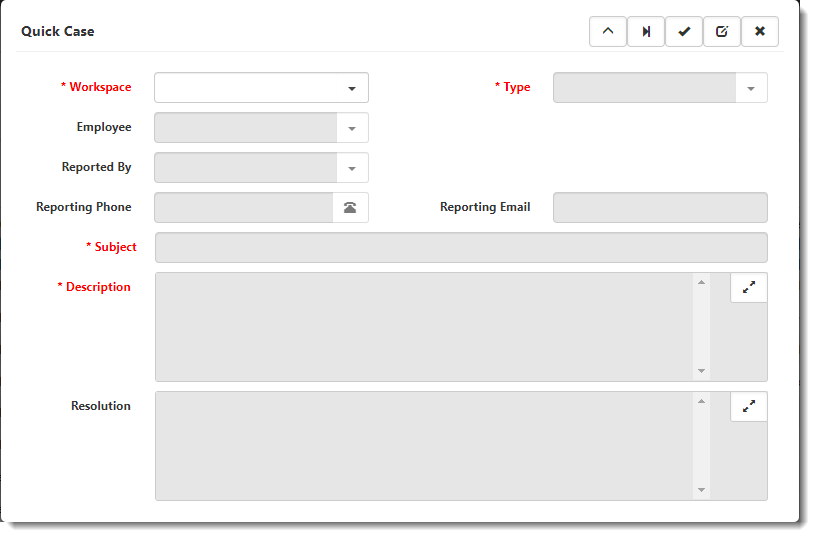
-
Complete the form. Required fields are marked in red.
Workspace
Select an associated workspace. (This field auto-fills with the workspace name when you use the Quick Case link on the Workspace landing page to launch the Quick Case popup window or when you access Quick Case through the Client Service Cases widget.)
Type
Select a Client Service Case type in the Type field. Type is a more specific classification for the case and is a typeahead field. Typeahead fields expedite your selection by allowing you to type the first few letters of a value and filter the list to matching entries before making a selection. Alternatively, you can scroll through the list and select a value without filtering it.
Note:
• Only case types with a check mark in the Expose Case Type to Quick Case field on the Client Service Case Type record display in the list. • If you have set a Short Name on the Client Service Case Category Metadata form for any of your case type categories, you can type the first few letters of the Short Name to filter the selection list and display only case types associated with that category. In the example below, the Banking Issues and Invoice Question case types both have a category of Accounting and the Accounting category has been assigned a Short Name of "Acct". The Short Name is appended to the front of the case type in the Type lookup list and typing "acct" in the Type field filters the selections that begin with the "Acct" short name: 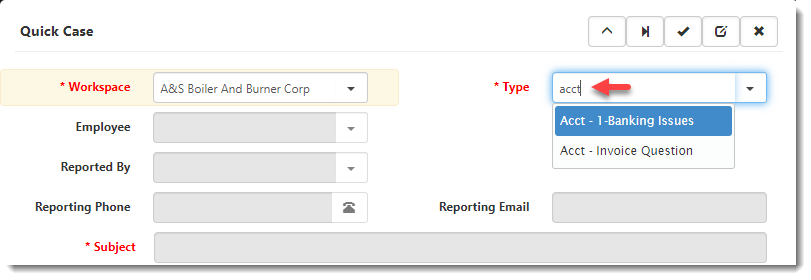
Minutes Spent
This field is displayed only when the Enable Time Tracking checkbox located in the "User Settings" fieldset of the User Profile record is checked and Time Tracking is enabled at the Cases dataform level.
See Adding and Editing User Accounts and Adding Time Tracking Capability to a Dataform.
Employee
If applicable, select the employee related to the case. For example, if you are entering a request related to an employee's onboarding, select the employee being onboarded. Use the typeahead search to enter a few letters of the employee name to filter the list if necessary.
Note:
• Only Active employees display by default. To search for an Inactive employee, begin your typeahead search by typing a tilde (~). • Whether the Employee field is optional or required varies by the case type selection in the Type field. If Require Employee is checked on the Client Service Case Type record for the selected case type, Employee is a required field. Reported By
Optionally, select a "reported by" category:
• Employee - Select an existing employee in ClientSpace. The Reporting Employee, Reporting Phone, and Reporting Email fields display. • Client Contact - Select an existing employee in ClientSpace. The Reporting Contact, Reporting Phone, and Reporting Email fields display. • Contact Information - Select this option if the contact is a new contact that is not yet entered in ClientSpace. The Reporting Name, Reporting Phone, and Reporting Email fields display. Reporting Employee, Reporting Contact, Reporting Name.
This field corresponds to your selection in the Reported By field. Selecting Employee or Client Contact in Reported By auto-fills the Reporting Phone and Reporting Email fields if this information is entered on the employee or contact record in ClientSpace.
Reported Phone
If the Reported By selection is Employee and the employee's work phone number is entered on the employee record OR if the Reported By selection is Client Contact and the contact's phone number is entered on contact record, the phone number auto-fills. Otherwise, enter the phone number of the reporting individual.
Note: The Reported Phone must always be manually entered if the Reported By selection is Contact Information since this selection represents a new contact not yet entered in ClientSpace.
Reported Email
If the Reported By selection is Employee and the employee's work email address is entered on the employee record OR if the Reported By selection is Client Contact and the contact's email address is entered on contact record, the email address auto-fills. Otherwise, enter the email address of the reporting individual.
Note: The Reported Email must always be manually entered if the Reported By selection is Contact Information since this selection represents a new contact not yet entered in ClientSpace.
Subject
If the case type chosen has a default subject associated with it, it will default here. Otherwise, enter a case subject.
Description
If the selected case type (i.e., Type) has a default issue associated with it, it will default here. Otherwise, enter a case issue/description.
Resolution
Enter a case resolution if you are saving the case as a completed case in step 4 below. (Resolution is required to save the case as a completed case.)
-
Select a save, cancel or other option from the Quick Case toolbar as appropriate.
Icon
Tooltip Text
Description

New
Creates and saves a new case containing the Quick Case details and places it in New status.

In Progress
Creates and saves a new case containing the Quick Case details and places it in In Progress status.

Complete Case
Creates and saves a new case containing the Quick Case details and places it in Complete status and sets the case record to Inactive.
Note: A Resolution is required for this option.

Go to full form
Creates and saves a new case containing the Quick Case details, places it in New status, and opens the case in the Client Service Case record form.

Cancel
Aborts Quick Case entry. Closes the Quick Case form without saving.
-
If you selected a "save" option, select Yes on the confirmation message to proceed with saving your work. If you selected Cancel, select Yes on the confirmation message to exit without saving.
Upon saving, the following occurs:
-
Your new Client Service Case is added and is accessible from the Cases dashboard and the Client Workspace.
-
The Communication Method field of the Client Service Case record is automatically set to "Quick Case".
-
Applicable Client Service Case business logic rules are honored and applied. (Hard and soft errors related to Client Service Cases are not currently honored.) For instance, if there are case type business rules set to apply a default case priority or a due date offset, those business rules are applied to any Client Service Case record created using the Quick Case dataform.
If you are adding a case in Complete status, to see the case, you may need to edit your Cases dashboard or Client Service Cases widget filter settings to display Inactive cases if Inactive cases are hidden.
Client Service Cases Widget
To add a Quick Case from the Client Service Cases Widget:
-
On a Workspace landing page, in the Client Service Cases widget header, click the Add Quick Case
 icon.
icon.
The Quick Case modal window displays in the Client Service Cases widget frame. The Workspace field is auto-filled with the current workspace name. Scroll bar(s) may be visible if all Quick Case fields cannot be displayed in the Client Service Cases widget frame dimensions.
-
Complete the form. Required fields are marked in red. Refer to the table in step three of the preceding section for field definitions.
-
Select a save (or cancel) option from the Quick Case toolbar as appropriate. Refer to the table in step four of the preceding section for Save and Cancel option definitions.
-
Click the Quick Case
button. -
If you selected a "save" option, select Yes on the confirmation message to proceed with saving your work. If you selected Cancel, select Yes on the confirmation message to exit without saving.
Upon saving, the following occurs:
• If you set an initial case disposition of New, In Progress, or Complete OR you selected Cancel , the Client Service Cases widget refreshes to display the original view of Client Service Cases. • If you selected Go To Full form , the Client Service Case opens in a separate window. Note that clicking the workspace name in the Work Center menu area to view the Client Service Case widget again displays the original view of Client Service Cases. • Your new Client Service Case is added and is accessible from the Cases dashboard and the Client Workspace. • The Communication Method field of the Client Service Case record is automatically set to "Quick Case". • Applicable Client Service Case business logic rules are honored and applied. (Hard and soft errors related to Client Service Cases are not currently honored.) For instance, if there are case type business rules set to apply a default case priority or a due date offset, those business rules are applied to any Client Service Case record created using the Quick Case dataform. If you are adding a case in Complete status, to see the case, you may need to edit your Cases dashboard or Client Service Cases widget filter settings to display Inactive cases if Inactive cases are hidden.