Configuring the Benefits Plan Prism Coverage Levels Fieldset
On the Benefits Plan dataform, there is a Prism Coverage Levels fieldset. This fieldset allows you to add coverage level names and indicate which coverage levels display (i.e., set field display rules) on the Benefit Plan Manager (BPM) Group Summary and Plan Comparison grids. You can add up to five (5) coverage levels.
By default, if you do not add any coverage level names or set any field display rules, the following coverage levels display for all plans:
-
Employee Only
-
Employee + Spouse
-
Employee + Child(ren)
-
Employee + Family
-
Domestic Partner
Accessing a Benefits Plan
You can access a benefits plan from the Admin workspace or a client workspace.
To access the Admin Workspace (for a Master Benefits Plan):
Access the Admin Workspace to affect coverage level names and field displays of a Master Benefits Plan.
There is more than one way to access the Admin Workspace:
-
From the modules bar, click
 Workspaces.
The Workspace Search dashboard opens.
-
Type %Admin in the search box to filter the list of workspaces and locate Admin Workspace.
OR
-
On the modules bar, on the right side, click <username> > Modules.
The Modules Search dashboard opens. The Admin Workspace is listed at the top of the dashboard.
Then, double-click the workspace row in the grid or click ![]() (Open) next to the workspace name.
(Open) next to the workspace name.
To access a client workspace (for a Client-Sponsored Benefits Plan):
Open a client workspace to affect coverage level names and field displays of a client-sponsored Benefits Plan.
-
From the modules bar, click
Workspaces.The Workspace Search dashboard opens.
-
Type the % and then a few letters in the workspace name in the search box to filter the list of workspaces and locate it.
To locate and open the Benefits Plan in the client or Admin workspace:
-
Once you are in the client workspace or Admin workspace, scroll to the administrative tiles where you see the dataform categories.
-
Type "Benefits" in the dataform search box to display a list of available forms related to benefits and click the Benefits Plan tile to display the Benefits Plan dashboard.

-
Click
 (Open) next to a Benefits Plan to open it
Update Prism Coverage Levels Fieldset Details
To update the Prism Coverage Levels fieldset:
-
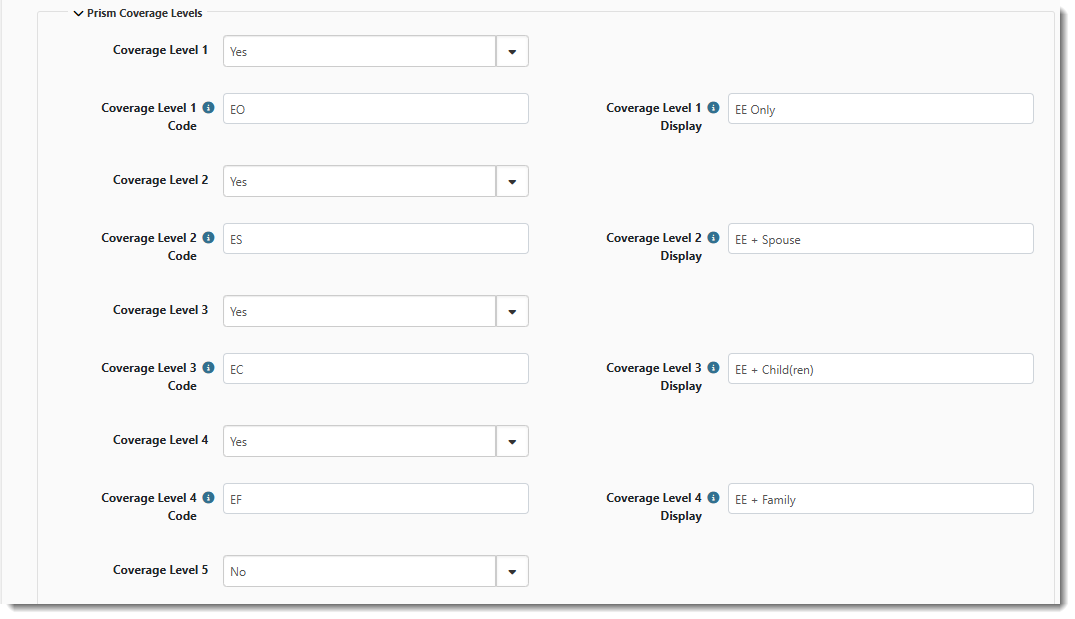
Once you have the Benefit Plan open in the Admin workspace or client workspace, scroll to the Prism Coverage Levels and specify the following:
-
Coverage Level (2 - 5): This is the field display setting. Click the down arrow in the fields and select Yes to display the coverage level tier or No to hide the coverage level tier.
Note: There is no Coverage Level 1 field here because the system minimally expects a Coverage Level 1 for every plan. Therefore, it is always displayed and it cannot be hidden. However, a Coverage Level 1 Code field is provided so that you can set the PrismHR code value as explained in the next bullet.
-
Coverage Level Code (1 -5): This is the PrismHR code value for the level. These fields map the Prism coverage level to the coverage level names defined in the Coverage Level (1 - 5) fields referenced in the bullet below. The code values must match the PrismHR codes. The codes are typically EO, ES, EC, EF, and EK but may vary by plan.
-
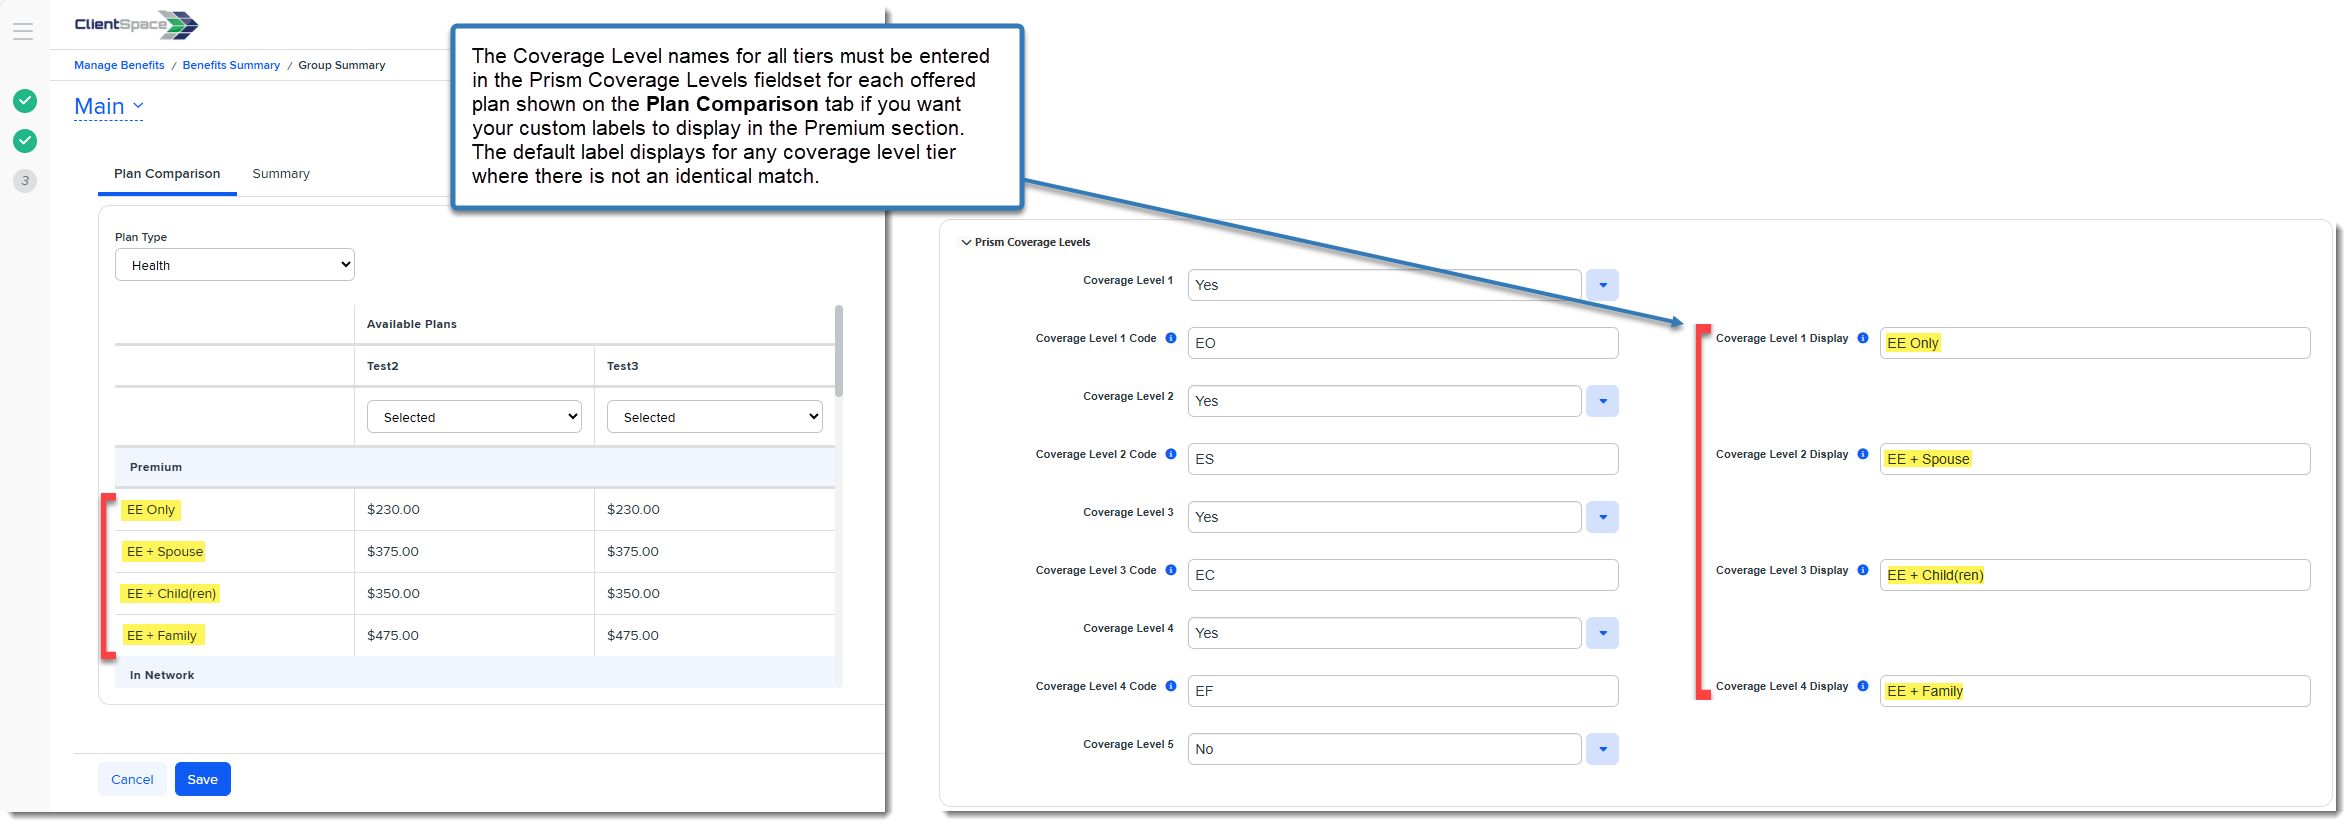
Coverage Level Display (1 - 5): This is the name of the coverage level tier that displays in BPM.
When you are finished updating the Prism Coverage Levels fields, the section should appear similar to the following. Remember to set the Coverage Level (1 - 5) field to No for any unused tier you want to hide.
Note:
-
On the Plan Comparison tab, a default label displays for a coverage tier if the coverage tier label is not entered identically for all offered plans on the Benefits Plan record. For instance, if Coverage Level 3 Display is set to EE + Child for one of the offered plans and set to EE + Children for another offered plan, the default coverage level label of Employee + Child(ren) displays.
-
In the Contribution Method grid, if any Coverage Level setting on the Benefits Plan record is set to "No" to prevent the coverage level from displaying, dashes display in place of values for the contribution details.
-
-
Click Apply or Save to commit the changes.
Hiding Coverage Levels
When you hide a coverage level on a Benefits Plan, the fields related to the hidden coverage level are also hidden in BPM as well as on the associated Offered Benefits Plans.
To hide a coverage level:
-
Once you have the Benefit Plan open in the Admin workspace or client workspace, scroll to the Prism Coverage Levels.
-
Set one or more Coverage Level (1 - 5) fields to No to hide the coverage level tier(s) and click Save.
ClientSpace searches for a corresponding Benefit Plan Premium and Rate Group Premium(s) and proceeds as follows:
-
If none are found, the Coverage Level field on the Benefits Plan becomes disabled and the associated fields on the related OBPs can be cleared and/or disabled. This includes:
-
The OBP widget (once you click Reload
 in the Action Center).
 -
The related OBP Premium field in the Total Client Premium fieldset.
-
The related Contribution field in the Employer Contributions fieldset.
-
-
If corresponding Benefit Plan Premium and Rate Group Premium(s) are found, a soft error message similar to the following displays. It lists the fields that must be cleared before the Coverage Level field can be hidden:
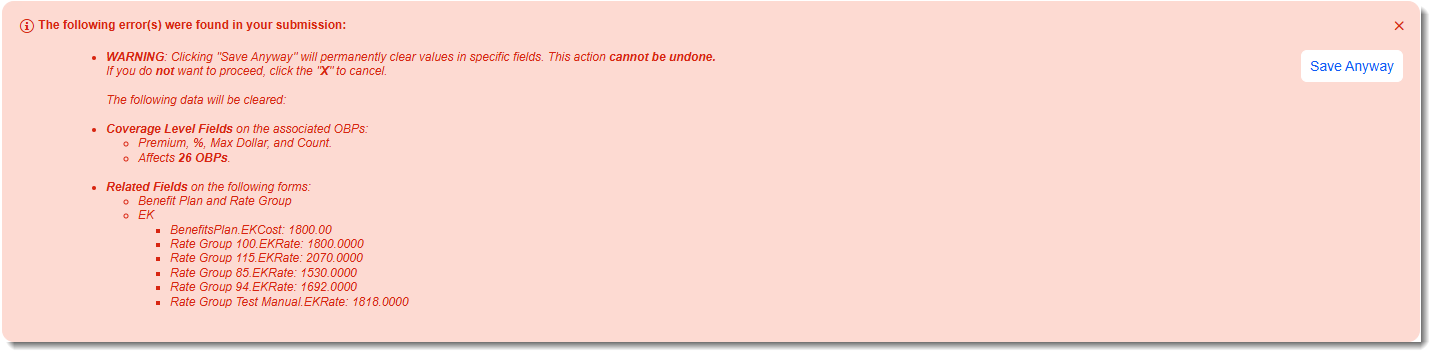
The message list all related fields that will be cleared if you click Save Anyway, including the affected Coverage Level fields and related fields on other forms. The message also lists the number of affected OBPs.
You have the option of clicking X in the upper right corner of the message to Cancel and manually review and clear these fields. You can return to the Benefit Plan record and attempt to hide the Coverage Level on the Benefit Plan record again after making the changes. However, keep in mind that these changes can be extensive depending on how many OBPs are impacted.
If you click Save Anyway, ClientSpace will clear the listed Benefit Plan Premium and Rate Group Premium fields for you and then proceed to clear and hide all of the associated fields on the related OBPs.
-