OSHA 301 Report Details
The OSHA 301 Injury and Illness Incident Report is a U.S. Department of Labor - Occupational Safety and Health Administration report that you are required to complete within 7 days of a work-related injury or illness being reported. It is submitted with the OSHA 300 Log of Work-Related Injuries and Illnesses Report and OSHA 300A Summary Report.
This topic details how to run the OSHA 301 report and provides field mapping details of where the report data comes from in ClientSpace.
Running the Report
Note: As of Jan. 1, 2024, OSHA requires report submission through their Information Technology Application (ITA) portal. You can generate a merge report from ClientSpace for ITA portal submission. ITA requires a .CSV file format. The merge generates a combined OSHA 300/301 report in .xslx format. You can save the Excel file in the required .csv format prior to submission. To generate an OSHA 300/301 report for ITA submission, refer to the Generating an OSHA 300/301 ITA Export File section of this article.
To run the report:
-
On the modules bar, select WC Claims.
The WC Claims dashboard displays.
- In the Action Center, under Reports, click OSHA 301.
- The OSHA 301 generates as a PDF in your Windows Downloads folder.
- Open the report and ensure that all fields are completed satisfactorily.
- If there are missing or incorrect fields and you are not sure of the location of the data in ClientSpace, refer to the Column Mappings section below, enter the correct information and run the report again.
Column Mappings
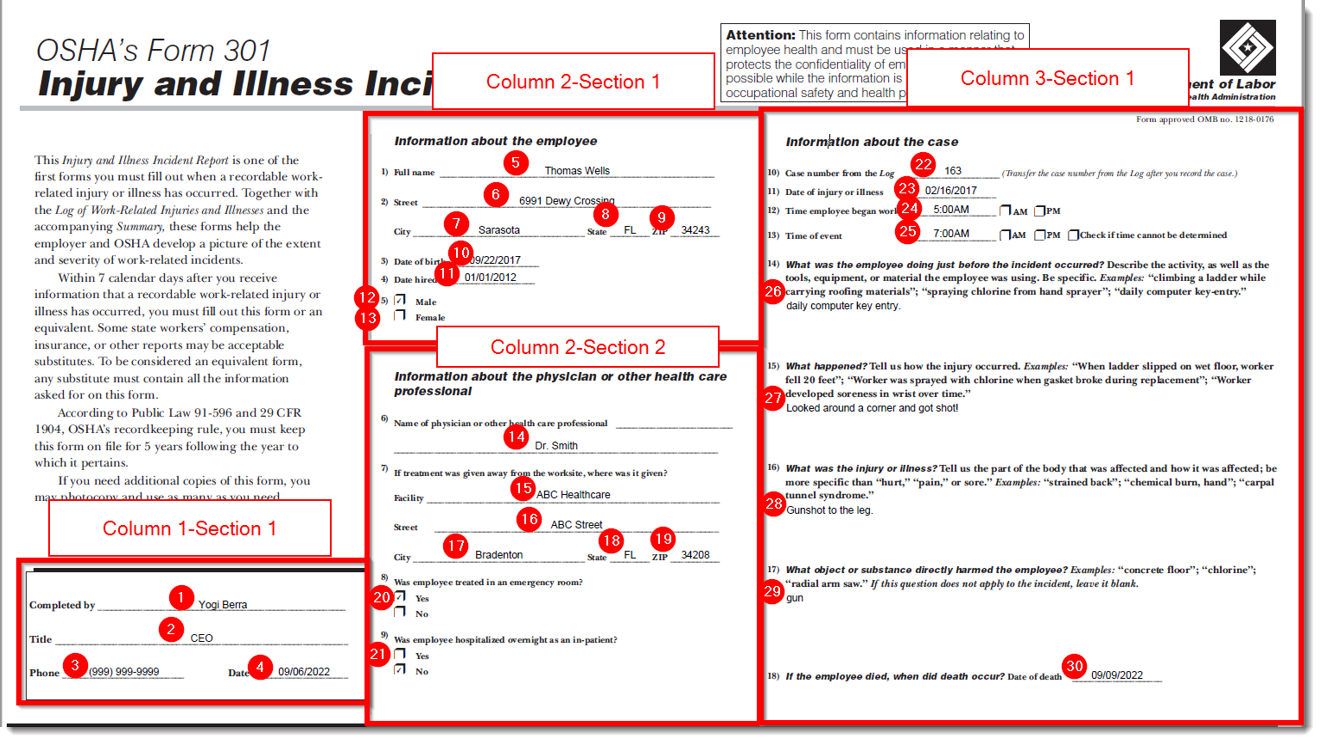
Review the image and table below for OSHA 301 field mapping details. Match the item number shown on the image to the item number in the table.
Note: Wherever there is ![]() (Open) link on the Comp Claim form that allows you to jump from the Comp Claim to a mapped field residing on a different form, we display the "jump" navigation method in the ClientSpace Field Location column of the table below. As the OSHA 301 report is generated from the Comp Claim, we assume in this topic that the Comp Claim is your starting point when navigating to the mapped fields in ClientSpace.
(Open) link on the Comp Claim form that allows you to jump from the Comp Claim to a mapped field residing on a different form, we display the "jump" navigation method in the ClientSpace Field Location column of the table below. As the OSHA 301 report is generated from the Comp Claim, we assume in this topic that the Comp Claim is your starting point when navigating to the mapped fields in ClientSpace.

|
Item # |
OSHA 301 Field |
ClientSpace Field |
ClientSpace Field Location |
|---|---|---|---|
| Column 1 - Section 1 | |||
| 1 | Completed By |
Claim Specialist |
WC Claims > Comp Claim form > Home tab > Claim Details section.
Note:Although Claim Specialist displays on the Comp Claim form as a selection, the value is located in the Users table here: System Admin |
| 2 | Title |
Title |
System Admin |
| 3 | Phone |
Phone |
System Admin |
| 4 | Date |
N/A |
Uses current system date. |
| Column 2 - Section 1: Information about the employee | |||
| 5 | Full Name |
First Name and Last Name |
WC Claims > Comp Claim form > Home tab > Claim Details section > Click |
| 6 | Street |
Address1 and Address2 |
WC Claims > Comp Claim form > Home tab > Claim Details section > Click |
| 7 | City |
City |
WC Claims > Comp Claim form > Home tab > Claim Details section > Click |
| 8 | State |
State |
WC Claims > Comp Claim form > Home tab > Claim Details section > Click |
| 9 | ZIP |
Zip Code |
Employees > Employee form > Home tab > Contact Information section. |
| 10 | Date of birth |
DOB |
Employees > Employee form > Home tab > Employee Detail section. |
| 11 | Date hired |
Last Hire Date |
Employees > Employee form > Home tab > Employee Info link under Action Center > Employment form > Employment Information section. |
| 12 | Male |
Gender |
WC Claims > Comp Claim form > Home tab > Claim Details section > Click |
| 13 | Female |
Gender |
WC Claims > Comp Claim form > Home tab > Claim Details section > Click |
|
Column 2 - Section 2: Information about the physician or other health care professional |
|||
|
14 |
Name of physician or other health care professional |
Physician |
WC Claims > Comp Claim form > Home tab >Treatment link under Action Center > Comp Claim Treatment form > Treatment Information section. |
|
15 |
Facility |
Provider |
WC Claims > Comp Claim form > Home tab >Treatment link under Action Center > Comp Claim Treatment form > Treatment Information section. |
|
15 |
Street |
Address1 and Address2 |
WC Claims > Comp Claim form > Home tab >Treatment link under Action Center > Comp Claim Treatment form > Treatment Information section > Click |
|
17 |
City |
City |
WC Claims > Comp Claim form > Home tab >Treatment link under Action Center > Comp Claim Treatment form > Treatment Information section > Click |
|
18 |
State |
State |
WC Claims > Comp Claim form > Home tab >Treatment link under Action Center > Comp Claim Treatment form > Treatment Information section > Click |
|
19 |
Zip |
ZIP Code |
WC Claims > Comp Claim form > Home tab >Treatment link under Action Center > Comp Claim Treatment form > Treatment Information section > Click |
|
20 |
Was employee treated in emergency room? |
Treated in Emergency Room |
WC Claims > Comp Claim form > Comp Claim Injurytab > Injury Details section. |
|
21 |
Was employee hospitalized overnight as an in-patient? |
Hospitalized Overnight |
WC Claims > Comp Claim form > Comp Claim Injurytab > Injury Details section. |
|
Column 3 - Section 1: Information about the case |
|||
|
22 |
Case number from the Log |
ClientSpace Claim ID |
WC Claims > Comp Claim form > Home tab > Claim Details section. |
|
23 |
Date of injury or illness |
Date of Injury |
WC Claims > Comp Claim form > Home tab > Claim Details section. |
|
24 |
Time employee began work |
Start of work (DOI) |
WC Claims > Comp Claim form > Home tab > Claim Details section. |
|
25 |
Time of event |
Time of Injury |
WC Claims > Comp Claim form > Home tab > Claim Details section. |
|
26 |
What was the employee doing just before the incident occurred? |
Pre-Injury Activity |
WC Claims > Comp Claim form > Comp Claim Injurytab > Injury Details section. |
|
27 |
What happened? |
Accident Details |
WC Claims > Comp Claim form > Comp Claim Injurytab > Injury Details section. |
|
28 |
What was the injury or illness? |
Describe Injury or Illness |
WC Claims > Comp Claim form > Comp Claim Injurytab > Injury Details section. |
|
29 |
What object or substance directly harmed the employee? |
Cause of Injury Detail |
WC Claims > Comp Claim form > Comp Claim Injurytab > Injury Details section. |
|
30 |
If the employee died, when did death occur? Date of death |
Date of Death |
WC Claims > Comp Claim form > Home tab > Click Show Details in Claim Details section to view Date of Death in Additional Claim Information section. |
Generating an OSHA 300/301 ITA Export File
An Excel Merge named OSHA_ITA_300_301_EXPORT_2024 (System Admin![]() > Outputs > Merges) is used to generate a combined OSHA 300/301 report in the required format for OSHA ITA portal submission. You can manually generate the report from the Client Master record of the desired workspace using the steps outlined in this section.
> Outputs > Merges) is used to generate a combined OSHA 300/301 report in the required format for OSHA ITA portal submission. You can manually generate the report from the Client Master record of the desired workspace using the steps outlined in this section.
Note: When the yearly scheduled process Generate OSHA Forms runs the merge, the merge file is added as file attachment to the OSHA Forms dataform OSHA 300/301 ITA field. When you manually run the report, the file is deposited in your Windows Downloads folder.
To generate an OSHA 300/301 ITA Export File:
-
On the modules bar, select Clients, locate the desired Client Master record on the Client Master dashboard and then open it (or from a workspace landing page, click
 (Open) at the top of the Client Info widget.)
 -
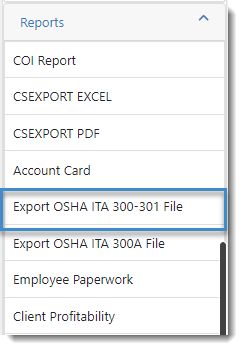
In the Action Center, under Reports, click Export OSHA ITA 300-301 File.

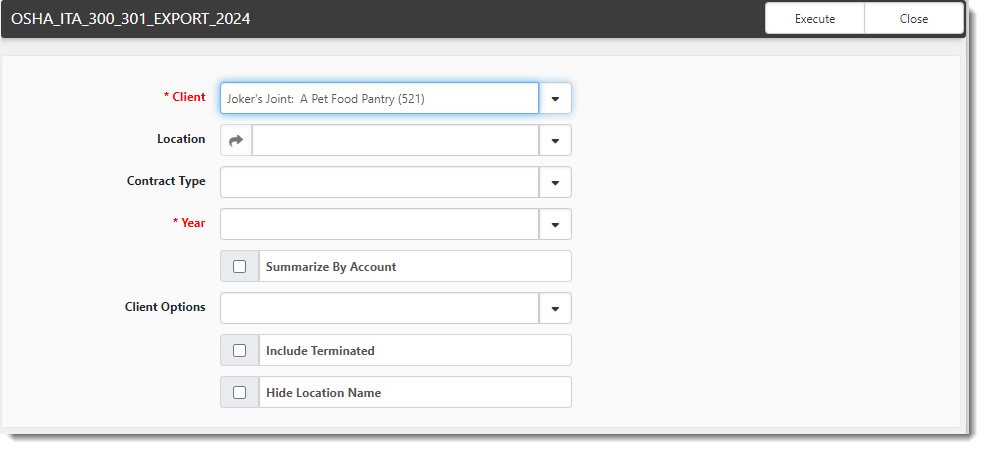
The OSHA_ITA_300_301_EXPORT_2024 form opens.
-
Complete the form:
Client
This runs the export for the selected Workspace.
Location
Location provides a list of Active Locations in the Workspace.
Contract Type
Contract Type is a filter used to run the report for selected contract type. This setting was used with the orginal version of the OSHA 300 report where you can run the report from the Admin Workspace for multiple clients at once. This does not apply for the combined OSHA 300/301 merge export as you can only run the report for a specific workstation from the Client Master file of that workstation. You cannot run the report across multiple clients.
Year
This required field filters for Claims logged in the selected calendar year.
Summarize By Account
When this option is selected, all available claims for the OSHA year selected display under the Primary location for that client.
Client Options
This filter option is a carryover from the orginal version of the OSHA 300 report where you can run the report from the Admin Workspace for multiple clients at once and specify whether you want to include clients with claims, without claims or clients with and without claims (i.e., all clients). This does not apply for the combined OSHA 300/301 merge export as you can only run the report for a specific workstation from the Client Master file of that workstation. You cannot run the report across multiple clients.
Include Terminated Clients
This filter option is a carryover from thorginal version of the OSHA 300 report where you can run the report from the Admin Workspace for multiple clients at once and specify whether you want to include claims from clients across workspaces that have been terminated in the OSHA year selected. This does not apply for the combined OSHA 300/301 merge export as you can only run the report for a specific workstation from the Client Master file of that workstation. You cannot run the report across multiple clients.
Hide Location Name
If the Hide Location Name field is checked, only the Organization Name is used in the Establishment Name. The location is excluded.
-
Click Execute.
-
Retrieve the file from your Windows Downloads folder.
-
Save the file as a .CSV file prior to submitting through the ITA portal.
