Creating Pricing
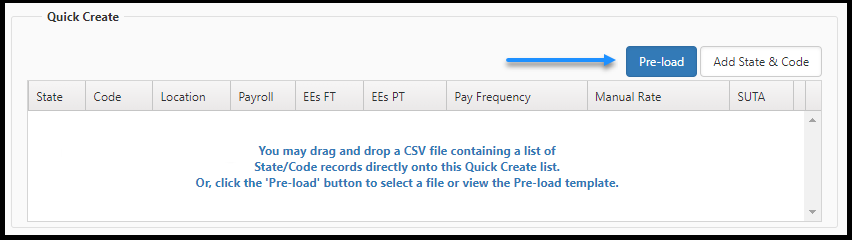
ClientSpace pricing is created using Add State & Code or dragging the pricing file onto the Pricing Console.
-
Add State & Code allows you to add one entry at a time. ClientSpace generates new pricing behind the scenes for you automatically.
-
Dragging or uploading the pricing data file allows you to perform bulk updates and then merge the data.
Using Add State & Code
With the Add State & Code approach, you can add individual states and codes, one at a time.
When you add a state in the States and Codes area, the system will do one of two functions. If the Legal Entity field on the related Client Master is empty, the system will check the Contract Type of the Pricing Batch and default the legal entity based on the Contract Type metadata (System Admin > Lookups > Contract Type). This can lead to a multitude of options for the selection of the state legal entity. The second option will only occur if the Legal Entity field is filled in on the Client Master. If filled in, the system defaults the legal entity setting for the states to the legal entity used on the Client Master when the user saves the new state. Changes to the legal entity on the Client Master can affect existing states.
If a user changes the legal entity on the Client Master and saves the change, the system prompts the user with the following message:

If the user selects Save Anyway, the system updates the legal entity for all existing pricing states.
Note: When selecting a legal entity on the Client Master to use as the default, you should be sure to select a legal entity that has valid state legal entity records for all pricing states. Otherwise, the system will display an error that indicates that state-specific defaults could not be found. The Client Master legal entity default overrides the default process handled by the Contract Type.
If a pricing console is created by using the quick create Add State & Code approach and multiple codes are added to a single state, the system will create a single Pricing Batch State (PBS) record and the Pricing Comp Code (PCC) records will share the same PBS record. If a user edits an existing batch and adds more PCC records by uploading from a file to the pricing batch, the system checks the existing PBS records. If a PBS record already exists, the system associates the PCC record with the existing PBS record. If a PBS record does not already exist, the system associates the PCC record with a new PBS record.
Note: When adding a State & Code and generating pricing, the system defaults the manual rate to 0.0000 on the pricing comp code for the affected state if the contract type does not offer Workers' Comp and the Comp Model is N/A.
To add individual states and codes:
-
From the Pricing Console, in the States and Codes area, click Add State & Code.
The Quick Edit dialog box opens.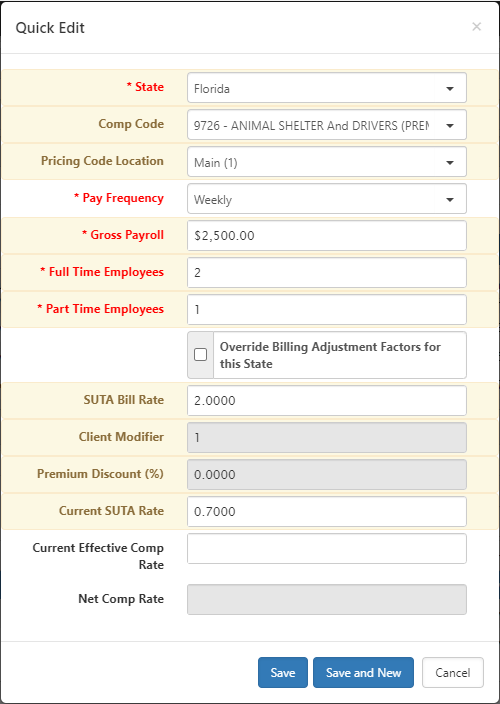
-
Complete the fields and click Save. To add multiple entries, click Save and New.
ClientSpace generates pricing behind the scenes and then displays the new entries in the Quick Create grid.Quick Edit Fields Field Description State
Select a state for pricing. After selecting a state, the system populates the following fields in the Quick Edit dialog box with the values set on the state:
-
Override Billing Adjustment Factors for this State
-
SUTA Bill Rate
-
Client Modifier
-
Premium Discount (%)
-
Current SUTA Rate
Comp Code
Select a master comp code. Pricing Code Location
Select a pricing code location from the supplied list of active locations for this workspace. If a client location is inactive, the system excludes the location from the drop-down list.
Note: The Pricing Code Location field is inactive by default. The field only displays if active on the Pricing Comp Code form. If the Pricing Code Location field is active, you must select a value in the Comp Code field before you can select a value in the Pricing Code Location field. You can edit a location by selecting the location in the States and Codes area of the Pricing Console.
Pay Frequency
Select a pay frequency. Gross Payroll
Enter a dollar amount to indicate the gross payroll for the indicated pay frequency. Full Time Employees
Enter the number of full time employees. Part Time Employees Enter the number of part time employees. Override Billing Adjustment Factors for this State
Select this check box to override the billing adjustment factors for the state indicted in the State field.
Note: If this check box is selected, you can enter or edit a rate in the Client Modifier field and a percentage in the Premium Discount (%) field.
SUTA Bill Rate
The system populates this field with the State Unemployment Tax Act (SUTA) bill rate for the state indicated in the State field.
You can enter a number to change the SUTA bill rate for the state.
Note:
-
The biz_EditSUTA_After_Submit security entity allows the user to edit the value in the SUTA Bill Rate field until Pricing is Locked. Once Pricing is Locked, the system does not allow a user to edit the SUTA Bill Rate. When a user edits the value in the SUTA Bill Rate field, the system triggers the Validate SUTA Discount rule. This rule validates that the new rate is within the discount threshold of the user editing the rate.
-
Optionally, activate the UpdateSUTARateForCRS business rule in System Admin
 > Advanced > Manage Business Rules to set the SUTA Billing Rate field using the SUTA Billing Rate field value from the State Legal Entity record. The rule uses the Pricing State in combination with the related Legal Entity and Contract Type to determine which State Legal Entity record to use. The rule is triggered when the SUTA - Client Report State checkbox on the State Master record is checked and the value in the SUTA Billing Rate field on the Pricing State record is cleared or the value in the Legal Entity field on the Pricing State record is changed.
Client Modifier
The system populates this field with the client modifier value for the state indicated in the State field.
Note: This field is available to edit if the Override Billing Adjustment Factors for this State check box is selected.
You can enter a number to change the client modifier factor for the state.
Premium Discount (%)
The system populates this field with the premium discount percentage value for the state indicated in the State field.
Note: This field is available to edit if the Override Billing Adjustment Factors for this State check box is selected.
You can enter a number to change the premium discount percentage for the state.
Current SUTA Rate
The system populates this field with the current State Unemployment Tax Act (SUTA) rate for the state indicated in the State field.
You can enter a number to change the current SUTA rate for the state.
Current Effective Comp Rate
Enter a number to enter the current effective comp rate. Net Comp Rate
This field indicates the net comp rate. Note: Users can add multiple versions of the same State/Code combination both before and after pricing is generated.
-
Editing a Location from the Pricing Console
To edit a location from the Pricing Console:
Note: The Location field must be active in the Pricing Comp Code form for the Location field to be available in the pricing grid. The Location field is inactive by default.
-
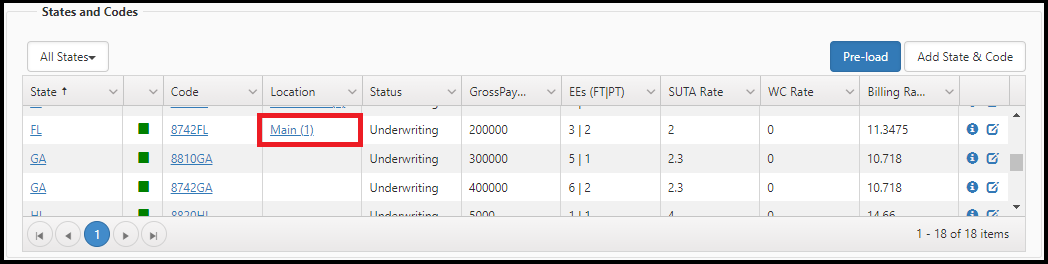
From the Pricing Console, in the States and Codes area, review the Location column.
-
Click the pricing code location name in the Location column.
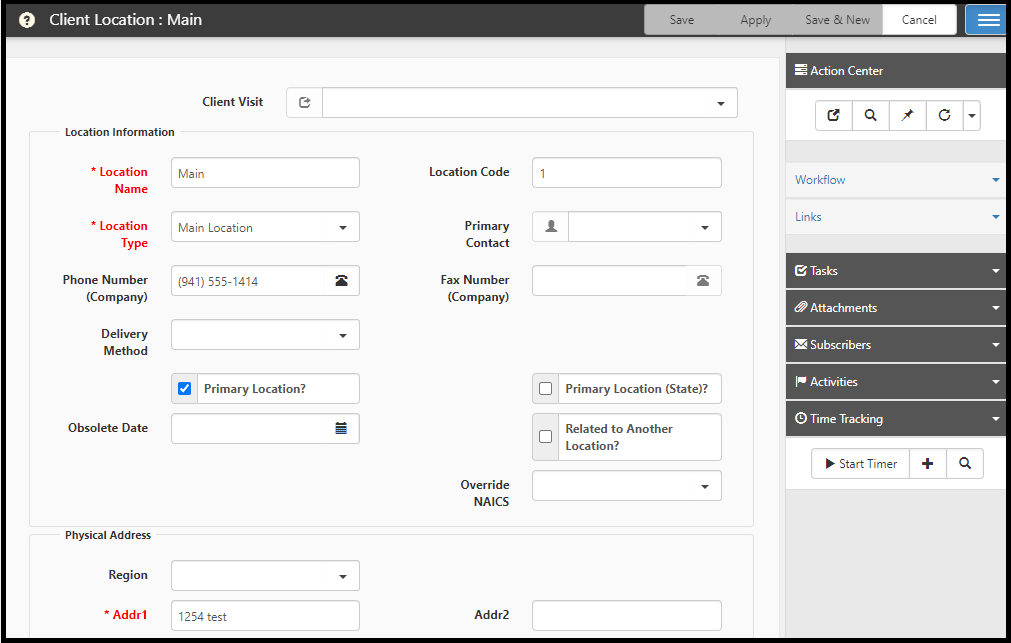
The Client Location page displays.
-
Complete the fields and click Save.
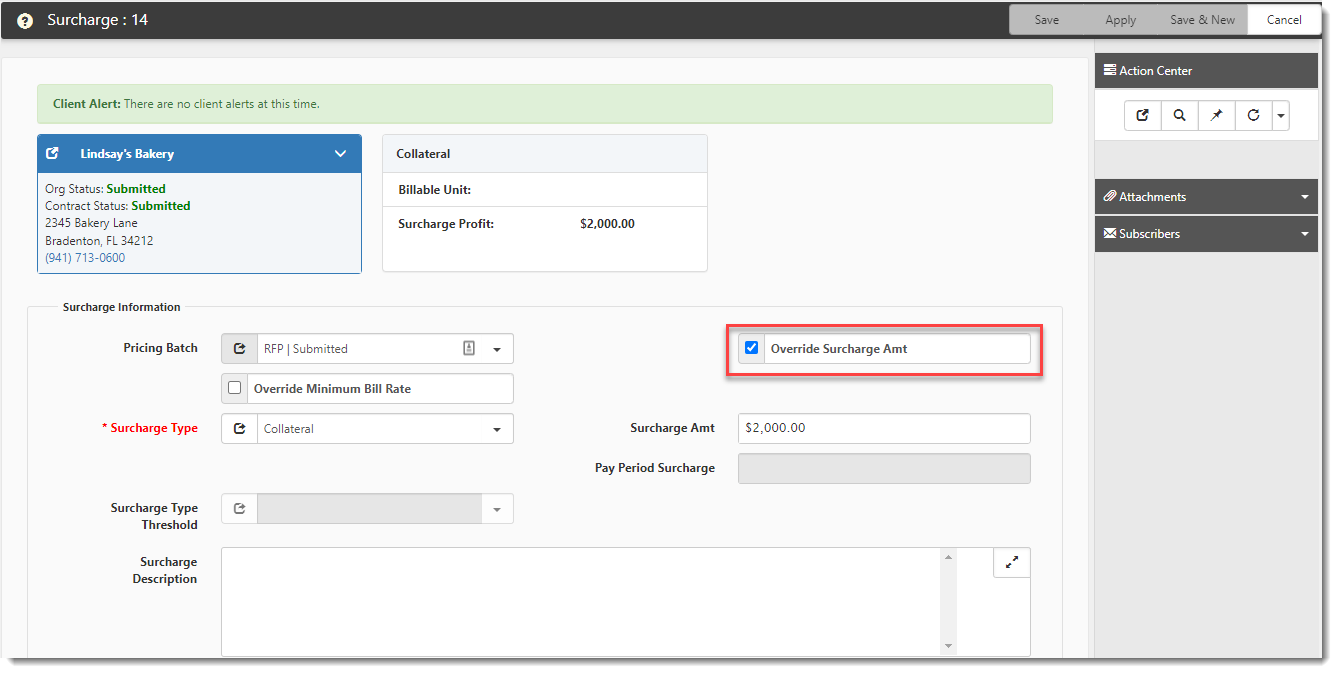
Editing Surcharges After Pricing is Submitted
Users with appropriate access permissions can edit pricing fields on the Surcharges form before and after pricing has been submitted. Editing pricing fields on a surcharge record requires a user to have appropriate rights to access and edit the Surcharges form provided by the gen_Surcharges entity. If individual pricing fields are secured on the form, a user may require rights to access and edit those fields as well. For more information on surcharge "Edit" security, please refer to the Security Related to Editing Surcharges and Individual Pricing Fields section of Configuring Pricing Console Security in ClientSpace PEO
To edit a surcharge record from the Pricing Console after pricing is submitted:
-
From the Pricing Console, in the Surcharges area, select a surcharge record and click Edit OR click
 (Open) next to a surcharge in the grid.
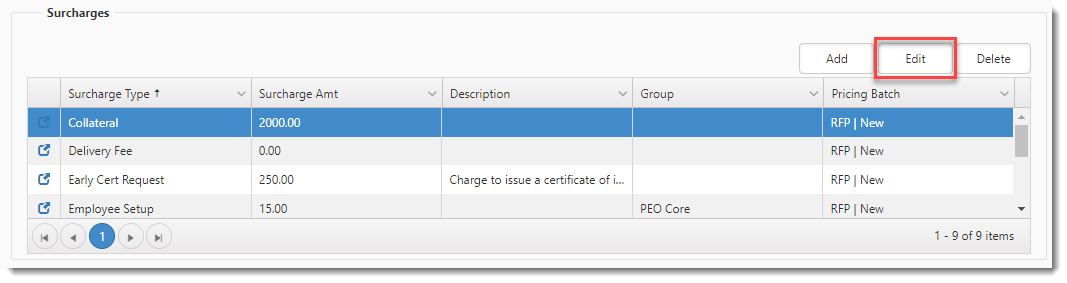
The Surcharges window opens. -
Edit the desired fields. (Click the Override Surcharge Amt checkbox to edit Surcharge Amt.)
-
Click Save.
Using the Bulk Approach
Creating pricing in ClientSpace is just a drag and drop away. Instead of manually entering your pricing data, you can drag a preformatted CSV file containing the pricing information onto the pricing console and let ClientSpace do the work for you.
The bulk approach involves editing a preformatted file (quick_create_preload_template.csv) to reflect States, Codes, Pay Frequency, Wages, and Employee counts. The file is available in the Help system (Quick Create Template) and through the Pricing Console. Next, you upload the edited file and then generate pricing. Additionally, when changes occur, you can edit the data and upload the file again. See Re-uploading pricing data.
Step 1: Edit the preformatted file
If your administrator has not edited the pricing file, you can download the CSV file to complete it. If you already have an edited file, go to Step 2: Drag or upload the edited file.
To download and edit the preformatted file:
-
From the modules bar, click
 Pricing.
The Pricing dashboard opens. -
Select a workspace and click
(Open).
The pricing console opens. -
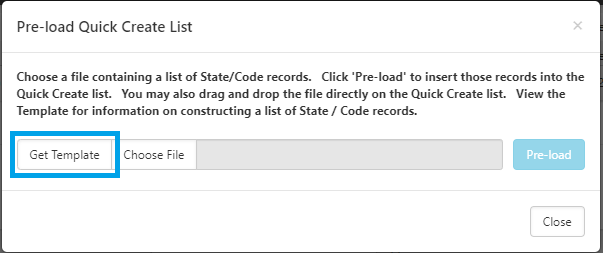
In Quick Create, click Pre-load.
The Pre-load Quick Create List dialog box opens. -
Click Get Template.
The template file downloads. -
Open the template file and edit. Add as many entries as required that contain the following data:
-
State
-
Code
-
PayFrequency
-
GrossPayroll
-
FullTimeEmployees
-
PartTimeEmployees
-
SUTA
-
CurrentEffectiveCompRate
-
PricingLocationCode

-
- Save the file.
If the Get Template option is not available, your administrator must upload the template file on the Admin Workspace PEO Configuration page in the Quick Create Pre-load Template field. For help with this, create an Extranet case.
Step 2: Drag or upload the edited file
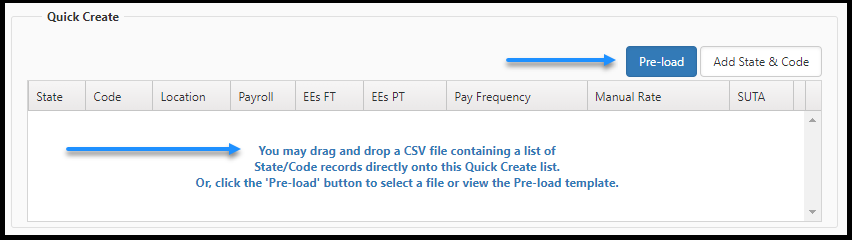
You can make the edited file available to ClientSpace by dragging the file onto the Quick Create area, or you can use Pre-load to upload the file. The following procedures show you how, using both approaches.
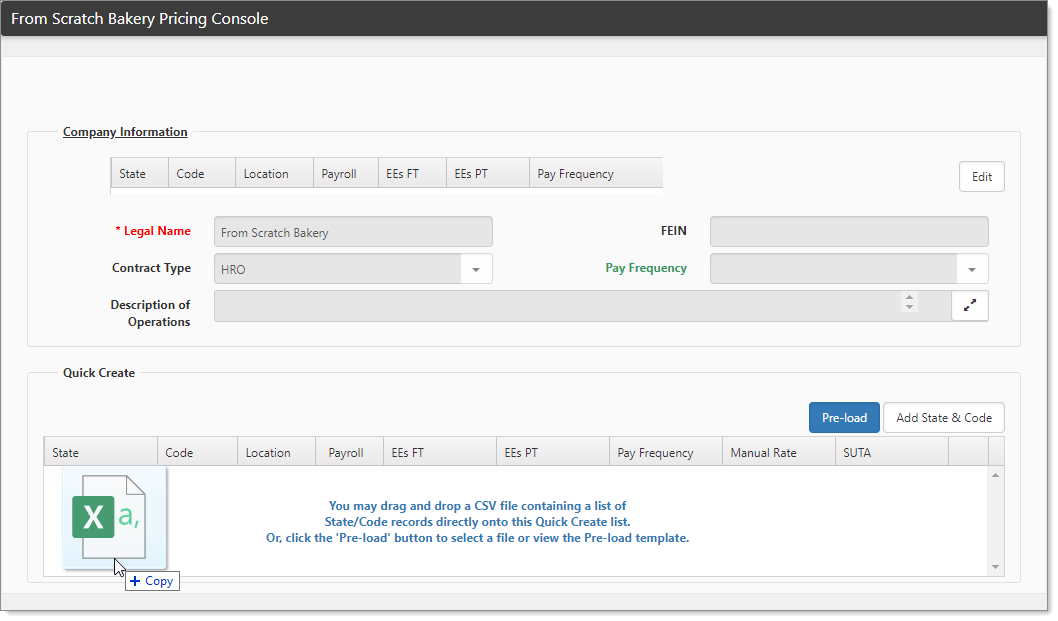
To drag the file onto the Quick Create area:
- Open file explorer and drag the file onto the Quick Create pricing area.
Note: If any of the records are missing required information, the system displays a message to indicate the problem.
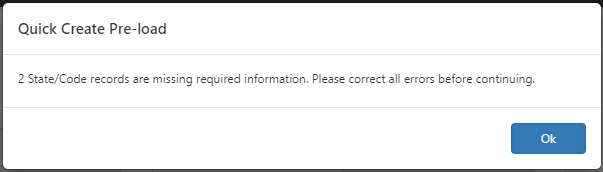
-
Click OK.
The system displays the file data in the Quick Create grid and highlights the rows in red.
Note: The location field only displays if the pricing location field is active on the pricing comp code.
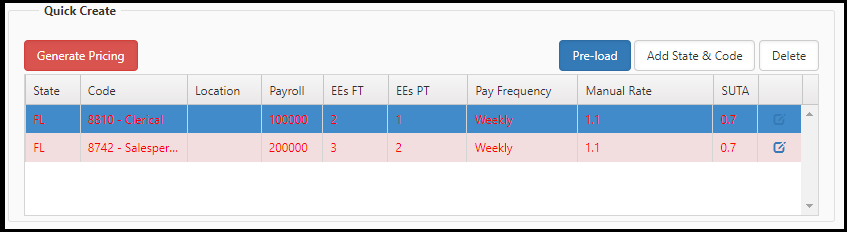
-
Click
(Jump) for a row that the system highlighted in red.The system displays the Quick Edit window.
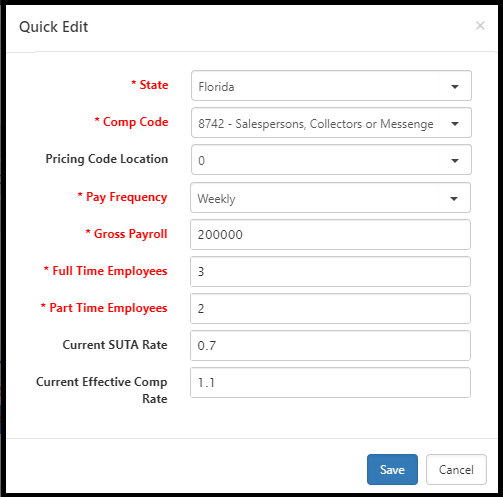
-
Correct the error(s) in the Quick Edit window and click Save.
-
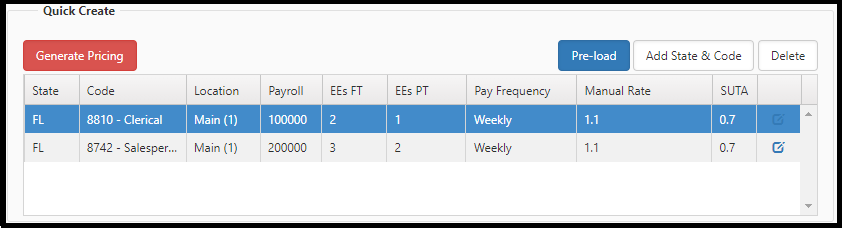
Repeat as necessary to correct all errors before continuing.
If there are no errors with the file data, the system displays the file data in the Quick Create grid.
Now, you are ready to generate pricing. Go to Step 3: Generate Pricing.
If you do not use the drag method, you can upload the pricing file using Pre-load.
To upload the pricing file to ClientSpace:
- From the Pricing Console, in Quick Create, click Pre-load.
The Pre-load Quick Create List dialog box opens.
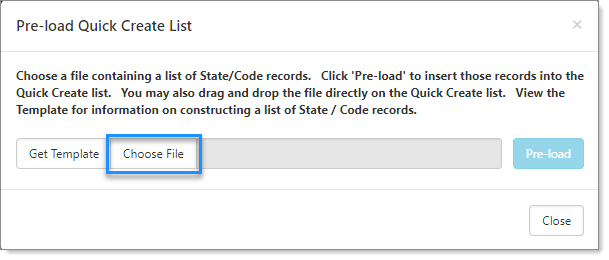
- Click Choose File.
File Explorer opens. - Locate the file and click Open.
The file appears in the Choose File box.
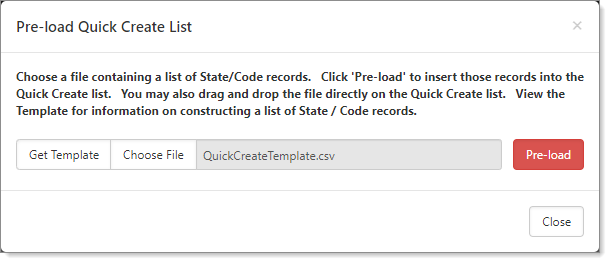
-
Click Pre-load.
Note: If any of the records are missing required information, the system displays a message to indicate the problem.
-
Click OK.
The system displays the file data in the Quick Create grid and highlights the rows in red.
Note: The location field only displays if the pricing location field is active on the pricing comp code.
-
Click
(Jump) for a row that the system highlighted in red.The system displays the Quick Edit window.
-
Correct the error(s) in the Quick Edit window and click Save.
-
Repeat as necessary to correct all errors before continuing.
If there are no errors with the file data, the system displays the file data in the Quick Create grid.
Now, you are ready to generate pricing. Go to Step 3: Generate Pricing.
Step 3: Generate Pricing

With the file inserted in the grid, you are ready to generate pricing.
To generate pricing:
- Click Generate Pricing.
This action builds pricing based on the configured settings and policies. While ClientSpace processes your pricing, the progress displays. Any errors found with your submission are also displayed. -
When the build completes, a synopsis of your pricing is displayed. You may need to take action if you receive any errors.
-
Click Ok.
Override Batch in Repricing
Occasionally, when pricing is running an error occurs and the Batch in Repricing checkbox is selected and locked for a batch. A user cannot proceed with repricing while the batch is in this state. A user in a role that contains the can_override_batchinpricing security entity with View rights can unlock the batch by selecting the Override 'Batch in Repricing' link on the batch.
Complete the following procedure to unlock a batch.
-
From the modules bar, click
Pricing.
The Pricing dashboard opens. -
Select a workspace and click
(Open).
The pricing console opens. -
Select the Pricing Batch
-
Click the Override 'Batch in Repricing' link in the Action Center.
After selecting the Override 'Batch in Repricing' link, the system deselects the Batch in Repricing checkbox.
Note: Before a user can access this link, a Global Admin user must add the can_override_batchinpricing security entity with View rights to a role associated with the user.