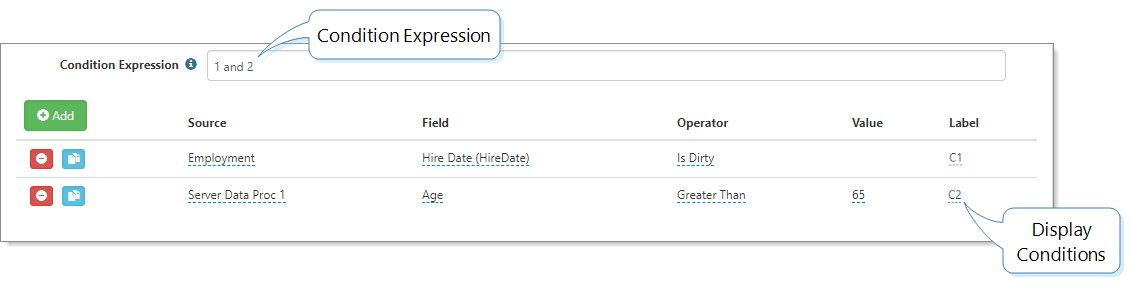
Conditions determine how and when the email notification triggers. You can configure display conditions (in the Add section), and you can use the display conditions in the Condition Expression field. When the Condition Expression field is empty, the display conditions process as ORs. In the example, the Condition Expression examines 1 and 2. Both conditions must be met. Without the Condition Expression, the display conditions process as 1 or 2. Only one of the conditions must be met. For a detailed explanation about conditions, see the topic Condition Expressions.
The following procedures guide you through configuring conditions. You can clone conditions and also set up a condition based on the number of days, months, or years from a date.
To configure conditions:
- Complete the fields:
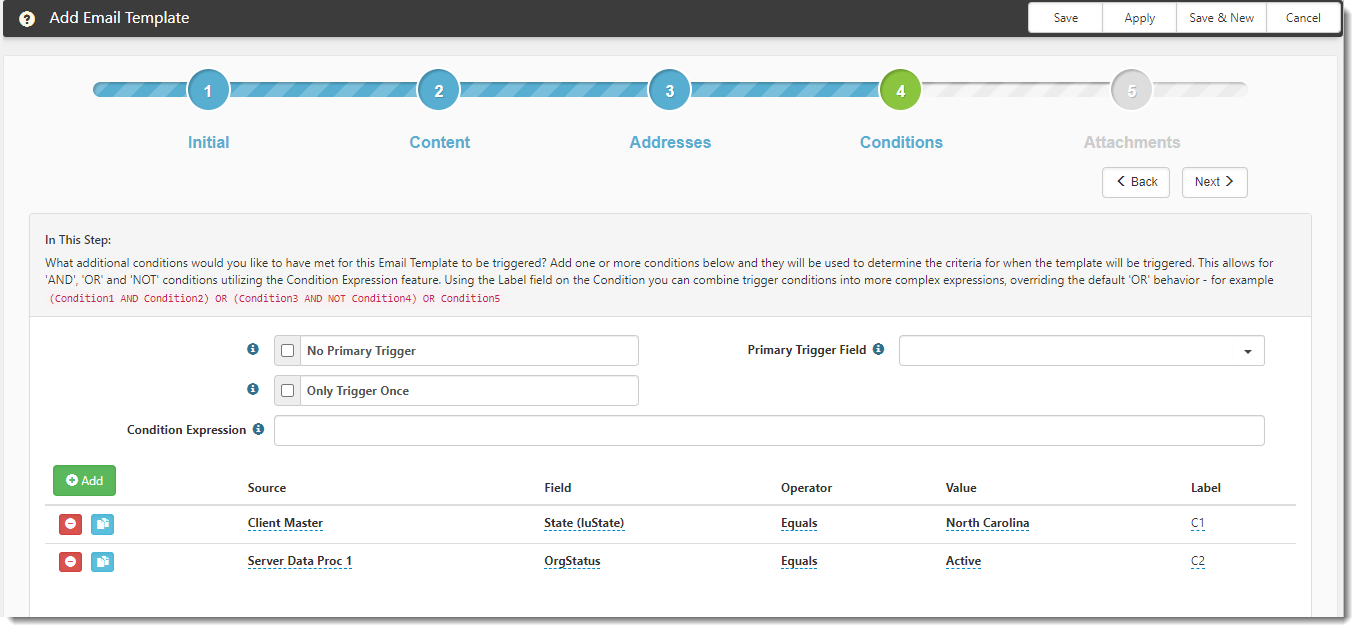
| No Primary Trigger | When selected, no single condition must be met to trigger the email template. When selected, the Primary Trigger Field is disabled. | ||||||||||||
|
Only Trigger Once |
When selected, the email template is triggered only once when the conditions are first met. Do not select this option if you want the email template to trigger each time the conditions are met. |
||||||||||||
|
Primary Trigger Field |
Optional. From the Triggering Form selected in Step 1, which, when changed, triggers the event. This can also be a HdrAction, such as a configured action link on the form.
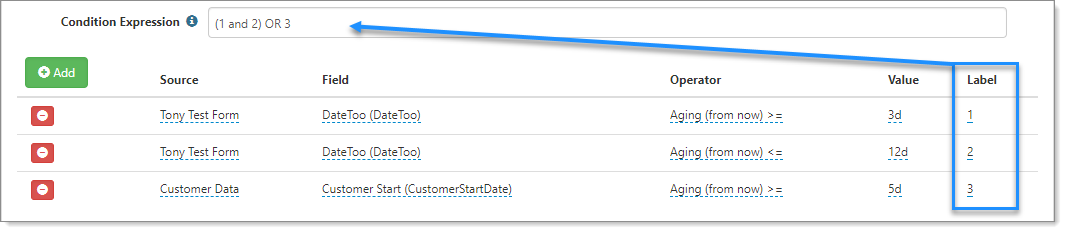
The following statements refer to the condition entries in the Add area. Condition entries are identified with a Label (the last column).
The Primary Trigger Field only displays fields associated with the triggering dataform and includes the ability to Add Untriggered Field. |
To add display conditions:
- Click Add.
A row opens with columns Source, Field, Operator, Value, and Label. The Add section is where you can add more granular triggering conditions. Each row you add is a display condition. When Condition Expression is empty, the display conditions process as ORs, meaning only one of the conditions must be met for the email notification to trigger.
| Source |
The Source list includes the triggering form and its tabs, the channel trigger (i.e., the original form that started the channel), all triggerable, active single-forms, and the tabs of those single-forms. Applicable server data procs, if configured, may also be included.
When you select Task as the Triggering Form in Step 1 Initial, in this step Source sets to Task. |
| Field |
Select the dataform or Stored Procedure field to compare to the trigger value. A few notes:
To add a trigger field:
|
| Operator |
Choose the type of comparison. Each value from a Multi Lookup Trigger Field can be added as a separate "=" condition. This supports complex AND, OR, and NOT conditions as well. Note:
|
| Value | The criteria against which the trigger field is compared. For a condition that is using a user datatype as the Field, the Value field uses a typeahead method so that you do not need to look up the User ID for the text field. |
| Label |
The label to use when constructing Condition Expressions for triggering. ClientSpace assigns a label to a new condition with the naming convention C#. For example, C1 for the first condition that you create, C2 for the second, and so on. You can change the label name by selecting the name of the label and typing a new name for the label. For example, you can select the C1 label and enter Condition1 as the new label name. Tip: Make this label short and representative of the Trigger Field. Labels are used in the Condition Expression field. |
|
Condition Expression |
Allows for AND, OR, and NOT conditions using the trigger conditions (Label) from the Add section. Using the Label field that corresponds to the entries in the Add section, you can combine the conditions into more complex expressions. The Condition Expression field could state, for example (Condition1 AND Condition2) OR (Condition3 AND Condition4) OR Condition5. Condition Expressions adhere to AND/OR/NOT across tabbed dataform conditions. For a detailed explanation about conditions, see Condition expressions. When the Condition Expression field is empty, the row entries are treated as OR conditions. Only one of the conditions must be met. |
To clone a trigger condition:
To save some time, you can clone a trigger condition and then edit as appropriate.
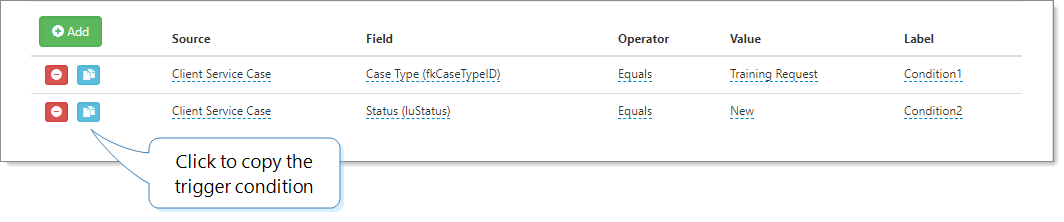
- In the Add section, locate an entry that you want to copy.
- Click
 Clone.
A new row opens, with the trigger condition copied. Source, Field, and Operator are copied. - You can now edit the new condition as appropriate.
- Click Apply or Save.
To trigger conditions based on number of minutes/hours/days/weeks/months/years from a date:
- Complete the form fields:
|
Field |
Select a Date or Date Time datatype field. This action makes the Aging operators available in Operator. Note: When comparing Date to Date Time datatypes (or vice versa) 12:00:00AM is used as the comparison time for the Date datatype. |
|
Operator |
Select one of the following:
The less than operator requires that the evaluated date occurs between the calculated date and today. It has to be between the date set in the configuration. For example, if the value is 6d, the from date must be between 6 days ahead and today. |
|
Value |
Type a number accompanied by:
|
- Click Apply or Save.
Putting it all together
The following example illustrates three conditions named 1, 2, and 3. The Condition Expression is (1 and 2) OR 3. The OR indicates that only one data point must be met. For an aging evaluation, this condition expression is looking for a date that is greater than 3 days and less than 12 days. Or, a date that is greater than 5 days.
- Click Next to proceed to Step 5: Attachments.