| 1. | The easiest way to get started it to use the Quick Add. |
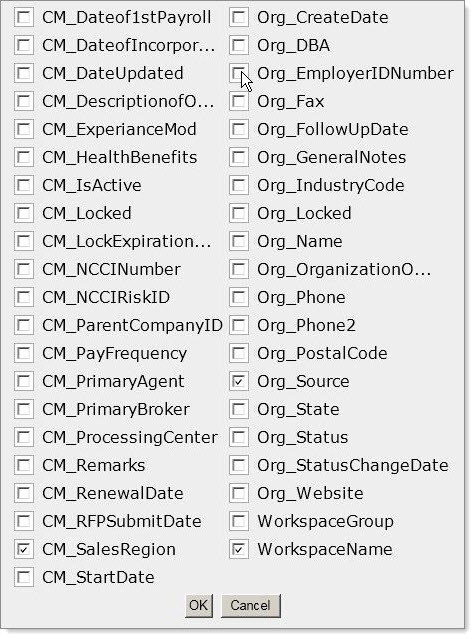
| 2. | Select the fields and click OK. |
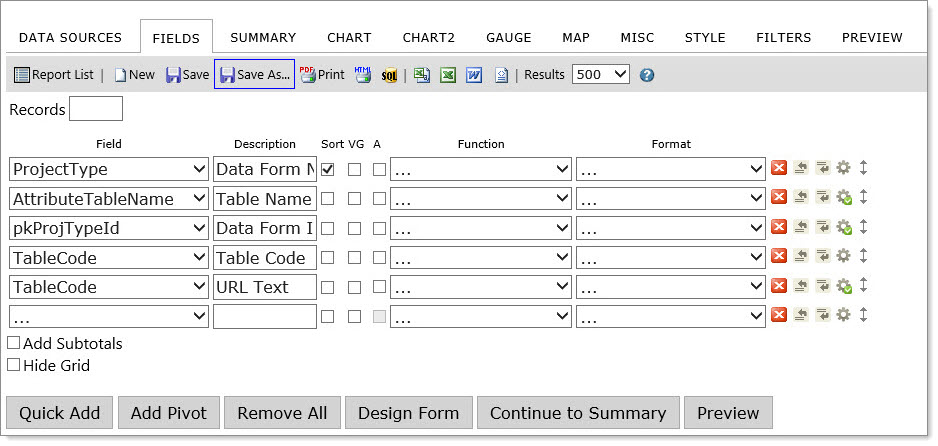
| 3. | After you have the selected the fields, you can perform a number of tasks, including changing the field label in the Descriptions column, changing the order, visually grouping (VG), and sorting. |
The Field drop-down menu is a list of the available fields in the table/view that is selected in the Data Sources tab. If joining tables/view, the title of the table/view that the field is from appears in parenthesis next to the name of the field. Select the fields to display. The entries in the list that are in Bold are the table/data source names.
The Description field is the title of the field when the table/view is displayed.
Sort, Group, and VG options and Functions drop-down menu features
|
Features |
Description |
|---|---|
|
Sort (a-z) |
Select this option if you want the table/view to be sorted by the field selected in the Field drop-down menu to the left in ascending order. |
|
Sort (z-a) |
This option is in the advanced properties of the row and can be set if you want the table/view to be sorted by the field selected in the Field drop-down menu to the left in descending order. |
|
VG |
Select this option to change the column for the field selected in the Field drop-down menu to the left into subheadings |
|
A |
Arithmetic – Performs basic calculations (+, -, x, %) and concatenation of text. |
|
Function menu |
Functions can be chosen from the menu. If the Group option is selected, a group of fields can be created. |
The Format menu is a list of formats for the entries of the field selected in the Field menu directly to the left to appear in.
|
Format |
Examples |
|
Short Date |
8/1/1996 |
|
Long Date |
Friday, August 09, 1996 |
|
Short Time |
12:34 AM |
|
Long Time |
12:34:56 PM |
|
Full(short) |
Friday, August 30, 1996 4:34 |
|
Full(long) |
Wednesday, October 23, 1996 2:28:37 AM |
|
D&T(short) |
3/12/1996 7:45 PM |
|
D&T(long) |
2/27/1996 12:45:13 AM |
The function buttons are for the rows that they are in
|
Control Name |
Description |
|---|---|
|
Delete button |
Delete the row the button is on. |
|
Insert Row button (above) |
Insert a row above the row the button is on. |
|
Insert Row button (below) |
Insert a row below the row the button is on. |
|
Move |
Move a row up or down in the list. When moving a field, you have to use the blue bar to guide where you are placing it. |
|
Advanced Properties++ |
Advanced field settings provide more granular control over what data is displayed in your report. They can be accessed by clicking on the gear icon to the right of any row on the fields tab or the summary tab in the report designer. There are several options that can be selected here. For more information on using Advanced properties click the expanding section below |
|
Features |
Description |
|---|---|
|
Quick Fields From Dialog menu |
List of tables/views selected in the Data Sources tab. |
|
Add Pivot |
Allows the user to add a pivot table to a report |
|
Continue to Summary |
Allows the user to advance to the Summary Tab |
|
Preview |
Allows the user Preview the current report. |
After you have finished, you can Continue to the Summary tab or Preview the report.
**Keep in mind that after you have selected your fields, you can preview the report at any time. This allows you to make the report look exactly the way you want through trial and error.