Using the Offered Benefit Plan (OBP) Import
You can import PrismHR Benefits Batch Offered Benefit Plans (OBPs) from PrismHR. (Also see PrismHR Benefits Batch Offered Benefit Plan (OBP) Import - Imported Fields List.)
You initiate the import by clicking the OBP Import link in the Action Center of the Benefits Batch dataform. A popup window displays that allows you to specify one of three import options:
-
Insert Only - Insert (i.e., add) OBPs from PrismHR that do not exist in ClientSpace.
-
Update Only - Update previously imported OBPs with any updates from PrismHR.
-
Both - Perform both inserting and updating of OBPs.
For the Update Only and Both options, you also have an additional Update Contributions option.
Once you select an import option and start the import, the system goes through the following steps:
-
Locate plans: Benefit Plans are located using the Client Number.
Note: This feature supports multi-tenancy. In multi-tenant environments where the Client Number may not be unique, Benefit Plans are located using the Import ID which is created using a combination of the Client Number and PEO ID.
-
Evaluate plan dates: Benefits data is only imported when the Benefits Batch effective date in ClientSpace is within a range that is greater than or equal to the PrismHR Benefit Plan Start Date and less than or equal to the PrismHR Benefit Plan End Date (i.e., the ClientSpace Benefits Batch effective date falls within the PrismHR plan start and end dates.)
-
Process each plan meeting the plan dates criteria: One plan at a time is processed.
-
Evaluate for a matching Rate Group: The system now tries to find a matching Rate Group between PrismHR and ClientSpace on the plan being processed.
If a match on the Rate Group is found and the incoming plan is using a Risk Factor, the risk factor from PrismHR is imported into the Risk Factor field on the OBP.
The Risk Factor field value can accommodate up to 12 digits after the decimal place. It is multiplied by the premium amounts entered on either the associated Rate Group or Benefit Plan record and then divided by 100. The resulting calculations are set in the EE Premium, ES Premium, EC Premium, EK Premium, and EF Premium fields in the "Total Client Premium" section of the Offered Benefits Plan dataform.
If no matching Rate Group is found, an error is logged and displayed when processing is complete.
-
Build Offered Plan data in ClientSpace: Offered benefit plans are added and/or updated based on the import option you selected. For new plans, any new Benefit Groups are also added.
-
Update contributions: Contributions are updated if you selected this option. See Update Contributions Logic for details on how contributions are updated for each insurance class.
-
Save the Offered Benefit Plan: Each insert or update is saved in ClientSpace on the default pipeline.
Note: The default pipeline represents default business rules or behaviors in the system. In this case, it determines which rules are applied when data is saved.
-
Display import results: At the end of import processing, the final import results display in the OBP Import from Prism window. The window shows the number of new groups, new OBPs, updated OBPs, skipped records and records with errors.
The feature is Inactive by default. Please contact your Professional Services team representative or log an extranet case for activation.
Before You Begin: Mapping Your PrismHR Coverage Levels
Mapping your PrismHR Coverage Levels in ClientSpace is typically a one-time step. Prism coverage level fields act as import mapping fields from the Prism Benefit Plan rules to ClientSpace Offered Plan Employee Contributions. This allows ClientSpace to correctly update ClientSpace Offered Plan contributions with contribution data imported from PrismHR.
ClientSpace does this by setting the Contribution Method field Employer Contributions section of the Offered Benefits Plan record to Manually Set Dollars, and then updating the Dollar Amount field for each coverage level (where a match could be made to a PrismHR coverage level).
You enter coverage level fields in the PrismHR Coverage Labels of the Benefits Plan dataform near the bottom of the form. You can add up to five (5) labels as shown in the example below:

Coverage level labels can be set from the following locations:
-
The Admin Workspace for master benefit plans and model benefit plans (which are managed in the Admin Workspace like master plans but are used as templates for client-level plans.)
-
Directly in a client workspace for client-level plans.
If you leave the fields blank, ClientSpace uses the following default PrismHR values:
-
EE for CoverageLevel1
-
ES for CoverageLevel2
-
EC for CoverageLevel3
-
EF or FAM for CoverageLevel4
-
EK for CoverageLevel5
Note:
-
The default values will not populate the PrismHR Coverage Labels fieldset. Only your entries (if provided) are ever displayed in the fieldset otherwise the fields are blank. The default values are the typical values defined in PrismHR as the Plan Type. If your Plan Type values differ from the default values, you should map the fields in the PrismHR Coverage Labels fieldset as shown in the example image above.
-
If you do not set coverage level labels and the system cannot make a match using default values, contribution updates are skipped. In the case of new offered benefit plans, this will result in contribution amounts being left blank.
-
When you set coverage level labels on an Active plan, upon renewing the plan, the labels are carried forward to the new plan.
To set PrismHR Coverage Labels:
- Open the Active Benefits Plan where you want to set the labels.
- Scroll to the Prism Coverage Labels section.
- Enter the desired PrismHR label names in CoverageLevel1 through CoverageLevel5 as applicable.
- Click Save or Apply.
Importing OBPs
To import OBPs from PrismHR:
-
Access the Benefits Batch to which you will import OBPs.
- From the modules bar, click
 Workspaces.
The Workspace Search dashboard opens. - Select the desired workspace and click
 (Open).
The Workspace page opens. -
Move down the page to the administrative tiles where you see the dataform categories.
-
Enter "Benefits Batch" in the search for dataform field and then click the Benefits Batch tile.
The Benefits Batch search window displays.
-
Open the desired batch by double-clicking it or by clicking click
(Open) next to it.
- From the modules bar, click
-
On the Benefits Batch form, in the Action Center under Links, click OBP Import.

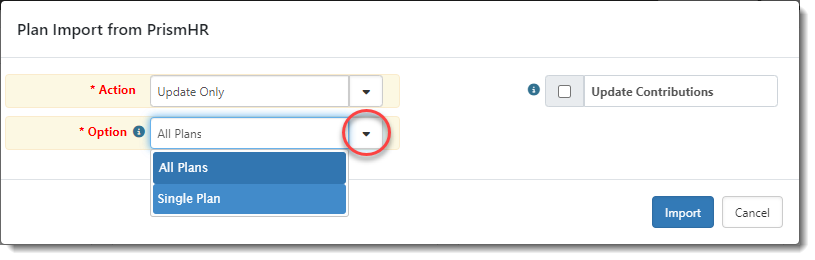
The Plan Import from PrismHR window displays.
-
Select an import option from the Action field:
-
Insert Only: Insert (i.e., add) OBPs from PrismHR that do not exist in ClientSpace.
-
Update Only: Update previously imported OBPs with any updates from PrismHR.
-
Both: Perform both inserting and updating of OBPs.
-
-
What do you want to do?
-
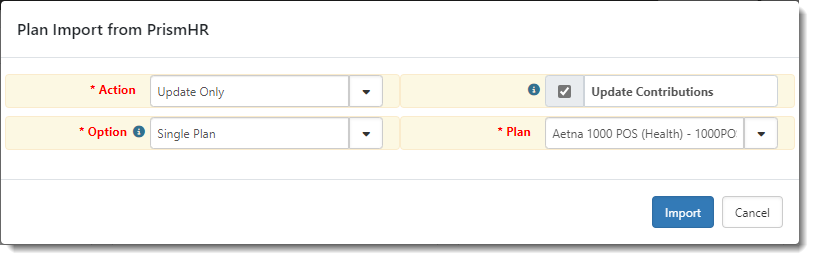
To update contributions: If you selected Update Only or Both options in Step 3, you also have an additional Update Contributions option. Select Update Contributions if you want to update the Employer Contributions sections of any Offered Benefit Plans where the contributions amounts have been updated in PrismHR.
Note: Your coverage level labels should have been reviewed and appropriately mapped at this point. See the preceding Before You Begin: Mapping Your PrismHR Coverage Levels section for details.
-
To import a single plan: If you selected Update Only in Step 3, an Option field displays. Select All Plans if you want to import all plans or select Single Plan if you want to import a single OBP.
If you select Single Plan, the Plan field displays. Select the OBP to import.
-
-
Click Import.
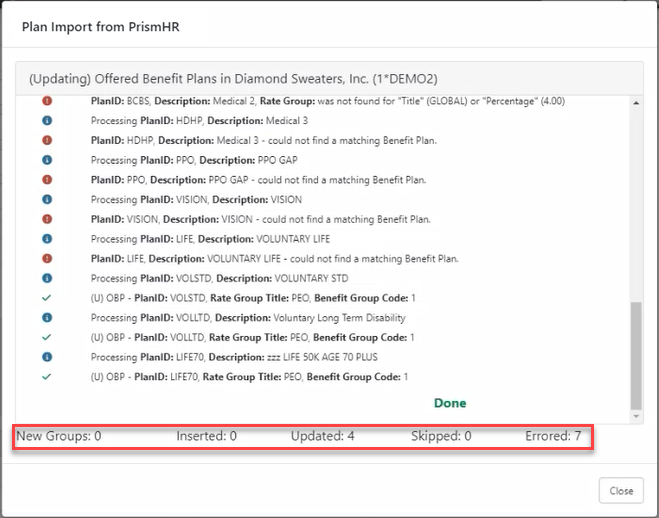
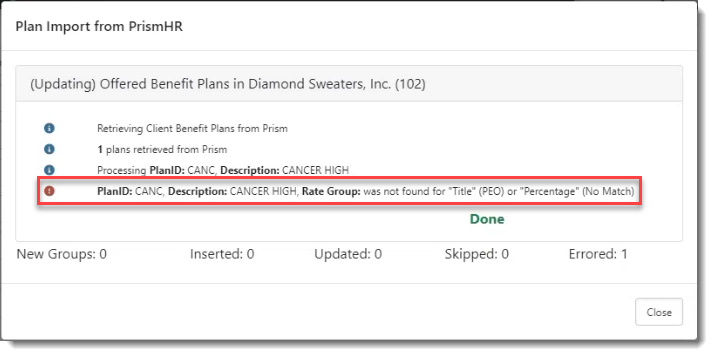
When the process is complete, the Plan Import from PrismHR window displays Done along with import details and import totals:
Note:
-
"Skipped" indicates the number of records that were skipped, but not because of an error. For instance, a record may have met the date criteria but was skipped because it was previously imported and already up to date.
-
"Errored" indicates that an error that prevented the record from being inserted or updated. All error details are displayed in the Plan Import from PrismHR window preceded by a red Info
 icon. Common errors include:
 -
Could not find a matching Benefit Plan.
-
Could not find a matching Rate Group.
-
Rate Group was not found for "Title" or "Percentage" (No Match).
This error displays when the premium data for the OBP cannot be set when attempting to import a new or updated plan from Prism because there is no rate group name match between the ClientSpace offered plan and the PrismHR benefit plan.
If a match on the Rate Group is not found and the incoming plan is not using a Risk Tier (i.e., Risk Factor), a check is made to see if any active Rate Groups exist for the associated plan. If none are found, we create an Offered Benefits Plan without a Rate Group using the Benefit Plan's base rates. We also log the error message referenced above on the Plan Import from PrismHR window similar to the example below:
Refer to the Troubleshooting: Common OBP Import Errors section below for steps to correct common OBP Import errors.
-
Additionally, if an error occurs, the OBP Import Errors field on the Benefits Batch dataform is set to Yes. (This field is set to Yes anytime an error occurs in the most recently run OBP import.) You can view the error message details in the Prism Log field located below the OBP Import Errors field as shown in the example below:
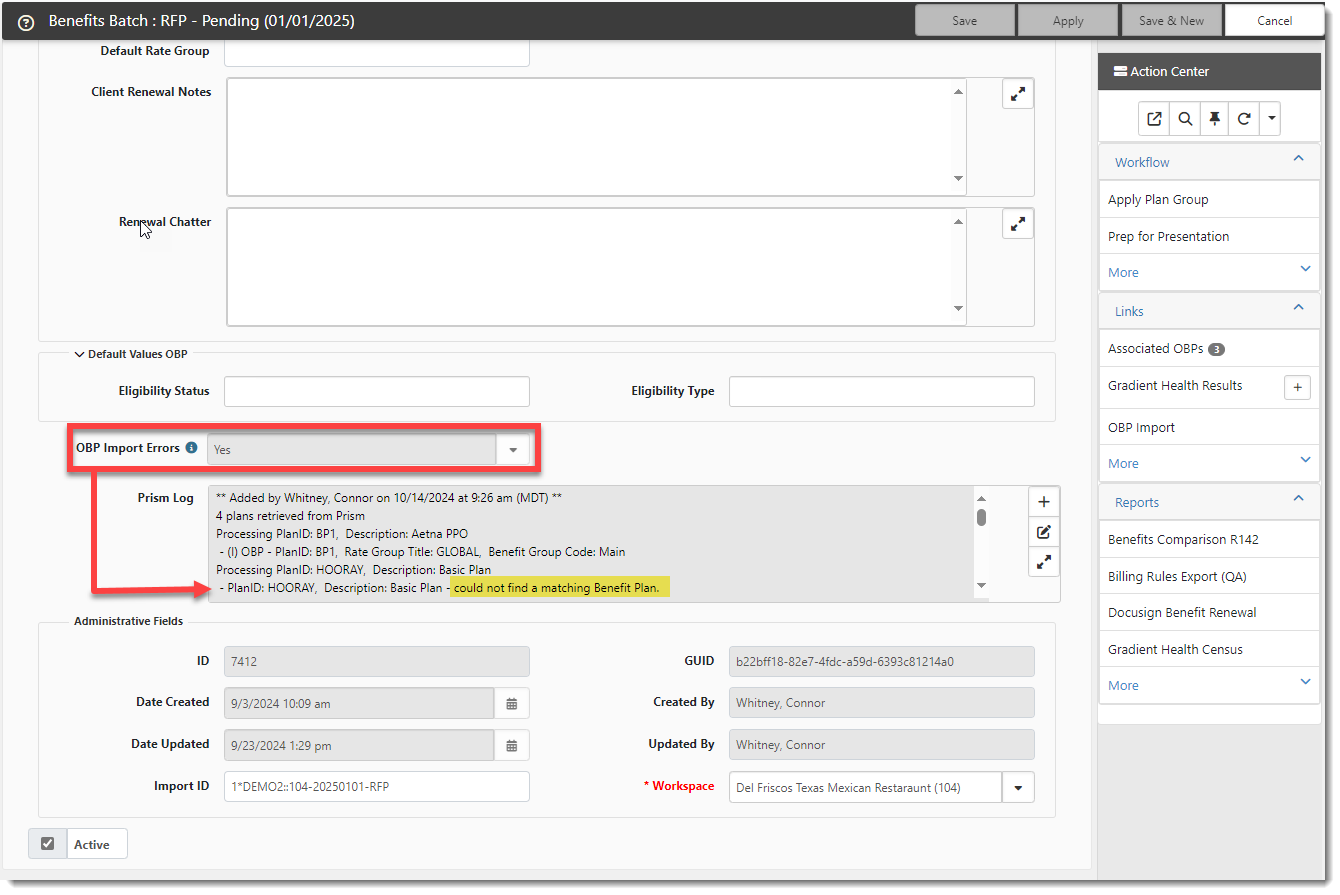 and then updating the Dollar Amount field for each coverage level (i.e., EO/EE, ES, EC, EF/FAM, or EK) where a match could be made to a corresponding PrismHR coverage level.
The next time you run the OBP Import, if there are no errors, the OBP Import Errors field is set to No.
Update Contributions Logic
If you select the option to Update Contributions, the following logic is applied based on the plan's insurance class:
For PrismHR insurance classes M (Medical), N (Dental), or V (Vision), the following conditions are evaluated:
-
If the PrismHR benefit plan does not have a Contribution Method of Percentage for all coverage levels, the process continues to set the Contribution Method field to "Manually Set Dollars" and then updates the Dollar Amount field for each ClientSpace coverage level (i.e., EO/EE, ES, EC, EF/FAM, or EK) where a match could be made to a corresponding PrismHR coverage level.
-
If the PrismHR benefit plan does have a Contribution Method of Percentage for all coverage levels, the process evaluates which Contribution Method to set for the plan and properly converts the contribution amounts to percentages using the following conditions:
-
In PrismHR Benefit Rules (Benefit Plan Maintenance/ Group Benefit Plans (Client) / Benefit Rules) under Contribution Rules, if the Company Contribution EE Bill value is 100 for all coverage levels and the Company Contribution DEP Bill value is 0 for all coverage levels, set the ClientSpace Contribution Method to "Contribute EO Premium". The coverage level percentage fields in ClientSpace are calculated when the OBP is saved.
-
In PrismHR Benefit Rules under Contribution Rules, if the Company Contribution EE Bill value is not 100 for all coverage levels but is the same value for all coverage levels and the Company Contribution DEP Bill value is 0 for all coverage levels, set the ClientSpace Contribution Method to "Match EO Contribution" and set the ClientSpace EO% field to the value in the PrismHR Company Contribution EE Bill field. The remaining coverage level percentage fields in ClientSpace are calculated when the OBP is saved.
-
If neither of the conditions above are true, set the ClientSpace Contribution Method to "Manually Set Percentages". Then, for each coverage level, divide the Company Contribution EE Billvalue by the Total Billed value located in PrismHR Benefit Rules under Contribution Rules. Multiply the resulting values by 100 to calculate a percentage and set the percentages in the corresponding coverage level percentage fields in ClientSpace.
-
For PrismHR insurance classes L (Life), B (Bond), D (Long-Term Disability), S (Short-Term Disability or O (Other) the following conditions are evaluated:
-
If the PrismHR benefit plan has a Contribution Method of Percentage, set the ClientSpace Contribution Method to "Combine EO and Dependent" and set the ClientSpace EO% field to the value in the PrismHR Contribution Amount field and set the ClientSpace Dependent Contrib % value field to the value in the PrismHR DEP Contribution Amount field.
-
If the PrismHR benefit plan does not have a Contribution Method of Percentage, do not import contributions and in the Prism Log (located in ClientSpace under OBP Import Errors on the associated Benefits Batch), display the following message: "Fixed contributions for supplemental plans are not supported with OBP Importing."
Troubleshooting: Common OBP Import Errors
Error
Cause
Solution
"Error retrieving Benefit information: Client does not exist."
There was an issue finding a matching client.
Step 1: Verify that a client with same Client Number exists in the PrismHR application and make any corrections as necessary to ensure that a matching client exists.
Step 2: Reimport. The error should no longer display.
"Could not find a matching Benefit Plan."
There was an issue finding a matching plan.
Step 1: Verify that the Plan IDs match between the PrismHR and ClientSpace applications. The PrismHR Plan ID field value located on the Benefit Plan Setup form must match the ClientSpace Benefit Plan Identifier field value located on the Benefits Plan form.
Step 2: Verify that the Plan Dates match between the PrismHR and ClientSpace applications. The PrismHR Start Date field value located on the Benefit Plan Setup form must be greater than or equal to the value in the ClientSpace Effective Date field located on the Benefits Batch form.
Step 3: Reimport. The error should no longer display.
"Rate Group: was not found for "Title" or "Percentage."
There was an issue with finding a matching rate group.
Step 1: Verify that the Rate Group Titles match between the PrismHR and ClientSpace applications. The PrismHR Billing Rate Group title located on the Benefit Plan Setup form must the ClientSpace Title field value located on the Rate Group Detail form.
OR
If the PrismHR plan has risk factors, verify that PrismHR Premium Risk Factor located on the Benefit Plan Setup form (with a most recent Effective Date that is less than or equal to the value in the ClientSpace Effective Date located on the Benefits Batch form) matches the ClientSpace Percentage field value located on the Rate Group Detail form.
Step 2: Reimport. The error should no longer display.
-