Managing Inbox notifications
All throughout the day when using ClientSpace you get notifications. Task items you need to attend to, Cases that have been updated – they all vie for your attention. But if you have to jump out to email to read them, it slows you down. To streamline this process, we included the notification center in ClientSpace. This allows you to keep up to date on those important ClientSpace notifications without the distraction of jumping over to email. This topic provides an overview of managing your notifications in ClientSpace.
Due to the volume of notifications that could be generated to the logged in user just by using ClientSpace, we have limited the number of actions that create Self notifications – these are notifications to the user that triggered the notification occurrence. The actions that trigger self notifications include:
| • | Calendar: Calendar events you create, notify you, allowing you to add them to your mail service calendar. |
| • | User: User events, such as new accounts, or your password expiring/being changed notifies you. |
| • | Marketing campaigns: Automatically sent notifications from Marketing campaigns created by you also notify you. |
When you first receive a notification alert, it displays as a transparent bubble message in the work items area. These alerts are designed to provide a brief introduction to the notification, allowing you to decide whether it needs to be addressed immediately. Reading these items, marks them as read, removing them from the Quick View and incrementing the Quick View counter down by one.
Inbox
For those of us who get more than a few notifications a day, the Inbox is a better way to manage them as it provides more detailed information at a glance, as well as a way to mass update the list.
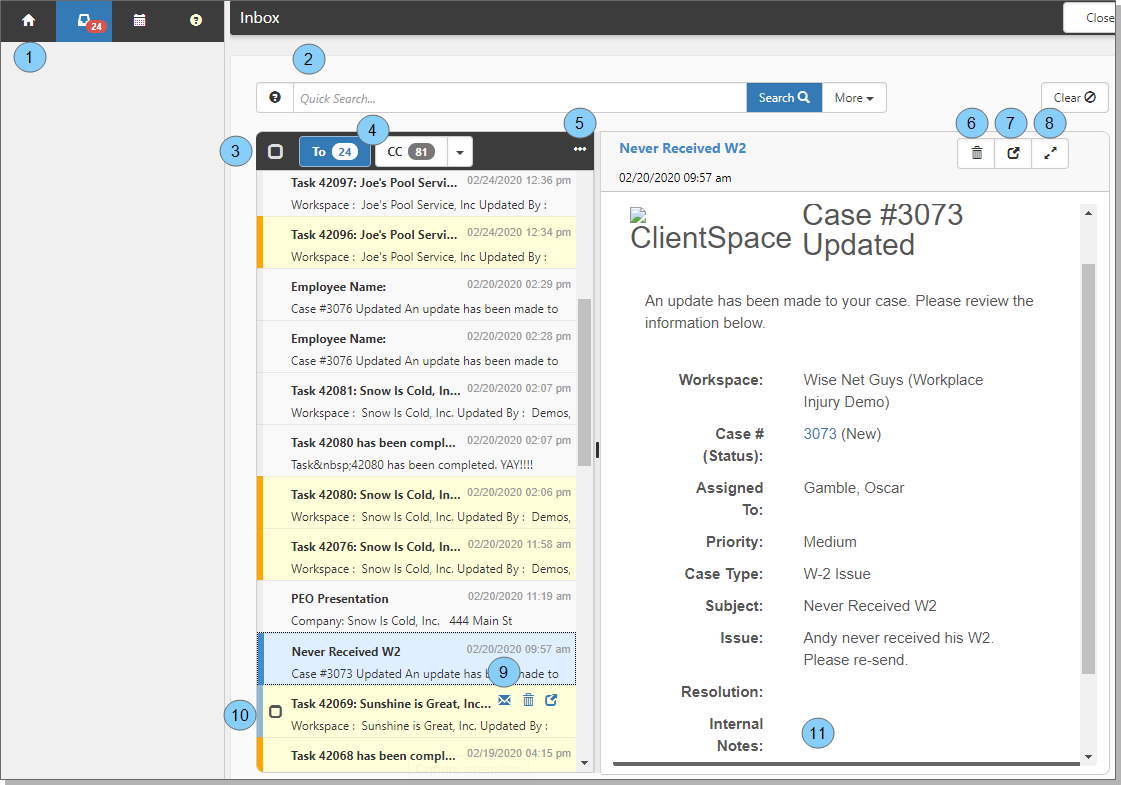
The numbered items in the image correspond to the numbered items in the following list.
|
1. Inbox Work Item |
Click here to open your Inbox. |
|
2. Inbox Quick Search |
Source, Unread, or Read and a Keyword search. |
|
3. Select All |
Allows you to select all visible records, used in conjunction with the Actions ellipsis. |
|
4. Receipt Type |
Receipt type provides insight into your involvement with the notification, separating notifications on which you were primary (in the To field) from notifications where you were included (in the CC field) and providing a badge counter of the number of unread for each. The CC area includes additional options using the arrow to display all notifications and to display Trash items (more on this below). |
|
5. Options |
Used to perform mass update actions on the selected record(s). See more below. |
|
6. Delete |
In the Notification detail pane. This icon allows you to delete the selected notification entirely. |
|
7. Jump To |
In the Notification detail pane. This icon allows you to jump directly to the select notifications triggering object (case, task). |
|
8. Expand |
In the Notification detail pane. This icon allows you to Expand the notification, providing a full-page view. |
|
9. Notification Actions |
These icons allow you to Mark as Unread, Move to Trash, or Open the related record. Actions are for the selected email. |
|
10. Inbox |
This is the collection of all your read and unread messages.
|
|
11. Notification Detail |
Provides a detailed view of the notification. This pane can also be used to manage multiple notifications at once by selecting several items using the notification option. |
Inbox Mass Actions
As previously mentioned, you can select either all the visible records using the Select All option, or a set of records using the email option to create a selection of records, which may then be mass updated using the Mass Actions ellipsis (...).
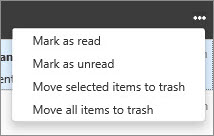
| • | Mark as read: Marks all selected items as Read, subtracting the items from the counter badge. |
| • | Mark as unread: Marks all selected items as unread - adding the items to the counter badge |
| • | Move selected items to trash: Just like it sounds - does not permanently delete items, but removes them from the inbox |
| • | Move all items to trash: self-explanatory |
Taking out the trash!
| • | To manage your trash items, use the options list on the CC receipt type to select Trash. |
| • | You can manage Trash items with a special set of Mass Update actions specific to Trash. |
Critical Notifications
| • | To learn how to create and manage Critical notifications in ClientSpace, see Broadcasting notifications. |
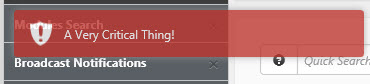
Announcements differ from standard notifications in a few key ways. When presented, an announcement alert displays in red.
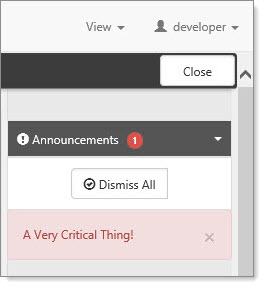
| • | Further, a Critical priority announcement also displays at the top of the right-hand Action pane until dismissed, ensuring that it cannot be overlooked: |
| • | Finally, when your Inbox contains a broadcast announcement, the Inbox icon displays in red until the item is marked as Read. |
