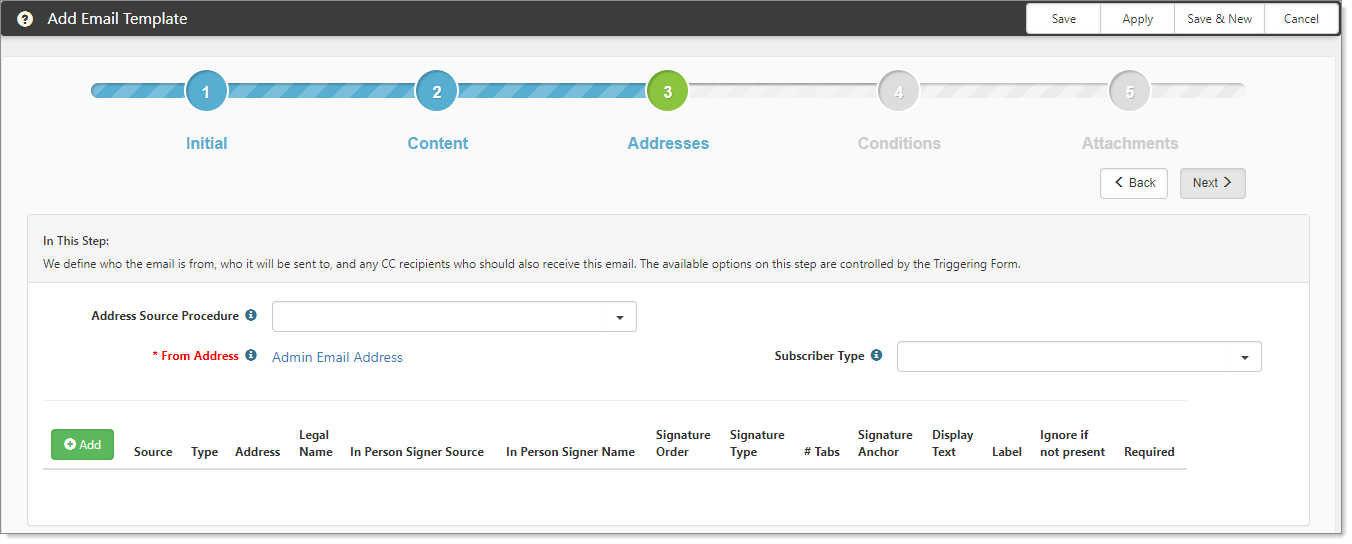
Step 3: Addresses
You can also send a document with the requirement for In Person Signing, which is used when a valid DocuSign user acts as a signing host for a signer. The document is sent to the signing host who physically delivers the document to the In Person Signer for signatures. For details on how to set this up, see Configuring the DocuSign email template for In Person Signing.
To configure the tags:
- Complete the form fields.
| Address Source Procedure | Select a stored procedure (optional) that can provide additional address options based on system data. A stored procedure can be selected from any stored procedure in the system with a name containing emailtemplate_recipient_proc. | |||||||||||||||
| From Address |
Select the From Address for the email. You can select from a distinct set of options:
|
- To add your tags for DocuSign, click Add.
A new row opens for adding DocuSign fields on the merge document.
| Source |
Source is the dataform where the field for the recipient is stored. The field can be a contact or a user field. The document is sent directly to these users. For Adhoc Email Address, enter the email address of the signer in the Address field. |
|||||||||
| Type |
This field indicates the type of recipient:
If you select In Person Signer, see Configuring the DocuSign email template for In Person Signing. Note: A carbon copy (CC) recipient can only view documents. They cannot make changes to documents. |
|||||||||
| Address |
This is the email address of the person who must sign.
Note: If you select the AdHoc email address option and enter a ClientSpace user's email address as a recipient, if the Enable Email for this account field on their user profile is unchecked, they cannot receive emails from ClientSpace and will therefore not receive the email generated from this template. Note that only a Global Administrator can change this setting. Also see Personalizing Your User Profile. |
|||||||||
| Legal Name |
This is the legal name of the person who must sign. The legal name is used when selecting a signature in DocuSign.
|
|||||||||
|
In Person Signer Source |
See Configuring the DocuSign email template for In Person Signing. |
|||||||||
|
In Person Signer Name |
See Configuring the DocuSign email template for In Person Signing. |
|||||||||
| Signature Order |
This field determines the order in which the signature fields are presented in DocuSign. For documents that don't have a required signature order, a recommended best practice is to use the order the signature tags are presented in the merge document, from top to bottom, and left to right as the signature order. As you add tags, the process continues with ascending numbers, giving them each a new number (reference the screenshot that follows this table). However, the signing order is per recipient, each of that recipient's tags that they need to address in DocuSign. |
|||||||||
|
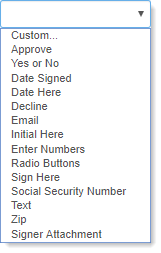
Signature Type
|
Select a Signature Type. When you select a type, this action places the appropriate DocuSign action on the document. Additionally, ClientSpace does not literally add check boxes to the form. We put the action tag in the document and let DocuSign do the heavy lifting when the document is compiled. Signature actions range from Approve, to Initial Here, to Sign Here, and many other tags. For assistance with custom tags, such as custom formatted fields and radio buttons, log an Extranet case. To implement Radio Buttons as a Signature Type, you must configure Radio Buttons as a custom type within DocuSign. |
|||||||||
| # Tabs |
If Ignore If Not Present is selected, it will clone that Recipient and Tab for the number of Tags that are needed, appending "-1", "-2", and so on to the end of the tag. This enables a dynamic number of Tags that are generated by merge SQL and placed into the document while only having to set up one Recipient record on the email template. Let's say you have a \Name\ tag for the signee's name. Instead of creating separate \Name\-1, \Name\-2, \Name\-3 recipient entries, create a single recipient entry with the tag of \Name\ and set the # Tabs to 3. It is a best practice to check the Ignore if not present option, otherwise DocuSign will reject the document if all tabs are not present.
By default, the # Tabs is set to 1. This means that this tag is only present one time in the document. If you want to clone the tag and allow it to be used multiple times throughout the document, change the # Tabs to the number of potential tags you may have. Therefore, you only need to set this if you need multiples of the same. If you use # Tabs for Radio Buttons or Yes/No actions, it will fill all of those DocuSign tags the same way when the signer responds. For example, if there are three Tabs for Yes/No action and the signer responds Yes to one, it marks Yes to the remaining two as well because the tags have the same label. The Ignore If Not Present setting will not remove a Recipient from the envelope that does not have any tags. It will only allow the document to be sent if that tag is not found on the file. If configuring the Email Template when a conditional recipient is necessary based on the document, we recommend creating a separate Email Template for that document type where that recipient will always have at least one tag. For example, if the CEO needs to sign on one specific Contract version and not another, a separate Email Template should be configured for that specific contract version where an action is required for that signer. If not, and the CEO signature tag is not found on the Contract that gets sent to DocuSign, the CEO will still get the document via DocuSign however they will not have any action to take to finalize the document and complete it via the DocuSign process. This will require that the CEO manually add an action to the document in DocuSign in order to finalize it. |
|||||||||
| Signature Anchor |
This is the custom tag that you embed in your DocuSign document that is used to merge the signature action in DocuSign. While there is no set standard, it is important to use a custom tag that does not occur naturally in written text. An example of a signature location for Initial 1, for example, could be \init1\ or for a signature, \S1\. The associated tag in the merged document must match this signature pattern exactly. Ensure the tags you used in your merge template match the tags in Signature Anchor. See Configuring the merge template. |
|||||||||
| Display Text |
This value appears in the tooltip of the Signature field on the document that is being signed. It is displayed near the signature location as instructions on what to do in DocuSign. For example, an initial location might have a signature display text of “Initial here”. Check boxes might state, “Select all that apply” and so on. |
|||||||||
| Label | Descriptive text that is displayed in the ClientSpace list to provide a more complete description of that recipient item. For example, instead of multiple Signature items in the list, you may want to use the label to indicate the type of signature, such as Principal Signature or Risk Signature, and so on. | |||||||||
| Ignore if not present |
DocuSign allows you to include a parameter on each Recipient/Tab in the envelope called Ignore If Not Present. The DocuSign integration allows you to define and include a recipient and associated tags in the envelope but not throw an error if that tag is not found in the envelope's documents using the Ignore If Not Present option on the recipient configuration. This makes tags optional as the system allows the send to DocuSign with or without tags marked in this way. When the # Tabs exceeds 1, you can enable this option by selecting Yes. The default setting is No.
For Radio Buttons or Yes/No actions, ensure that each tag has a different label value. When these tags have the same label, DocuSign applies the response that the signer enters in one tag to the rest of the tags of that same action/label.
For Email Templates with multiple documents that also have conditions on the contract type or required addendums, use the Ignore if not present option. Enabling this option allows the DocuSign email to be sent when that document is not included. |
|||||||||
|
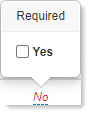
Required |
Indicate if this is a required field for the Signer during the DocuSign process. This option helps to streamline the process for signers when the fields are not applicable. When selected (Yes), the Signer must sign the custom tag. When not required (No), the tag appears as optional to the Signer. Note: For existing Email Templates (configured before R93), the tags are set to Required unless you change them. |
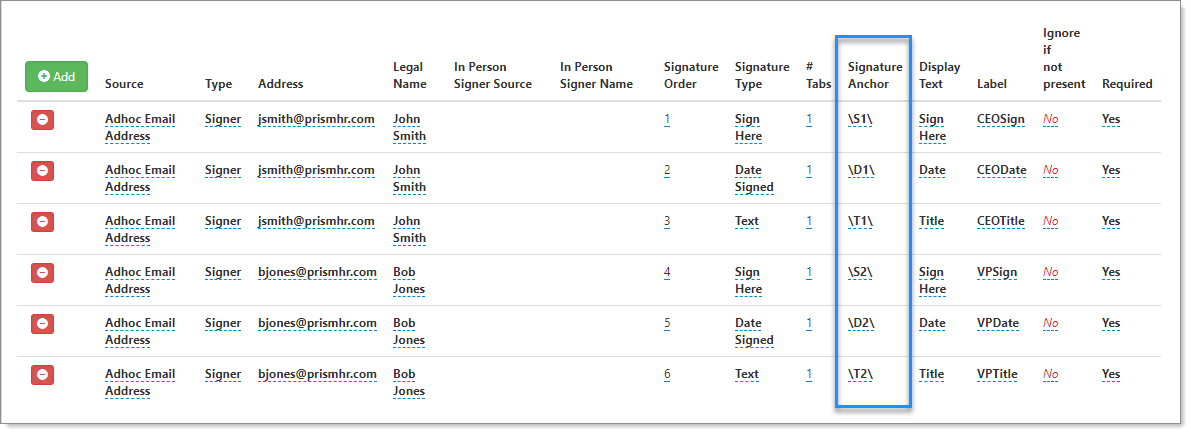
In the following example, each row represents a signer action such as signature, date, and title. The Signature Anchor column (noted in the image) uses the tags from the merge template. This example shows two signers (S1 is John Smith and S2 is Bob Jones), and each signer must indicate a date and add their title.
After the first person has signed, the process sends to the next person to sign based on the signature order. DocuSign reads all the tags for the first signer, then goes to next one. If the entries are out of order in the Email Template, it does not matter. The processing order proceeds by signer. Our example shows two signers, John Smith and Bob Jones. All the tags for John Smith are processed before the tags for that of Bob Jones. This is the case even if the tags for the signers were in a different order than shown in the example.
- Click Next to proceed to Step 4: Conditions.