Closing Cases Automatically
A Global Administrator can configure a business rule and workflow channels to automatically close a case when the last task on the case is completed.
Note: The case must be a case that was automatically created by a workflow, not a manually added case. To close a case manually, see Closing Cases.
This article details how to configure the business rules and workflows for the "Auto Close Case" feature.
Step 1: Business Rules Configuration
You will need to configure two business rules. Both rules use the _SetFieldValue business rule method. One rule sets the Active flag on the case record to unchecked and the other rule sets the case Status field on the record to "Resolved".
Active Flag = Unchecked
To configure the "Uncheck Active Flag When Last Task is Complete" business rule:
-
Go to System Admin
 > Advanced > Manage Business Rules. The Custom Logic Rules dashboard opens.
 -
Click Add. The Rule Details form opens.
-
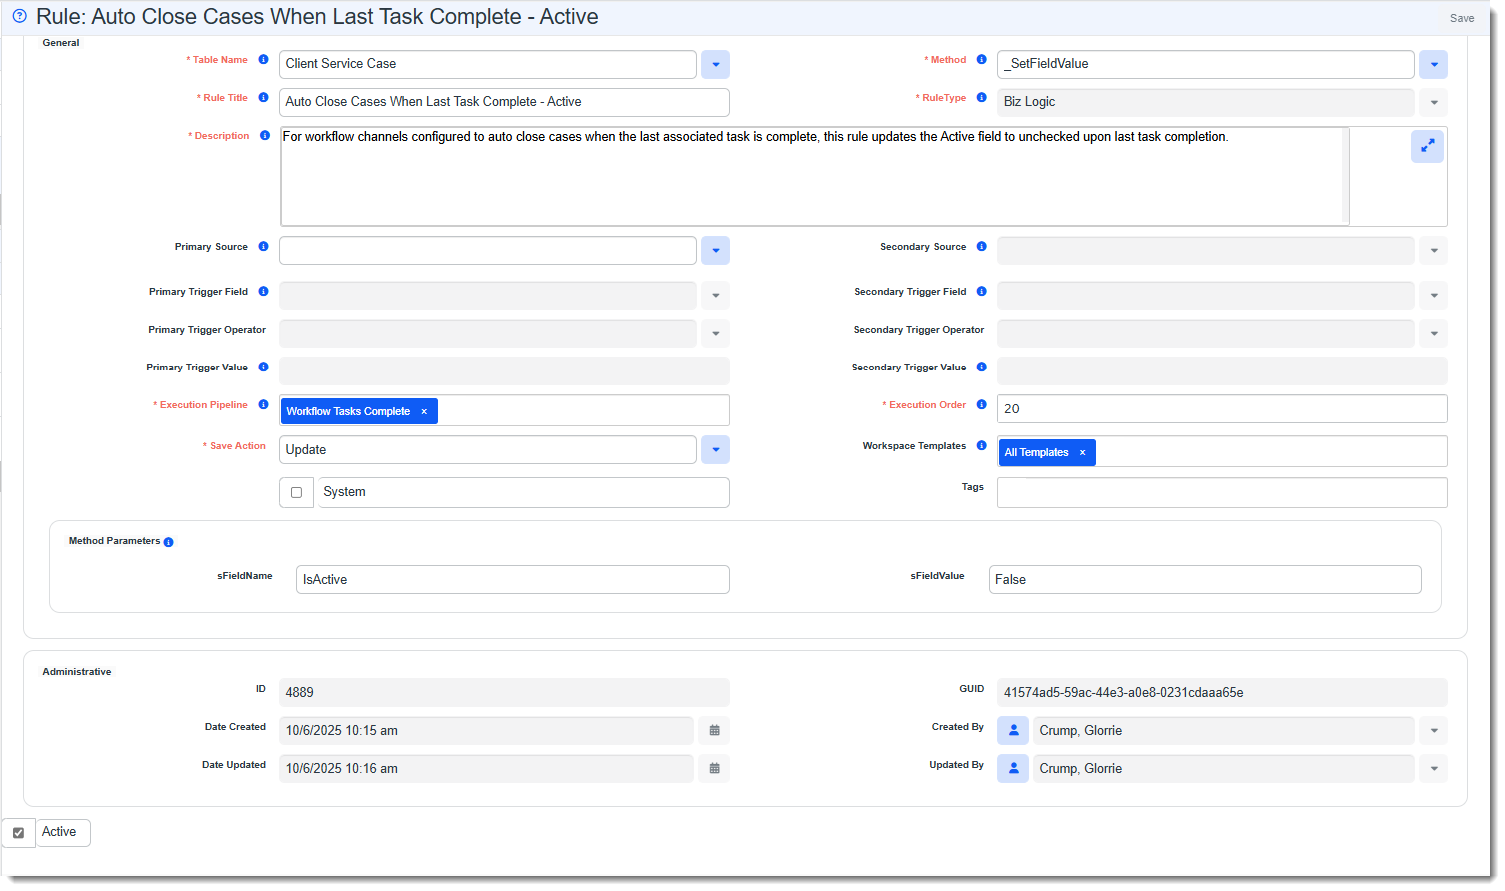
To add the rule to uncheck the Active flag upon case completion, complete the form fields:
Table Name This is the dataform where this rule will execute when the dataform is saved. Select Client Service Case. Method Select _SetFieldValue. Rule Title Provide an abbreviated explanation of what this rule does. EX: Auto Close Cases When Last Task Complete - Active. Rule Type ClientSpace controls this field automatically. When you select the method _SetFieldValue, the Rule Type is set to Biz Logic. Description Provide a more thorough explanation of what this rule is to accomplish. EX:For workflow channels configured to auto close cases when the last associated task is complete, this rule updates the Active field to unchecked upon last task completion. Primary Source
Auto-fills to Client Service Case.
Secondary Source
Auto-fills to Client Service Case.
Primary Trigger Field Leave blank. Primary Trigger Value Leave blank. Secondary Trigger Field Leave blank. Secondary Trigger Value Leave blank. Execution Pipeline Set to Workflow Tasks Complete. Execution Order This field controls the order in which rules will execute first. Rules execute from lowest to the highest number (i.e., least to greatest). It may be necessary to look at other rules already configured on this dataform to determine the order of precedence for executing rules.
EX: If you want the Active flag unchecked after the case is marked "Resolved", you might set the Execution Order on the "Update Status" rule to 10 and set the Execution Order on the "Active Flag" rule to 20.
Execution Order of Precedence: Within the Business Rules system, there is a distinct order of precedence that controls when the rules fire: 1. HardError, 2. SoftError, 3. BizLogic. Hard Error rules fire first using Execution Order to determine the order (from least to greatest). Then, Soft Errors fire by Execution Order and finally, Biz Logic rules fire by Execution Order.
Save Action Select Update. Workspace Template Select the Workspace Template(s) to which this rule applies. If it applies to all templates, select All Templates. System
N/A. This flag restricts access to only Developer Users for some of the rule fields. This does not apply when a Global Admin sets up the business rule and will maintain it going forward.
Tags
Optional. Tags are used to group rules or associated rules with certain features: EX: Cases, Pricing, SIDES, etc.
Note: Global Admin users can not edit the value in the Tags field if the System check box is selected.
Method Parameters
Set the following values:
-
sFieldName - Type IsActive.
-
SFieldValue - Type False.
-
-
To activate the rule, leave Active selected. Active is enabled by default.
-
Click Apply to save the rule and leave it displayed or Save to save the rule and close.
The configured rule appears similar to the following:
Status Field = Resolved
To configure the "Set Case Status to Resolved When Last Task is Complete" business rule:
-
Go to System Admin
> Advanced > Manage Business Rules. The Custom Logic Rules dashboard opens. -
Click Add. The Rule Details form opens.
-
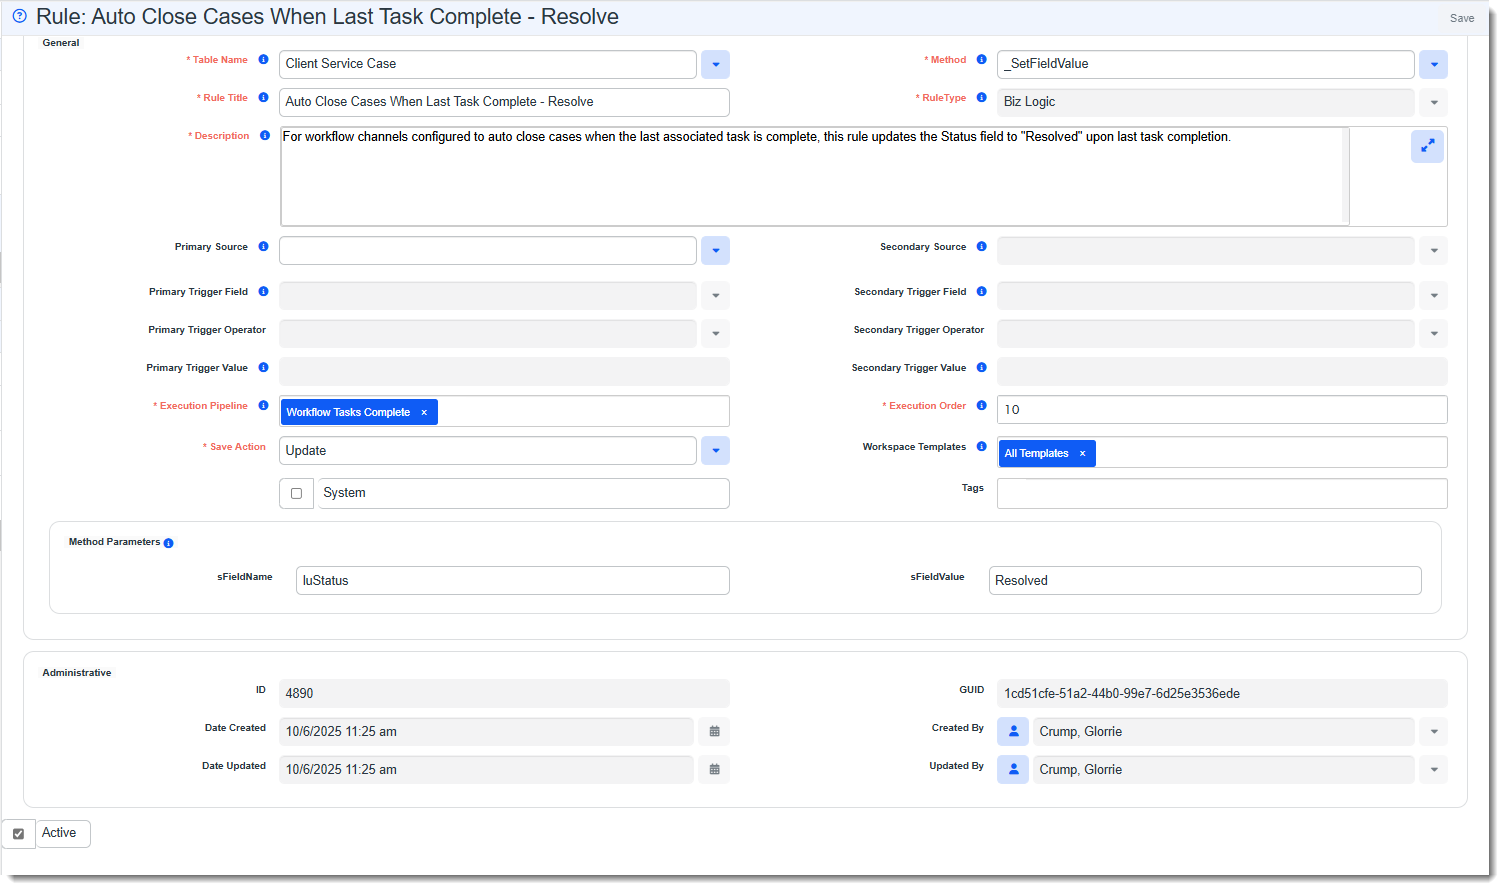
To add the rule to set the case Status field to "Resolved" upon case completion, complete the form fields:
Table Name This is the dataform where this rule will execute when the dataform is saved. Select Client Service Case. Method Select _SetFieldValue. Rule Title Provide an abbreviated explanation of what this rule does. EX: Auto Close Cases When Last Task Complete - Resolved. Rule Type ClientSpace controls this field automatically. When you select the method _SetFieldValue, the Rule Type is set to Biz Logic. Description Provide a more thorough explanation of what this rule is to accomplish. EX:For workflow channels configured to auto close cases when the last associated task is complete, this rule updates the case Status field to "Resolved" upon last task completion. Primary Source
Auto-fills to Client Service Case.
Secondary Source
Auto-fills to Client Service Case.
Primary Trigger Field Leave blank. Primary Trigger Value Leave blank. Secondary Trigger Field Leave blank. Secondary Trigger Value Leave blank. Execution Pipeline Set to Workflow Tasks Complete. Execution Order This field controls the order in which rules will execute first. Rules execute from lowest to the highest number (i.e., least to greatest). It may be necessary to look at other rules already configured on this dataform to determine the order of precedence for executing rules.
EX: If you want the Active flag unchecked after the case is marked "Resolved", you might set the Execution Order on the "Update Status" rule to 10 and set the Execution Order on the "Active Flag" rule to 20.
Execution Order of Precedence: Within the Business Rules system, there is a distinct order of precedence that controls when the rules fire: 1. HardError, 2. SoftError, 3. BizLogic. Hard Error rules fire first using Execution Order to determine the order (from least to greatest). Then, Soft Errors fire by Execution Order and finally, Biz Logic rules fire by Execution Order.
Save Action Select Update. Workspace Template Select the Workspace Template(s) to which this rule applies. If it applies to all templates, select All Templates. System
N/A. This flag restricts access to only Developer Users for some of the rule fields. This does not apply when a Global Admin sets up the business rule and will maintain it going forward.
Tags
Optional. Tags are used to group rules or associated rules with certain features: EX: Cases, Pricing, SIDES, etc.
Note: Global Admin users can not edit the value in the Tags field if the System check box is selected.
Method Parameters
Set the following values:
-
sFieldName - Type luStatus.
-
SFieldValue - Type Resolved.
-
-
To activate the rule, leave Active selected. Active is enabled by default.
-
Click Apply to save the rule and leave it displayed or Save to save the rule and close.
The configured rule appears similar to the following:
Step 2: Configuring Workflows
In this step, you will set up workflows for the triggering case and the dependent tasks that must be completed.
Note: Case workflows trigger differently than task workflows. Therefore, they must be contained in separate workflows.
In this article, we will cover only the requirements for configuring the "Auto Close Case" feature. For detailed steps to configure workflows, refer to Configuring your Workflow Channel.
Creating the Triggering Case Workflow
To use the "Auto Close Case" feature, the initial case must be created via a workflow. The workflow must have the following requirements:
-
Create a "Real Time" workflow.
-
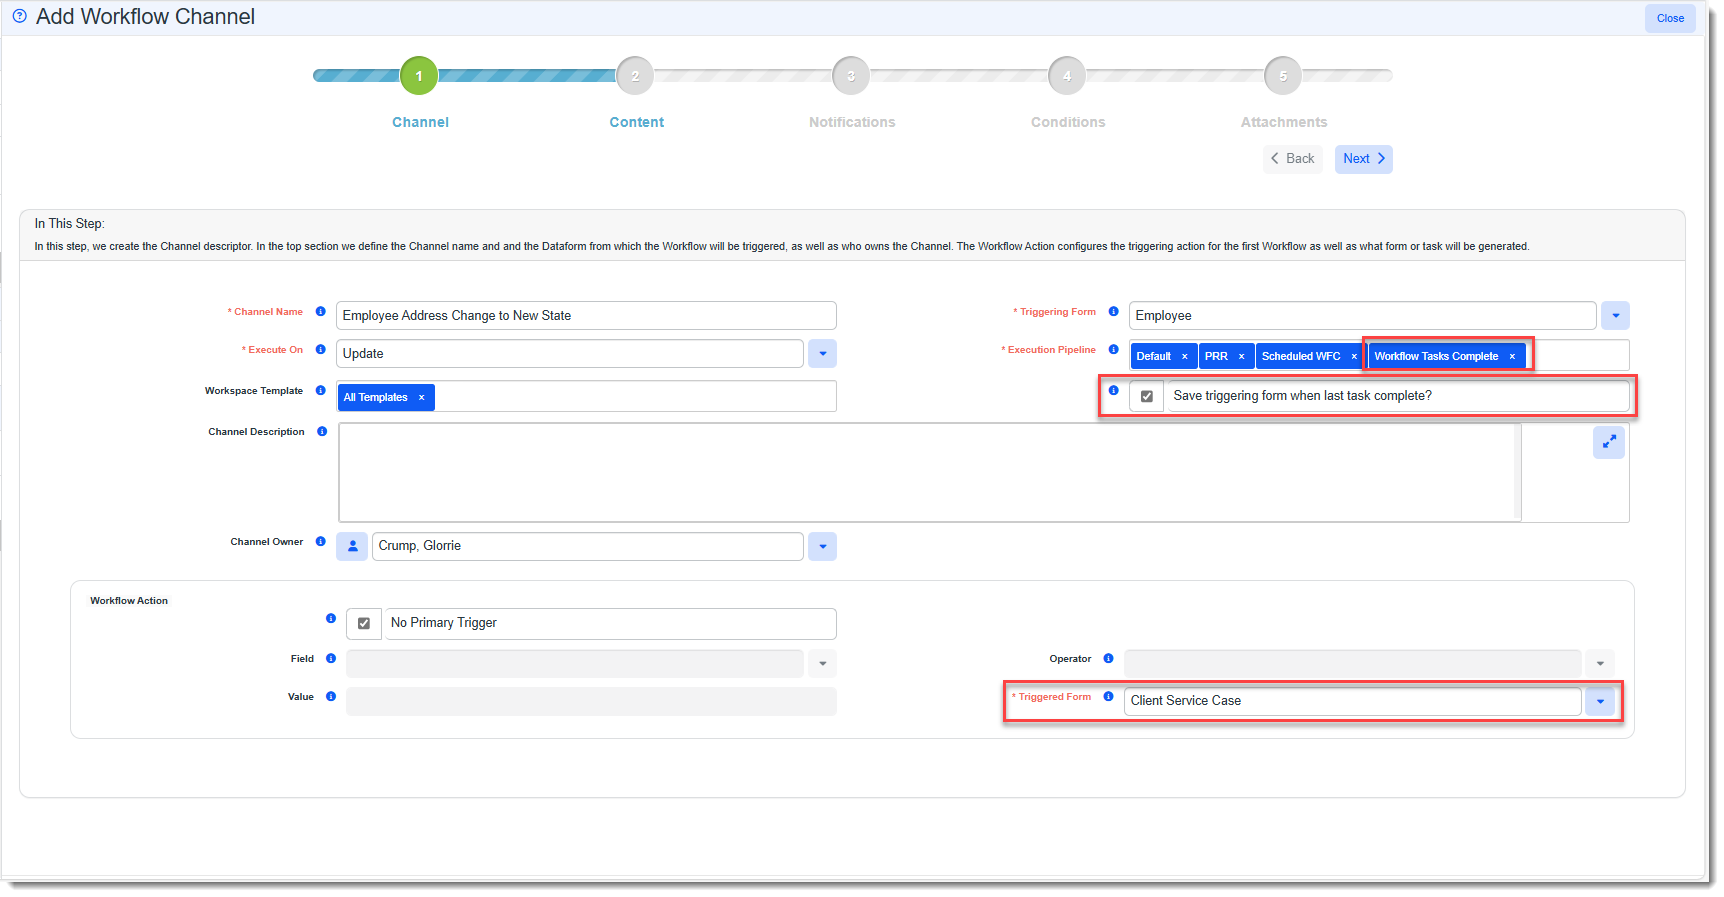
In Workflow Channel configuration, Step 1: Channel, ensure the following:
-
Execution Pipeline contains Workflow Tasks Complete.
-
Save triggering form when last task complete? is checked.
-
Triggering Form is set to the form you are using to trigger case creation. In our example, the Triggering Form is the Employee dataform as we will be triggering automatic case creation when an employee's address is updated to an address in a new state.
-
Triggered Form is set to Client Service Case.
Note: The name of the form may vary slightly depending on your configuration. EX: Case or Client Service Case.
Your screen, when properly configured, should appear similar to the following:
You can publish the workflow when you are ready. The workflow is added to the Workflow Channels dashboard. Note: If it is still unpublished, you may have to adjust default filter settings on the dashboard to see it listed.
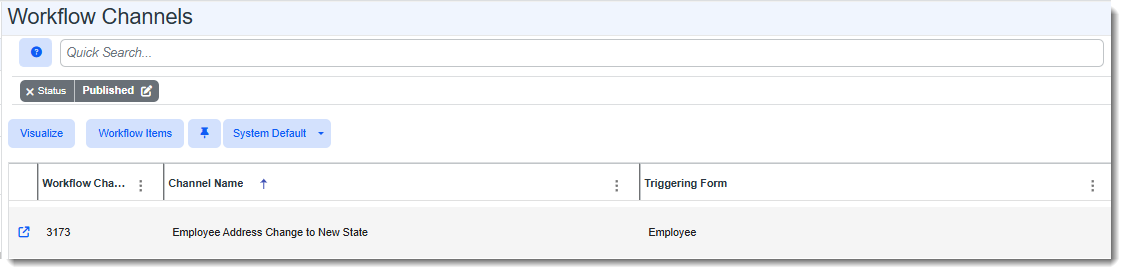
-
Creating the Initial Task Workflow
Next, create the initial task workflow for the triggered case as a separate workflow. The workflow must have the following requirements:
-
Create a "Real Time" workflow.
-
In Workflow Channel configuration, Step 1: Channel, ensure the following:
-
Execution Pipeline contains Workflow Tasks Complete.
-
Save triggering form when last task complete? is checked.
-
Triggering Form is Case.
-
Field is set to Case Type (fkCaseTypeID).
-
Operator is set to Equals.
-
Value is set to the default case type that you want assigned to the created task.
Note: We recommend creating a lookup specifically for the "auto close" feature. EX: Employee Address Change - New State.
-
Triggered Form is set to Task.
-
Your screen, when properly configured, should appear similar to the following:
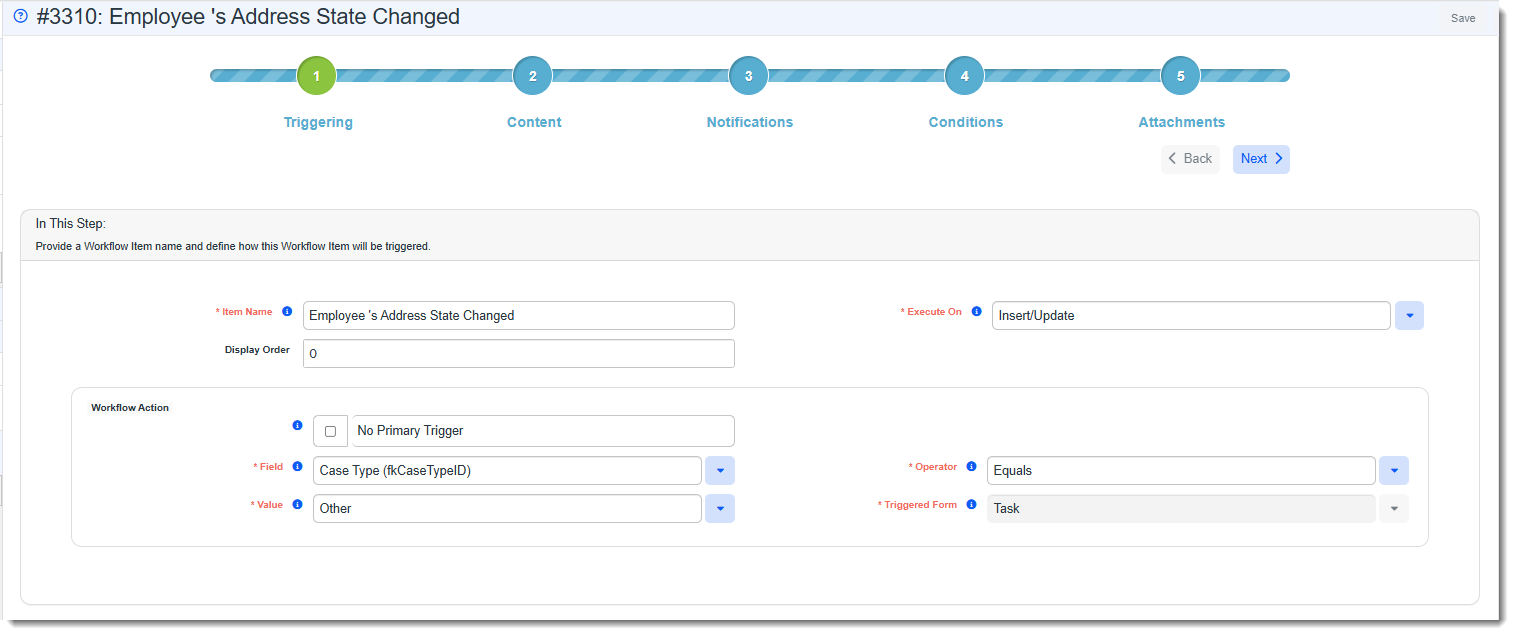
You can publish the workflow when you are ready. The workflow is added to the Workflow Channels dashboard. Note: If it is still unpublished, you may have to adjust default filter settings on the dashboard to see it listed.
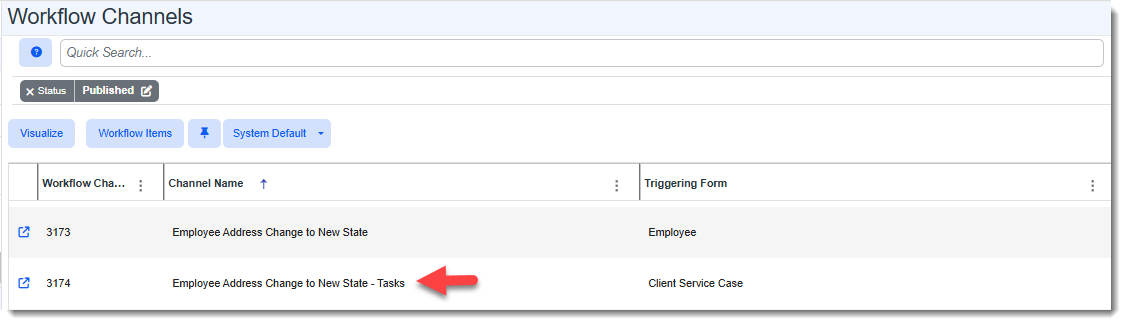
Creating the Dependent Task Workflows
Next, create dependent task workflows by clicking Continue Workflow from Here on the Action panel of the initial task workflow in Step 1: Triggering.
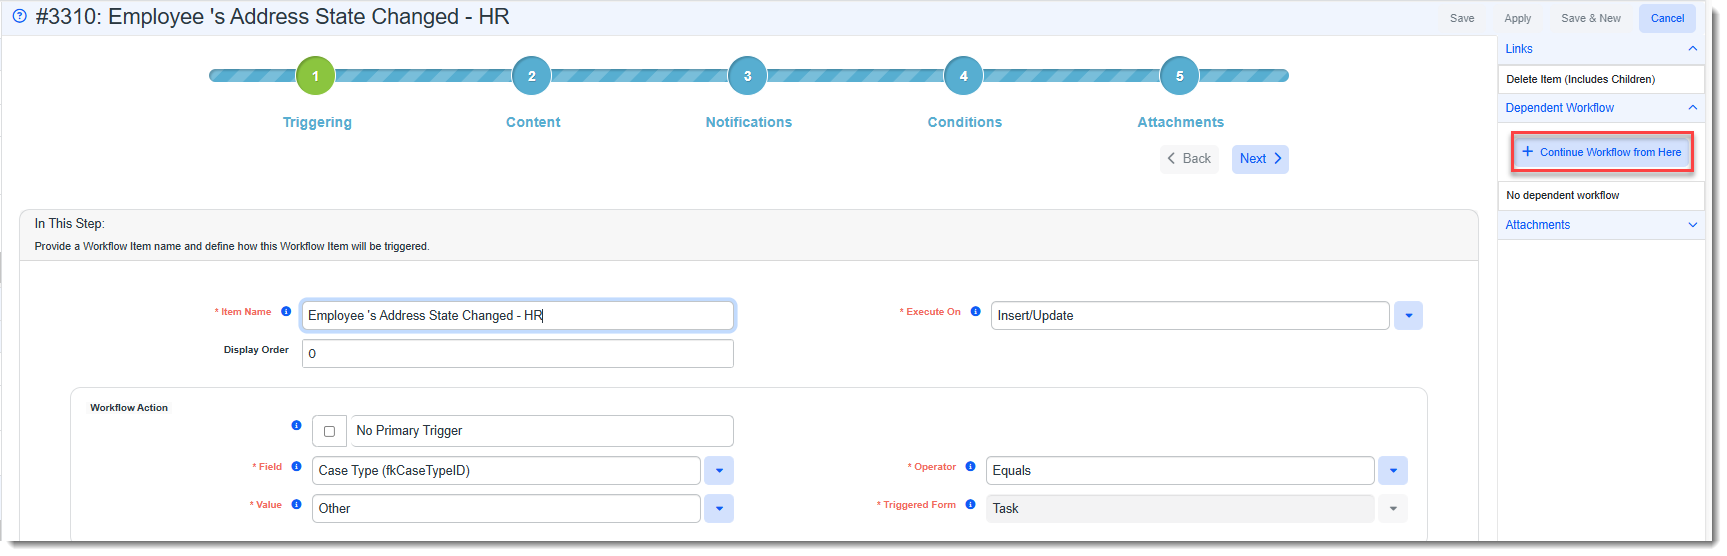
Each workflow will be dependent on the other so that the Case cannot be closed until each dependent task is completed. Each workflow must have the following requirements:
-
Create a "Real Time" workflow.
-
In Workflow Channel configuration, Step 1: Channel, ensure the following:
-
Execution Pipeline contains Workflow Tasks Complete.
-
Save triggering form when last task complete? is checked.
-
Triggering Form is Case.
-
Field is set to Case Type (fkCaseTypeID).
-
Operator is set to Equals.
-
Value is set to the default case type that you want assigned to the created task.
Note: We recommend creating a lookup specifically for the "auto close" feature. EX: Employee Address Change - New State.
-
Triggered Form is set to Task.
-
Repeat the step of clicking Continue Workflow from Here from the last dependent workflow until all dependent tasks have been completed.
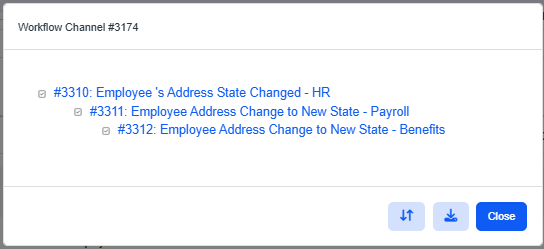
When you view the initial task workflow, you will see all of the dependent workflows:
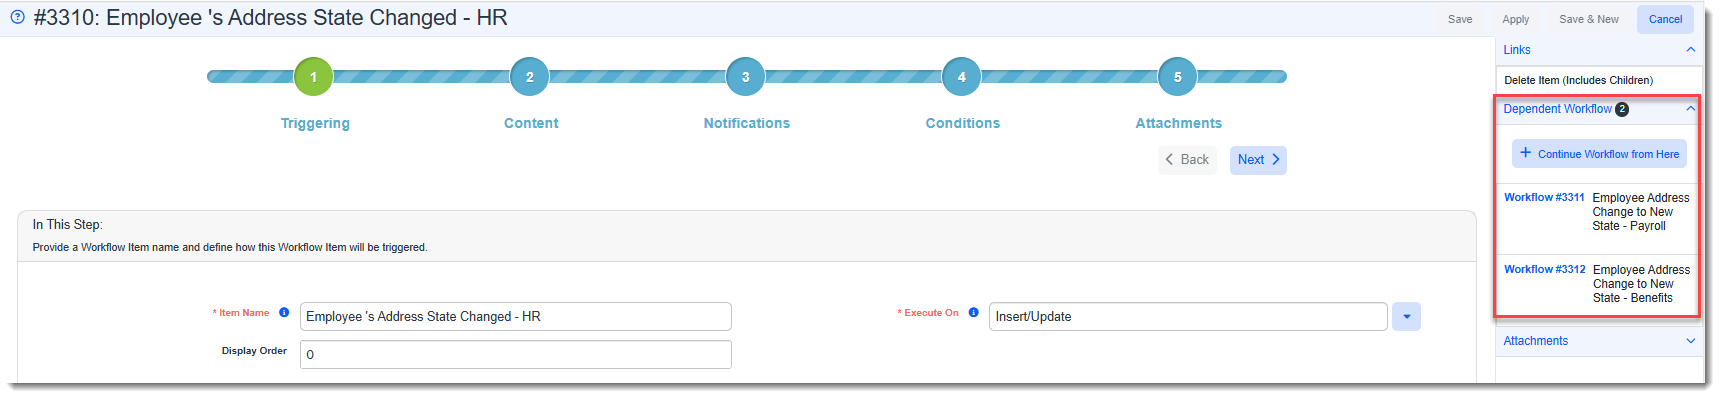
You can also click initial task workflow on the Workflow Channels dashboard and then click the Visualize button at the top of the grid to view the dependency relationships.