BPM Option 2: Reviewing, Selecting, and Approving Benefits - No Prior Batch History
Note: The steps below are written for your customers. While there are some notes in the online version that only you can see (such as this one), the customer version contains only steps and relevant customer notes. The process outlined in this article is for new customers or prospects who have no prior batch history (i.e., the Source Benefits Batch field of the Benefits Batch is blank.) Click the link to download a PDF to share with your customers: BPM Customer Guide.
Step 1: Log in to BPM
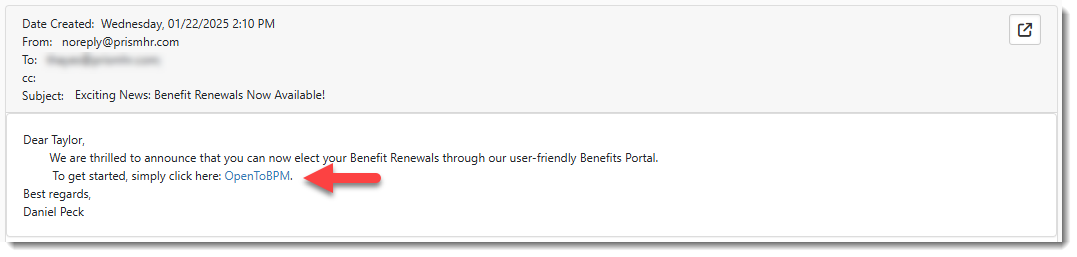
When offered benefits are ready to review, you will receive an email similar to below announcing that benefits are ready to review in the Benefit Plan Manager (BPM) portal. The email will contain a link to access the portal.
Note: Some of the verbiage and design elements in the example images displayed here will vary slightly from your actual screens due to differences in software configuration. However, the functionality is the same.
To log in to BPM:
-
Open the email announcing that benefits are ready for your review and click the link to open BPM.
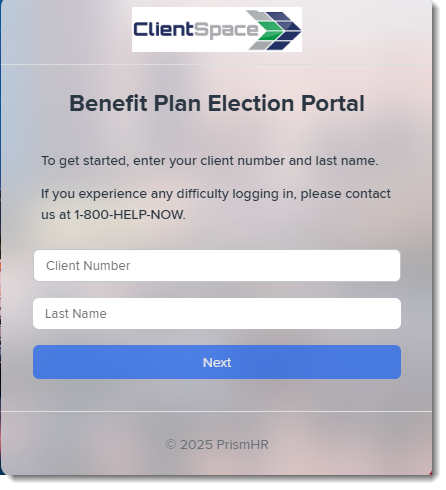
The BPM Login Window displays.
-
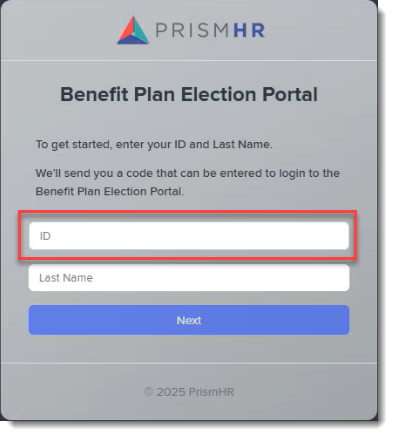
Enter your Client Number or ID and Last Name and then click Next.
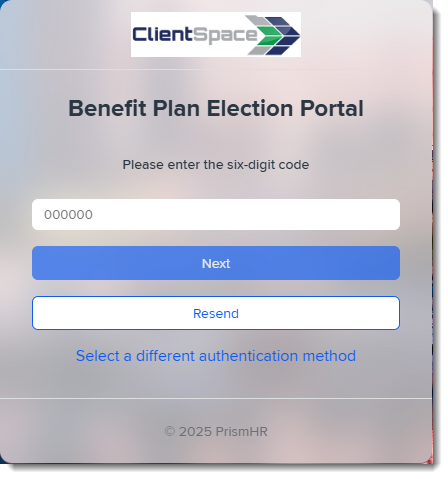
The Account Access Confirmation window displays.
Note:
-
You may have received the Client Number by phone or in a separate email from the notification you received with the BPM access link. For assistance, contact your Benefits Representative.
-
If you are not an existing customer and have requested a proposal, you will be prompted for an ID instead of a Client Number. The ID was included with the email notification you received containing your BPM access link.
-
-
Click the option to send the code to either your mobile phone number or email address and then click Send Verification Code.
A data entry field displays for entering the code.
Note: You must use the mobile phone number or email address that your Benefits Representative has on file for you.

-
Once you receive the code, enter it in the space provided and click Next.
Note: Additional options display on this screen for resending the code or selecting a different authentication method. If you select the option to use a different authentication method, you are returned to the Account Access Confirmation window. The only two options are email or SMS/Text Msg to your mobile phone and you can select the alternative option if the first option failed. For instance, if you were unable to receive a verification code via email, select the SMS/Text Msg option to receive the verification code via text your mobile phone number.
After successful authentication of the verification code, the BPM Welcome page displays.
Step 2: Open the Batch
To open the batch:
-
Click the Benefits Batch card on the BPM Welcome page.
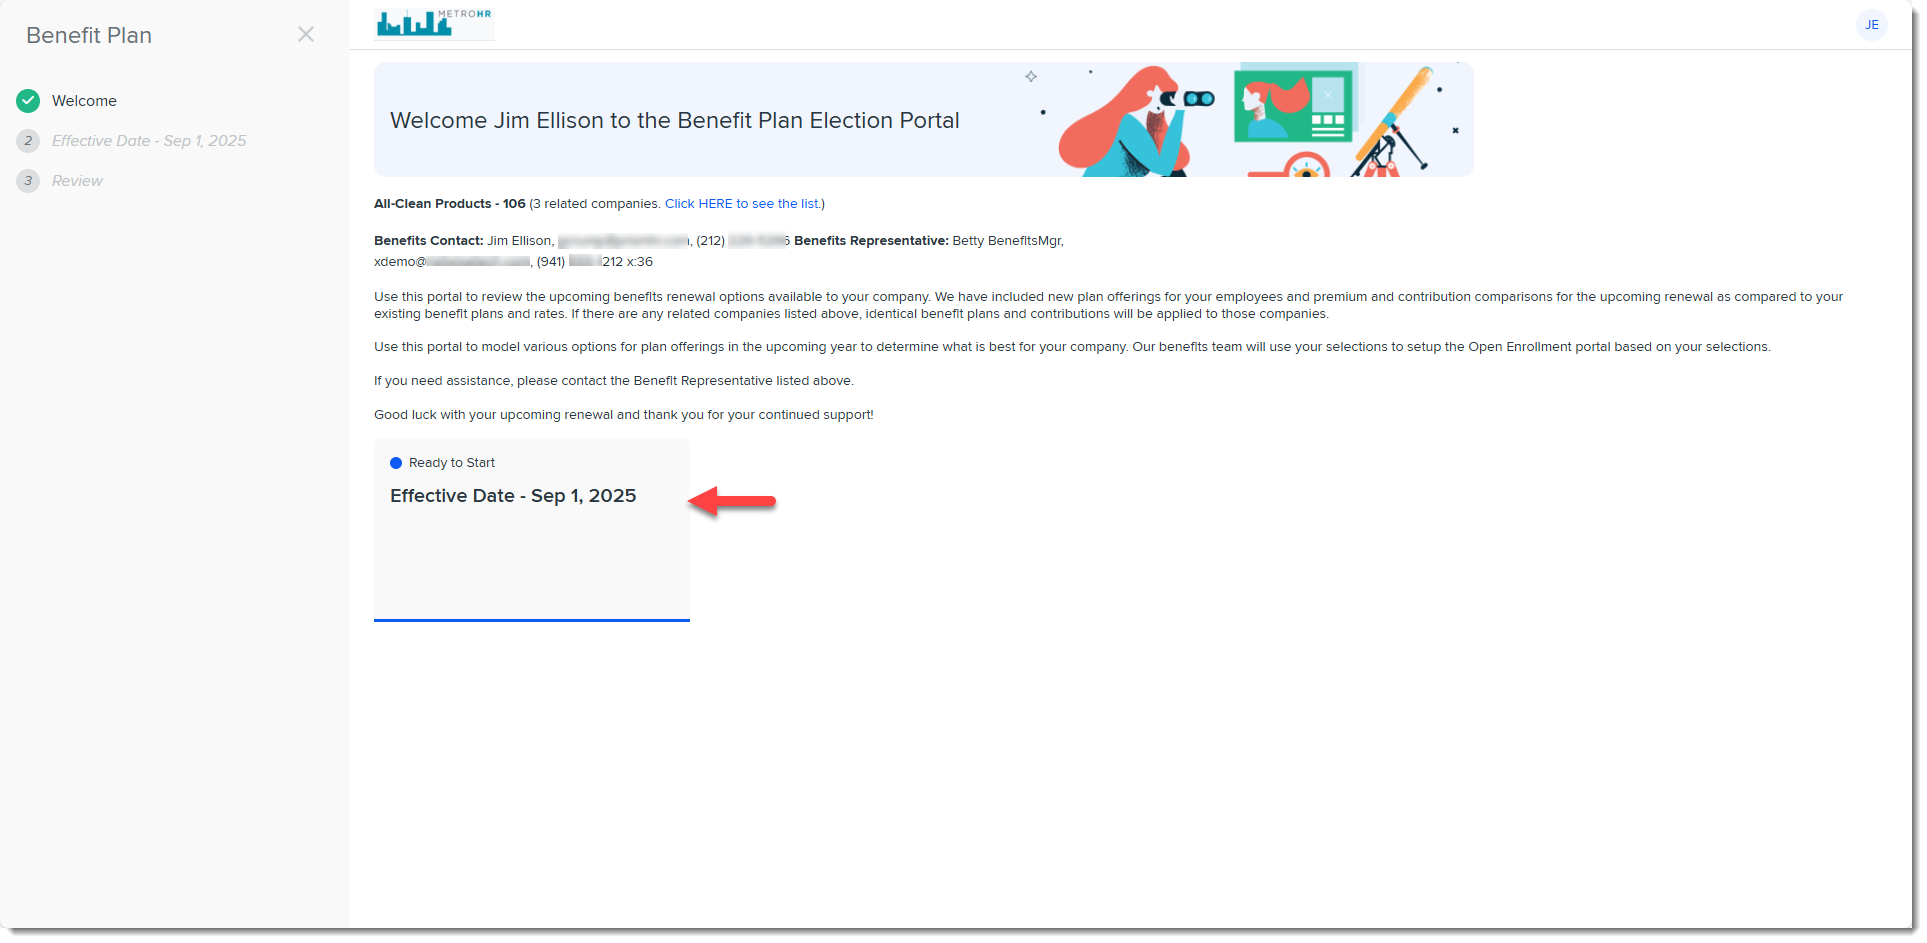
- Note: If your company is a parent company and you have related child companies, you may also see a Related Companies link on the Welcome Page next to the Client Name and Client Number.
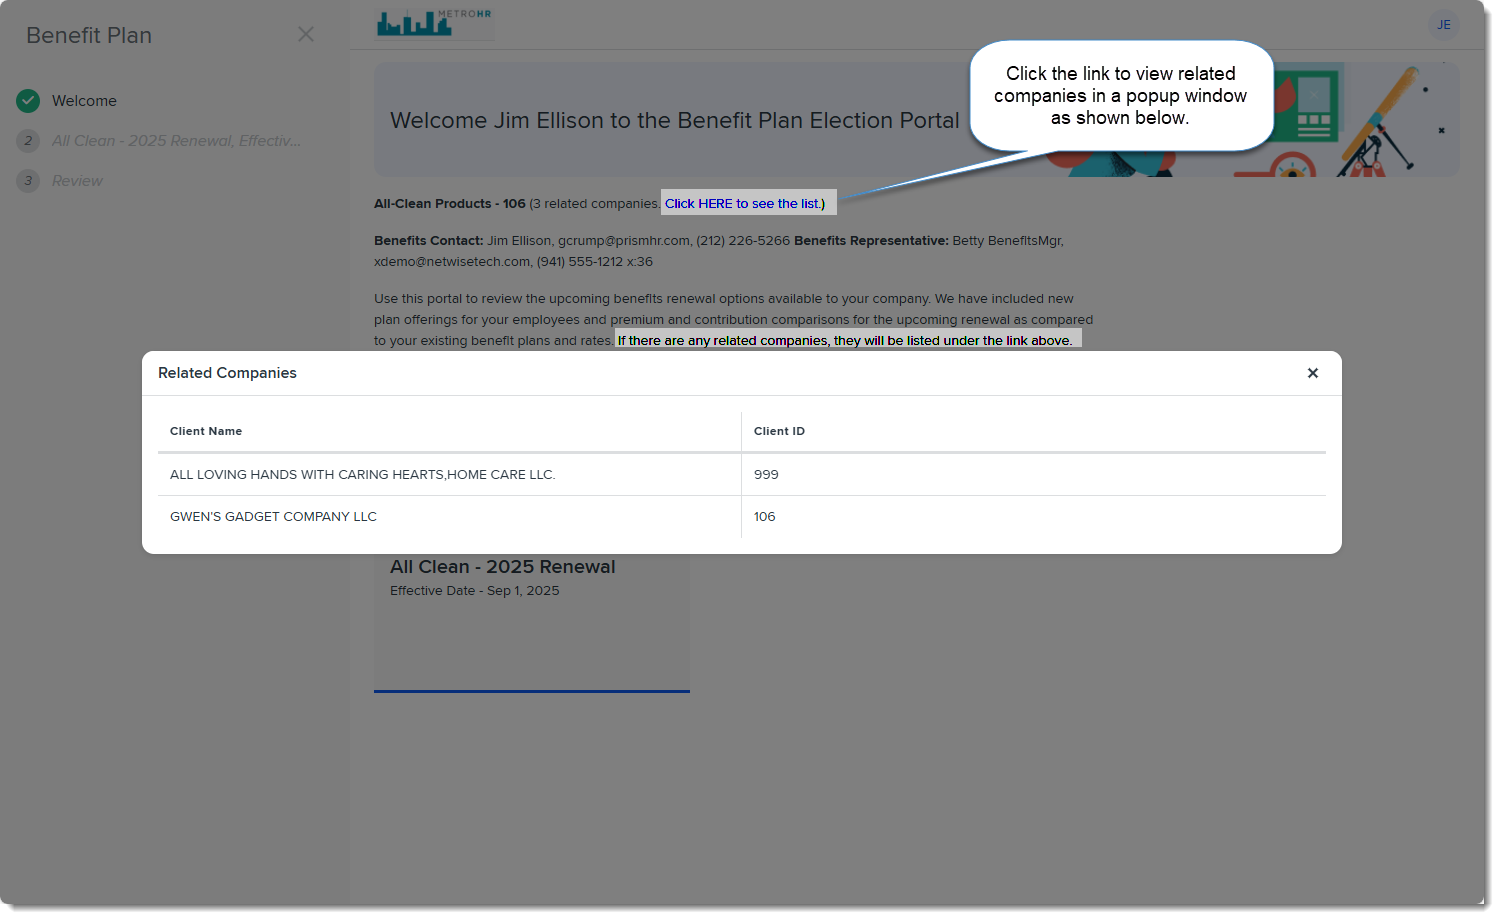
- Clink the link to display the related companies.
The batch opens to the Benefits Summary tab and displays a summary of the offered benefits in this benefits batch.
Tip: Clicking Manage Benefits or Welcome in the navigation pane takes you back to the Welcome page.
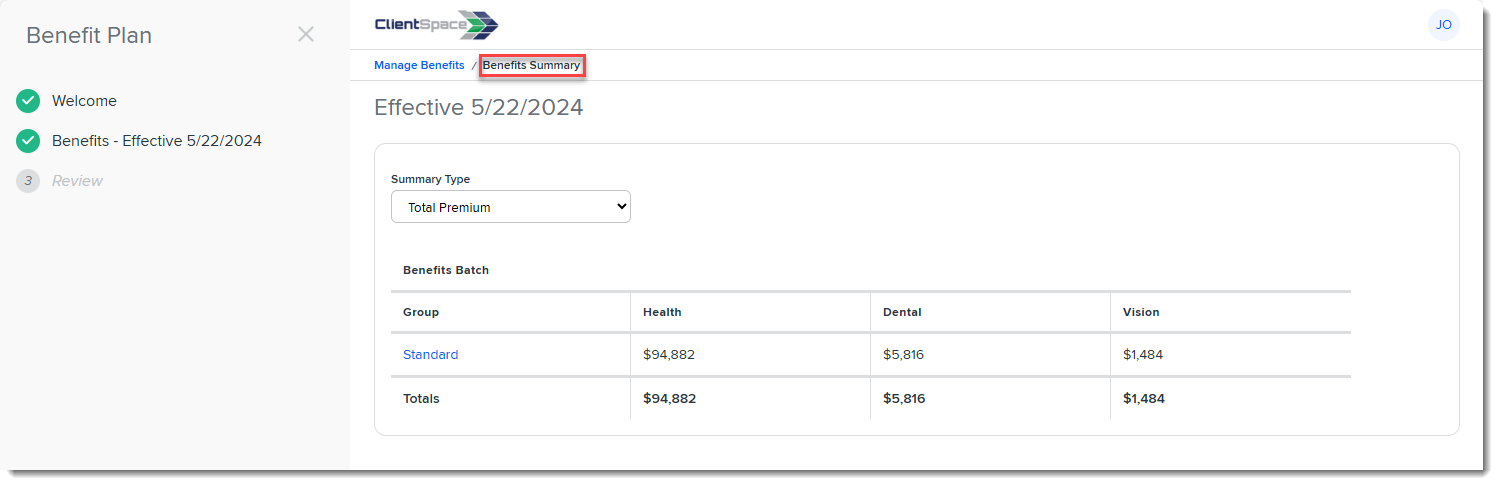
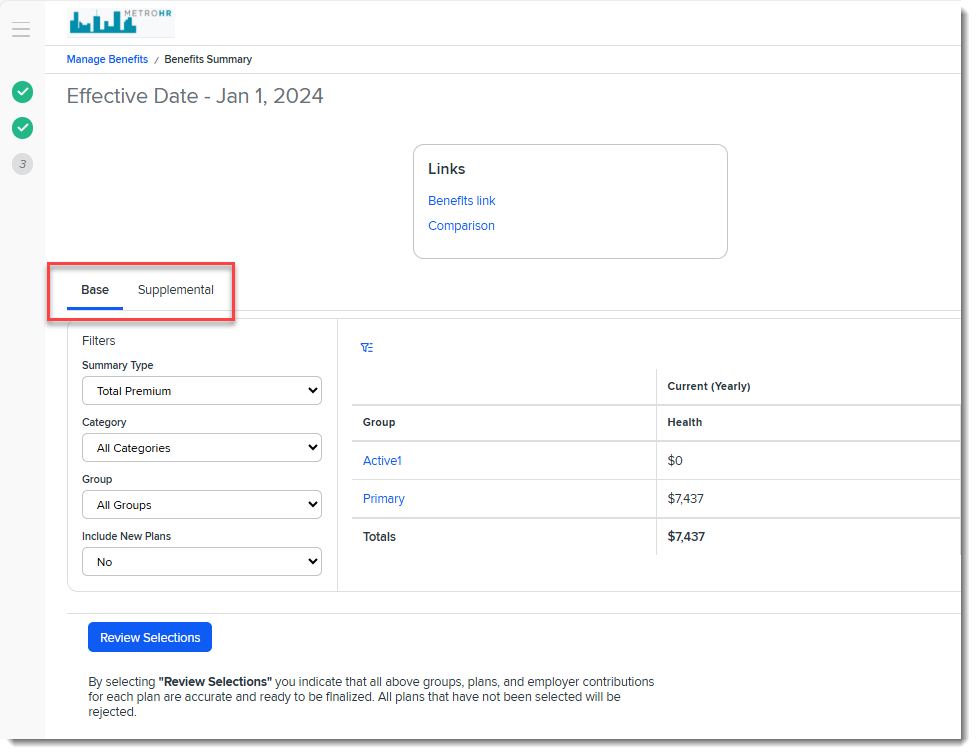
Step 3: Review the Benefits Summary
Once you open the batch, you are on the Benefits Summary tab where you can review Benefits Summary details.
Basic Navigation
To navigate the benefits summary:
-
The Benefits Summary tab has two sub-tabs: Base and Supplemental. The Base tab displays tier-based plan calculations. The Supplemental tab displays supplemental plan calculations.
-
The display rules for the Base and Supplemental tabs are as follows:
-
If the Benefits Batch contains a mix of tier-based and supplemental plans in "New" or "Selected" status, both the Base and Supplemental tabs display.
-
If the Benefits Batch contains only tier-based plans in "New" or "Selected" status, only the Base tab displays.
-
If the Benefits Batch contains only supplemental plans in "New" or "Selected" status, only the Supplemental tab displays.
-
-
The Benefits Summary tab also contains a "Filters" section containing filter drop-down lists for Summary Type, Category (i.e., plan categories such as Health, Dental , Vision, Other, etc.), and Group (i.e., Benefits Group name).
-
The filters are set to display all plan categories and benefits groups in the batch for all plans in "New" or "Selected" status by default.
-
The default Summary Type is Total Premium when you are viewing the Base tab. The default value (and only available value) is Employee Contribution when you are viewing the Supplemental tab.
-
-
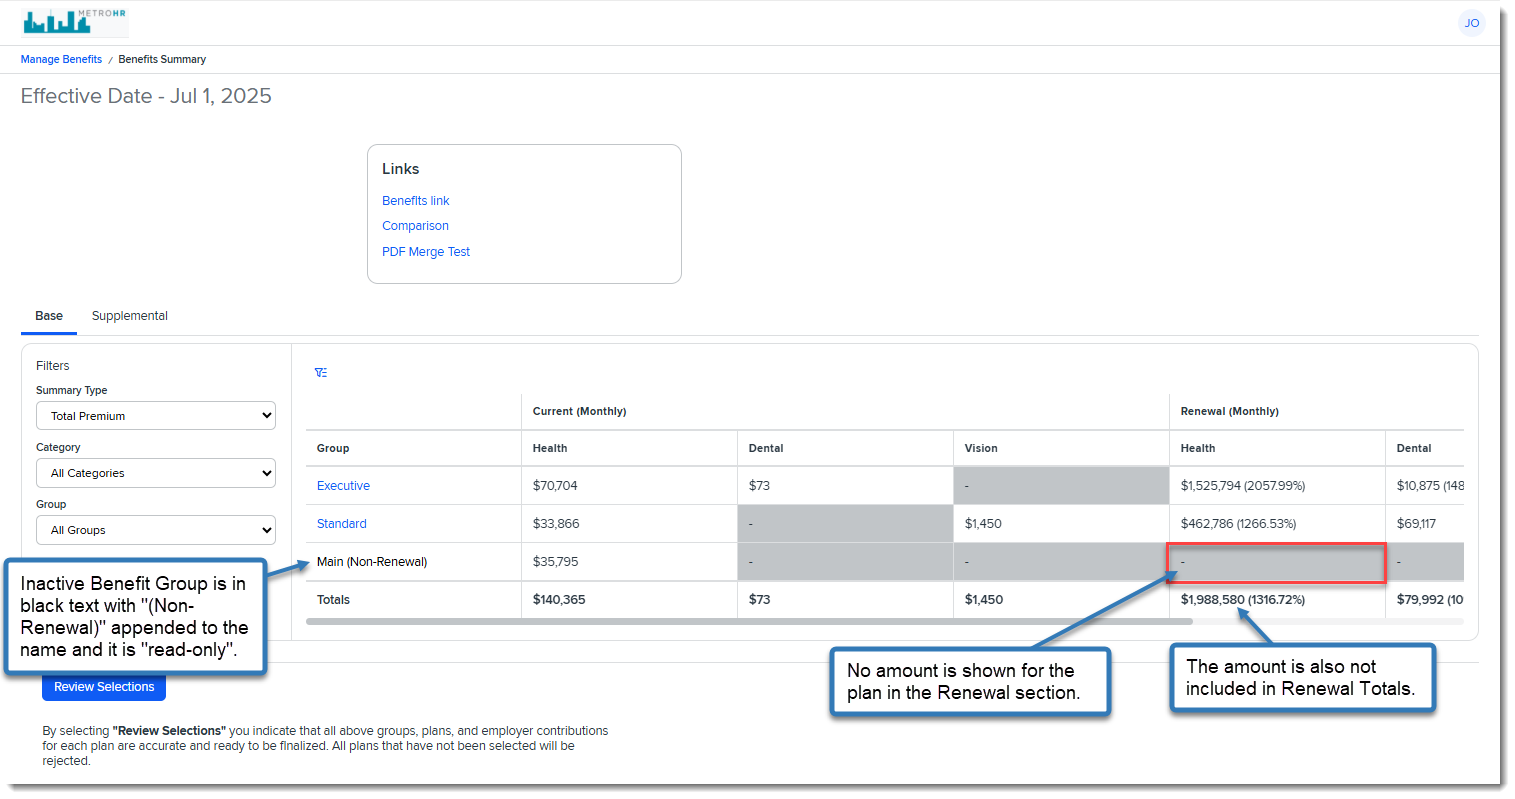
If a Benefit Group is Inactive but contains Active OBPs for the current plan year, you can see the historical values under Current (Monthly) but the amounts are not included in the renewal calculations (or on Plan Comparison tab and Selection Summary/Signature page calculations when you finalize the batch at the end of this process). On the Manage Benefits > Benefits Summary Page:
-
Active Benefit Groups are listed alphabetically first. Inactive Benefit Groups are listed alphabetically after the list of Active Benefit Groups.
-
For each Inactive Benefit Group, "(Non-Renewal)" is appended to its name, the benefit is read-only with its name in black text, and no amounts from its associated OBPs are shown in the Renewal section or included in the Renewal Totals calculations.
In the example below, the benefit group "Main" is Inactive and contains a single Active Health plan.
-
Review
To review the benefits summary:
-
For renewal batches, on the Benefits Summary tab, review the side-by-side comparison of Current to Renewal statistics for the benefit group(s).
-
For tiered plans on the Base tab, change the Summary Type view from the default of Total Premium to other available views: Employer Contribution, Employee Contribution, and Enrolled Count.
-
For supplemental plans, the only available selection for Summary Type is Employee Contribution.
-
-
If you are a new customer or you have requested a proposal (RFP) no Current to Renewal statistics are available to display. However, you can view the benefits batch calculations.
-
For tiered plans, change the Summary Type view from the default of Total Premium to other available views: Employer Contribution, Employee Contribution, and Enrolled Count to see the benefits batch calculations broken down by these categories.
-
For supplemental plans, the only available selection for Summary Type is Employee Contribution.
-
Step 4: Review and Select Offered Plans
Since this is your first time selecting plans and you have no current plans. If you had some current plans up for renewal, they would already be in a "Selected" status and you would be able to see current year and renewal year summary details and make some initial comparisons on the renewing plans. Since you do not have that, you need to review the available plans first and at least tentatively select some plans on the Plan Comparison tab before you can review summary details such as contribution methods and enrollment counts.
Reviewing Plans
To review and compare offered plans:
-
Click a Benefit Group name to drill into the Group Summary details.
This takes you to the Group Summary tab where the Plan Comparison sub-tab defaults as open.
Note: Since there is no prior history, and all of the plans are new plans, there is no percentage of premium change shown next to each coverage level. If you were renewing plans from the prior year, you would see a percentage of premium change in parentheses next to each coverage type for renewal plans.
You can compare the details of each offered plan by Plan Type on the Group Summary > Plan Comparison tab. The Plan Details include:
-
All premiums for all Coverage Levels as applicable. Example: Employee Only, Employee + Spouse, Employee + Child, Employee + Family, etc.
Note: Coverage Level names may vary from the examples given above.
-
Co-pay amounts
-
In Network/Out of Network Deductibles
-
Out-of-Pocket Maximums
There may also be details for specific services (such as hospitalization or outpatient surgery) as well as additional fields specific to a plan category. For instance, for a Vision Plan, there may be details outlining the coverage for both necessary and elective contact lenses. There are not as many details for supplemental plans. For these plans, typically only the premium amounts display in BPM.
Note: You will need to repeat this step for each Plan Type by selecting a different option from the Plan Type field.
The Plan Comparison tab is also where you will select plans. Return to the Plan Comparison tab for plan selection once you have reviewed Benefits Summary information and made any changes as necessary to Contribution Methods and/or enrollment counts.
-
Selecting Plans
Remember: It is OK to tentatively select plans and later make changes prior to submission as long as you review the Group Summary details and make any necessary changes or corrections to contribution methods and/or enrollment counts prior to submission. (This process is covered in Step 5.)
To select plans:
-
While still on the Group Summary > Plan Comparison tab and the desired Plan Type selected, at the top of the Plan Comparison tab, notice that all of the plans are grouped under "Available Plans" in "New" status.
-
Make selections using the following guidelines:
-
If you want to select a New plan: Click the down arrow and change from "New" to "Selected".
-
If you want to reject a New plan: Click the down arrow and change from "New" to "Reject". Notice that the background color of the rejected plan changes to gray.
-
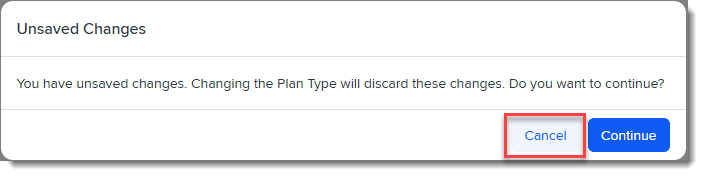
When you are finished making selections for the currently selected Plan Type, click Save.
ALERT: If you attempt to go to another tab or select a different Plan Type without saving your changes, an Unsaved Changes warning message similar to the example below displays. To avoid losing work, click Cancel and then click Save to save your work.
-
Repeat the steps in this section to make plan selections for all Plan Types in the selected Group.
Step 5: Review the Group Summary
Next, review Group Summary details on the Summary tab. This is where you can:
-
Review the Available Plan premiums for the Employee Only (EO) coverage level within a Benefit Group by Plan Type.
Note:
-
Coverage level names may vary depending on your configuration. The equivalent of the Employee Only (EO) premiums are shown here.
-
As covered in the previous section, you can view renewal premiums for all coverage levels included in offered plans on the Plan Comparison tab.
-
-
Edit contribution method details and enrollment counts for the selected plans, if necessary.
Accessing the Group Summary
To access the group summary:
-
With the desired group selected, click the Summary (Contributions)tab.
-
Then, ensure the desired Plan Type is selected.
You are now on the Group Summary > Summary (Contributions) tab.
Review EO Premiums
To review EO Premiums:
-
On the Group Summary > Summary (Contributions)tab, select each Plan Type and evaluate each Plan Type's EO (Employee Only) Premium, Total Premium, Employer Contribution, Employee Contribution and Enrolled Count.
Edit Contribution Methods and Enrollment Counts
Now, let's review contribution methods and enrollment counts and edit them if necessary.
To edit contribution method and enrollment counts:
-
With the desired Group and Plan Type still selected on the Group Summary > Summary (Contributions)tab, click arrow next to a plan to expand the details.
-
Review the Contribution Method and the contribution amounts and percentages for each tier, paying particular attention to the Employer Contribution details. In the example below, the employer pays the entire Employee Only premium and a portion of the premium for the remaining tiers:
-
If you want to change the contribution method:
-
Open the Contribution Method drop down list and make a new selection.
Note:
-
To view definitions of each contribution method, click the tooltip icon
 next to the Contribution Method section label to display a popup window containing the definitions.
 -
Depending on your selection, Employer Contrib% or Employer Contrib fields in the grid become editable.
-
-
Enter the Employer Contrib% or Employer Contrib amounts and then click Save.

-
-
If you want to change Enrolled Count values, with the Contribution Method details still expanded, update the Enrolled Count fields for each coverage level as necessary.
Note: If there are associated child companies, you cannot edit the Enrolled Count in BPM. The fields will appear dimmed and unavailable. This is because BPM aggregates parent company and child company enrollment counts for you and uses this information to calculate the percentages and other calculations shown.
ALERT: If you return to the Plan Comparison tab and select new plans that are not yet listed here, you should then return to the Group Summary > Summary tab and review/edit the contribution methods and enrollment counts for these plans, making any necessary changes.
-
Repeat these steps to review contribution method and enrollment details for all plans within each Plan Type.
Edit the Waiting Period Option
If you need to edit the default Waiting Period option located near the top of the Group Summary > Summary (Contributions) tab in BPM, you can select the applicable period from the drop-down list.
The Waiting Period field may appear by itself or display under the Cafeteria Contribution Amount field (if the offered plan includes one or more cafeteria plans). If you edit the Waiting Period field, you must click the Save button in this section to apply the change.
The associated Benefit Groups record in ClientSpace is also updated upon Save.
Add the Cafeteria Plan Contribution Amount
A Cafeteria Contribution Amount field displays near the top of the Group Summary > Summary tab in BPM if you have at least one cafeteria plan identified in the Benefits Group. This reflects the yearly employer contribution that employees who sign up for a cafeteria plan can use toward plan premiums. The employee pays the remaining premiums using pretax dollars up to the IRS contribution limits.
Click Save in the section to apply the change. Note also that cafeteria plans are identified in the Group Summary > Summary (Contributions) grid by a coffee cup![]() icon.
icon.
Step 6: Work on the Remaining Groups (if Applicable)
If you have more than one Benefit Group in this batch, repeat the following sections for the remaining groups:
Step 7: Review the Selection Summary, Sign and Submit Selections
ALERT: Plans for all Benefit Groups in the current batch must be reviewed and your final selections must be made before submitting final selections. Any plans in "New" status that have not been either selected or rejected will automatically be rejected when you submit final selections.
When you are finished making plan selections for all Plan Types in all Groups, you can review a summary of your selections, add your signature to indicate that you have approved the selections and then finalize the process by submitting the changes.
To review the selection summary and submit selections:
-
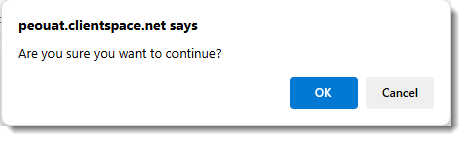
When you are finished making plan selections for all Plan Types in all Groups, click Review Selections.
A confirmation message similar to the following displays.
-
Click Continue .
BPM checks for submission errors before proceeding with the review. Review the errors and proceed as necessary. Non-critical errors will have a Save Anyway option similar to the one in the message below.
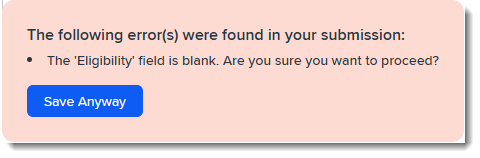
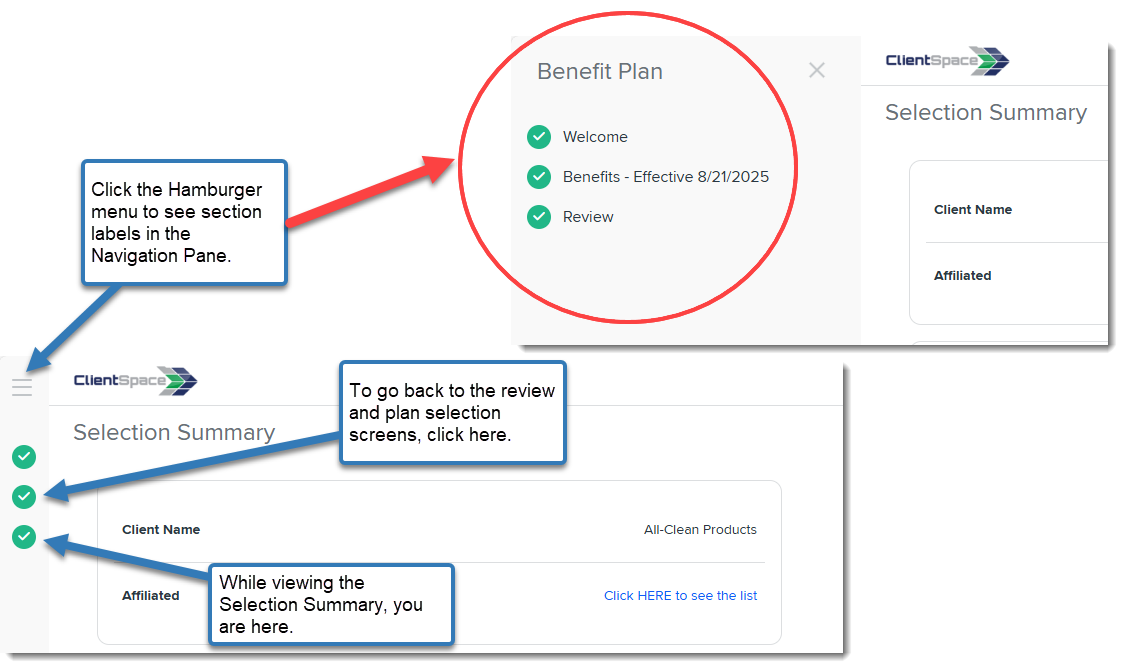
You can continue with the review and address the errors later or go back to a prior section using the left navigation panel. Click the second green check mark to go back to the plan review and plan selection screens.
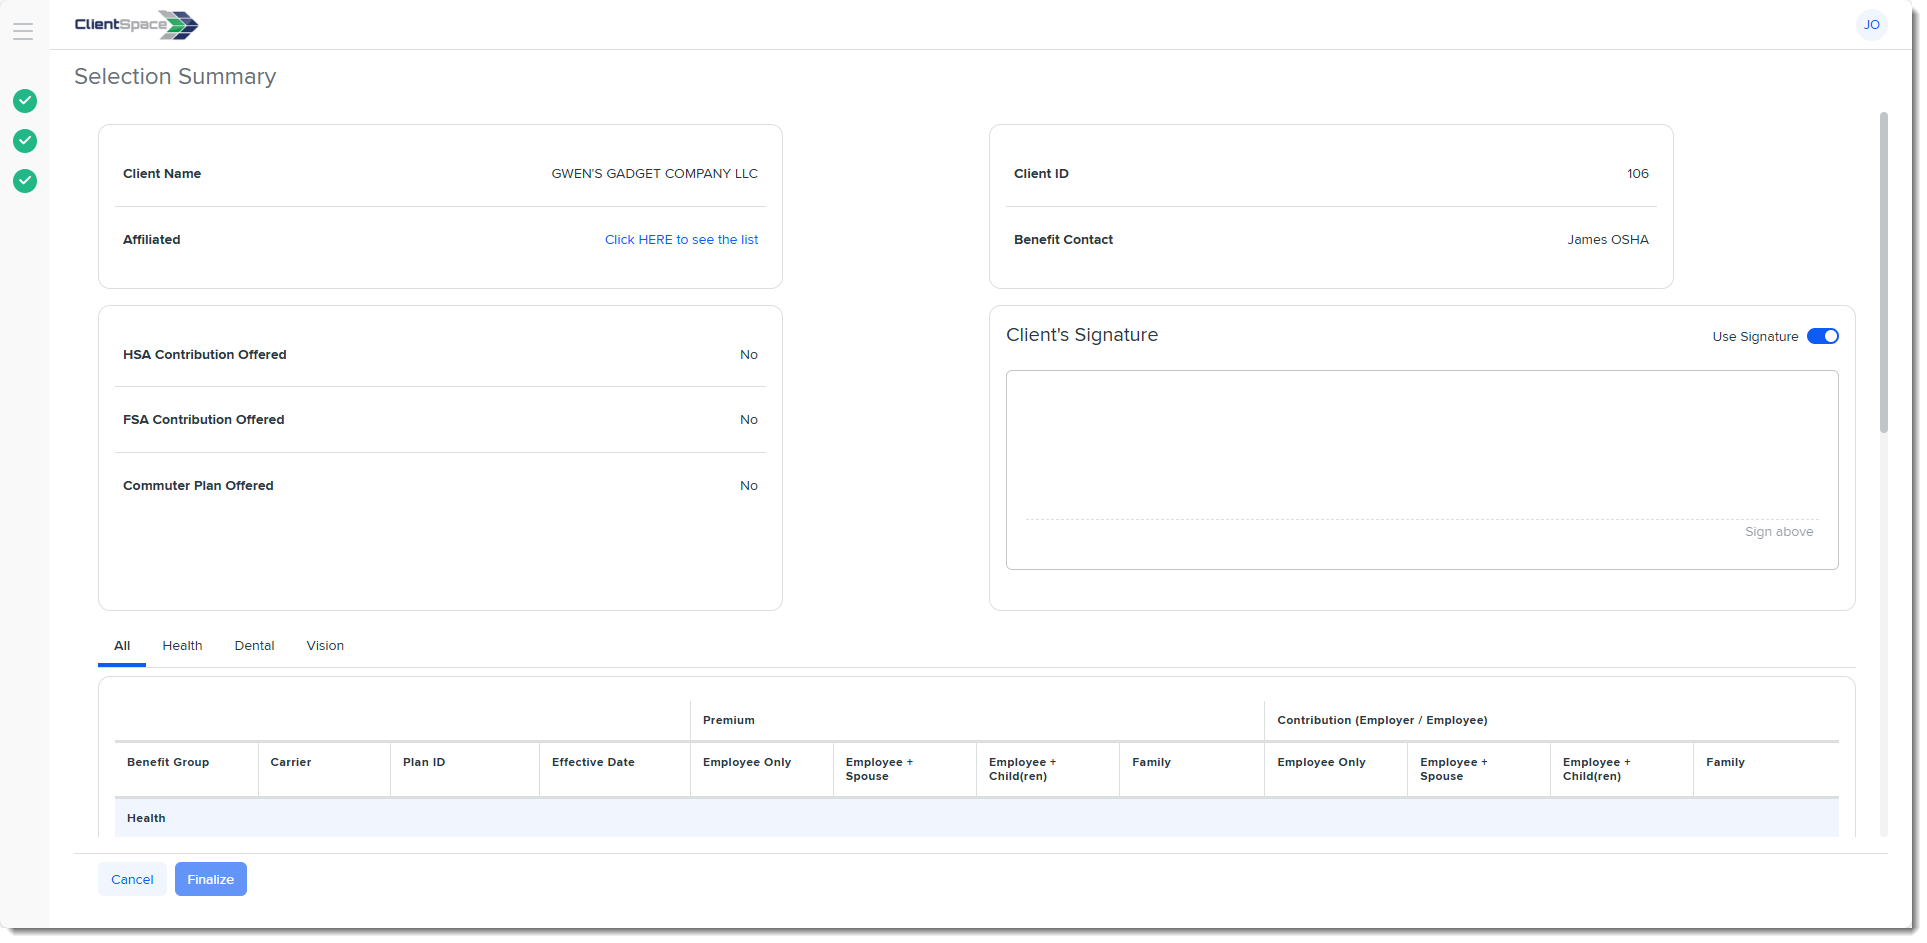
The Selection Summary window displays.
Note: The tiles shown at the top of the Selection Summary window may vary slightly depending on the offered plans. For instance, if you are not offering any cafeteria plans, the section displaying the cafeteria plan contribution amount(s) for each Benefit Group does not display.
-
On the Selection Summary window, before you finalize your selections, you can:
-
Scroll to the tabbed sections near the bottom of the screen and review selections for each Plan Category:
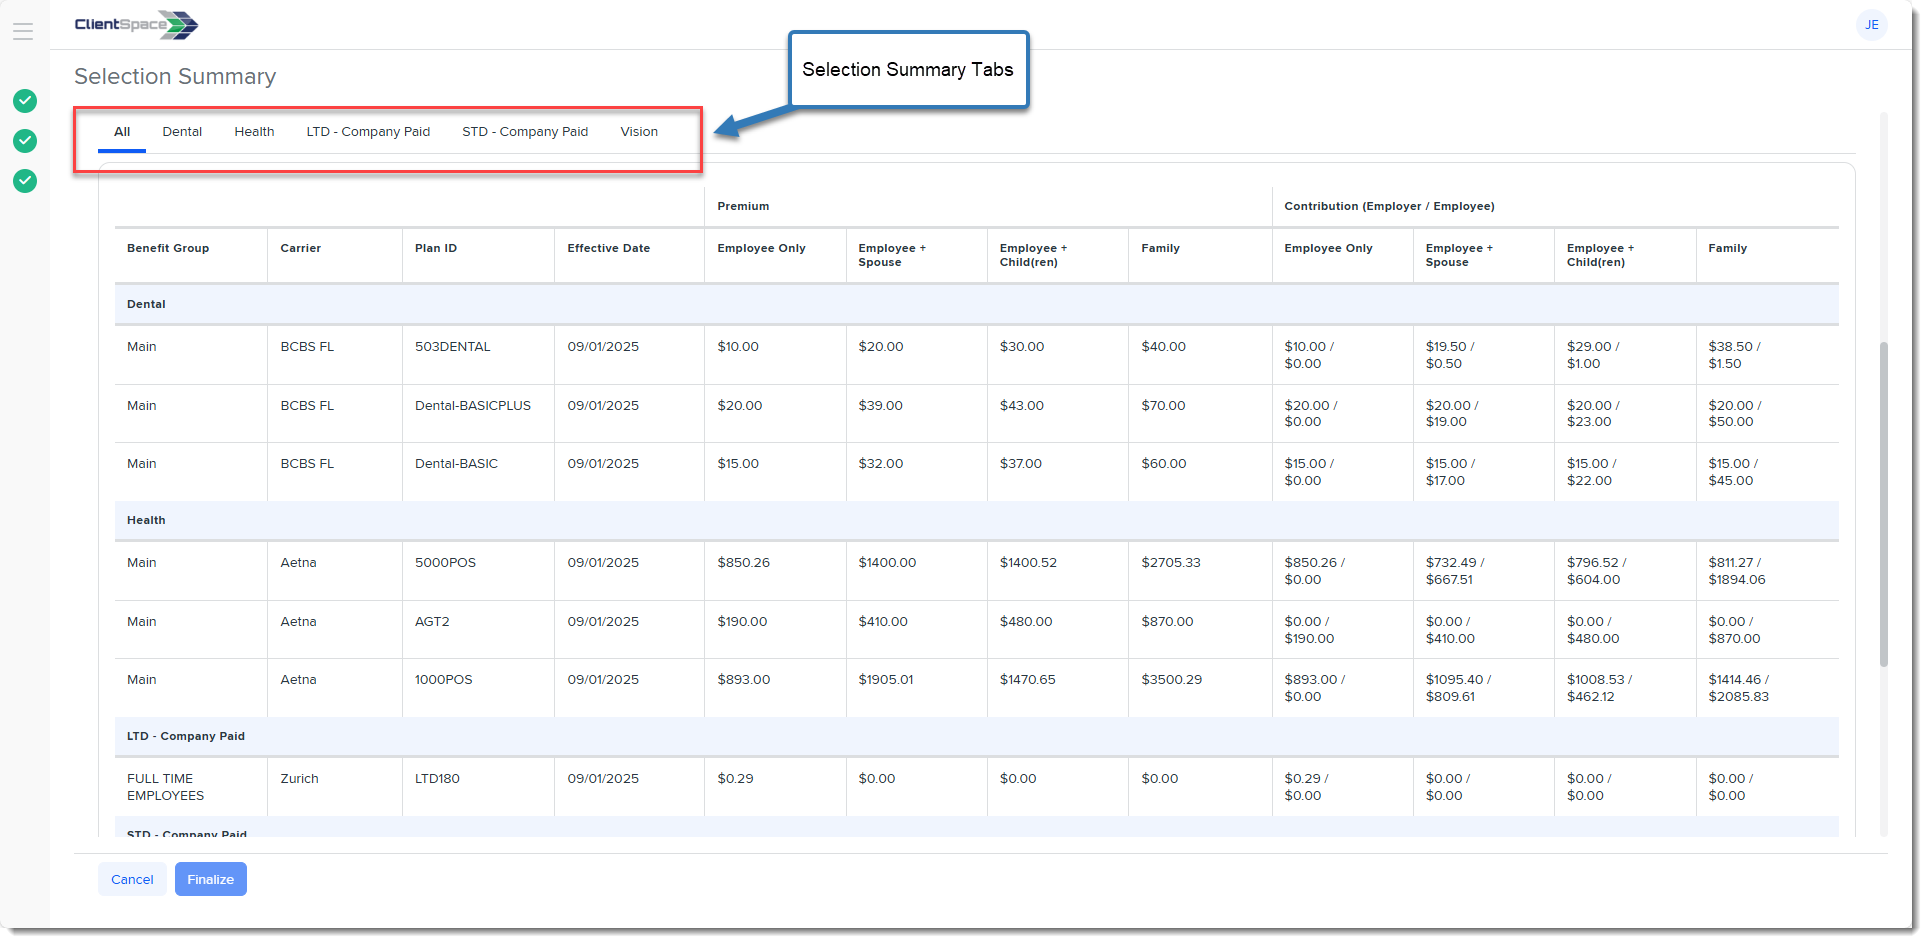
The Plan column displays the Plan Title (if available) up to 60 characters.
Note:
-
If no Plan Title was entered for the benefit plan, the Plan ID displays.
-
If the Plan Title is greater than 60 characters, ellipses (...) display at the end of the Plan Title. You can hover your mouse pointer over the Plan Title to see the full value.
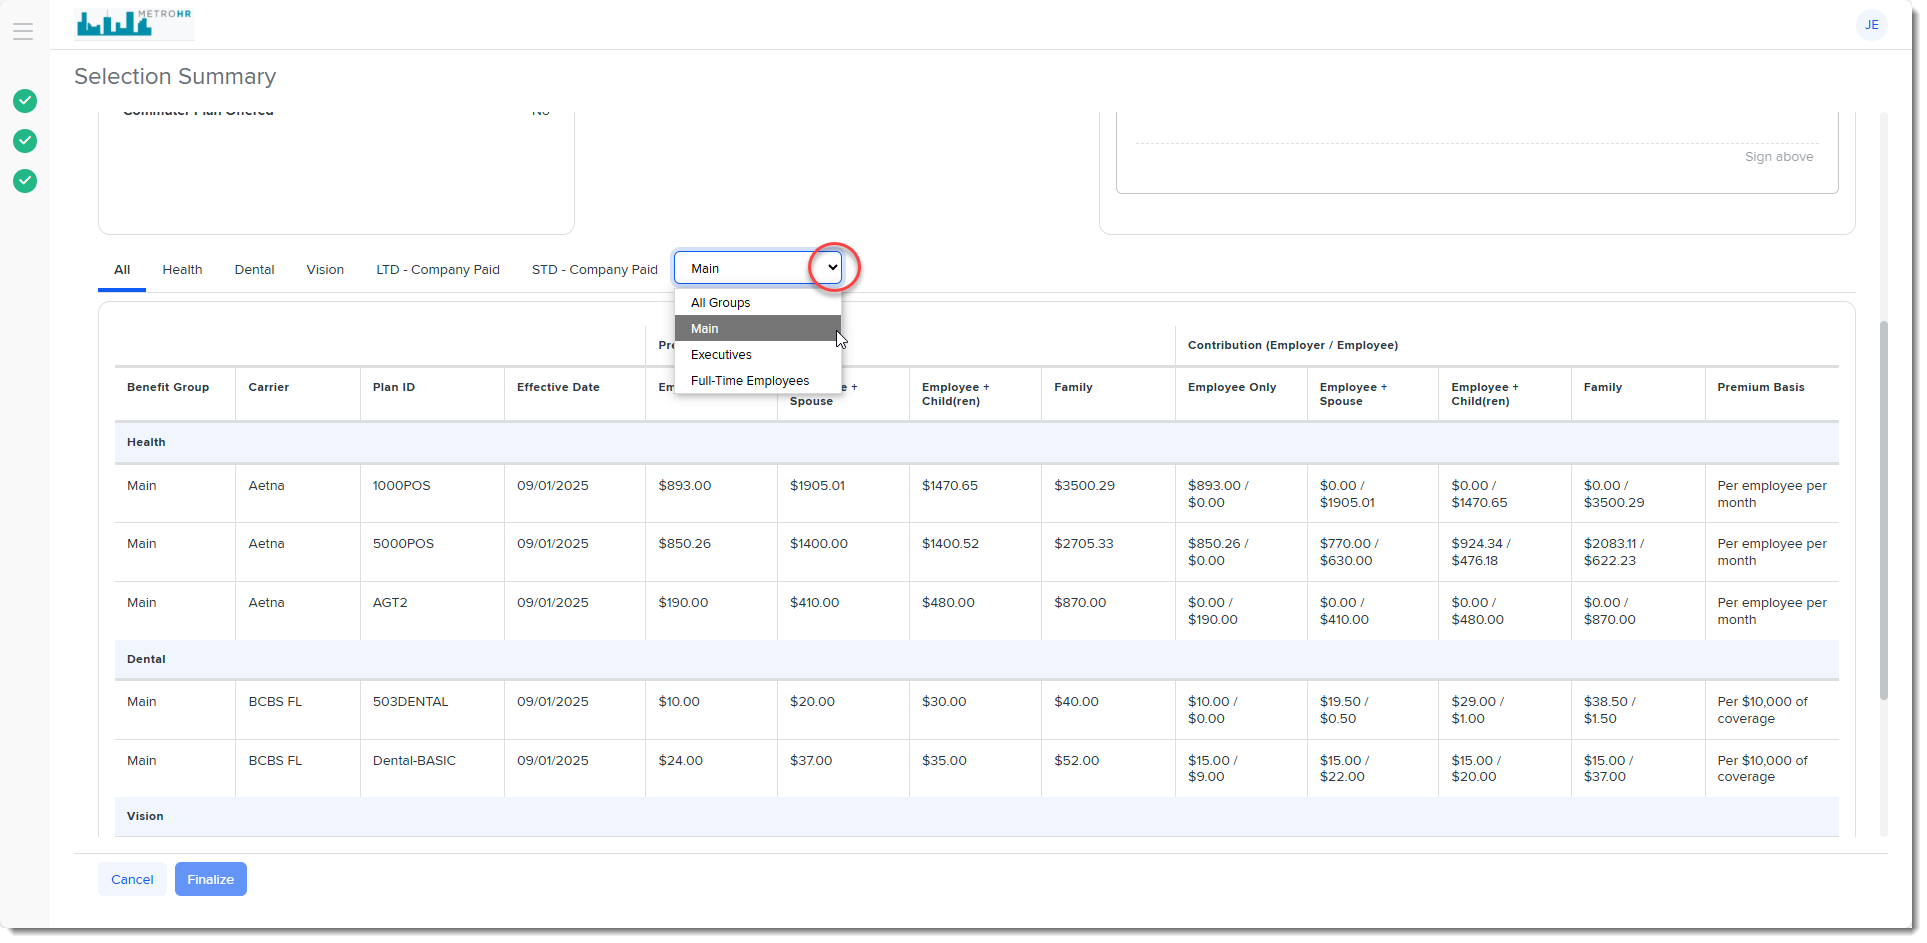
Note that in addition to being able to view the summary for each plan type by clicking the tab for each Plan Category, you can also further filter to a specific Benefit Group within the Plan Category. The default filter is "All Groups". In the example below, we have filtered to a Benefit Group named "Main" to only see calculations for that group:
Note: If you need to make a correction, go back to a prior section using the left navigation panel. Click the second green check mark to go back to the plan review and plan selection screens.
-
-
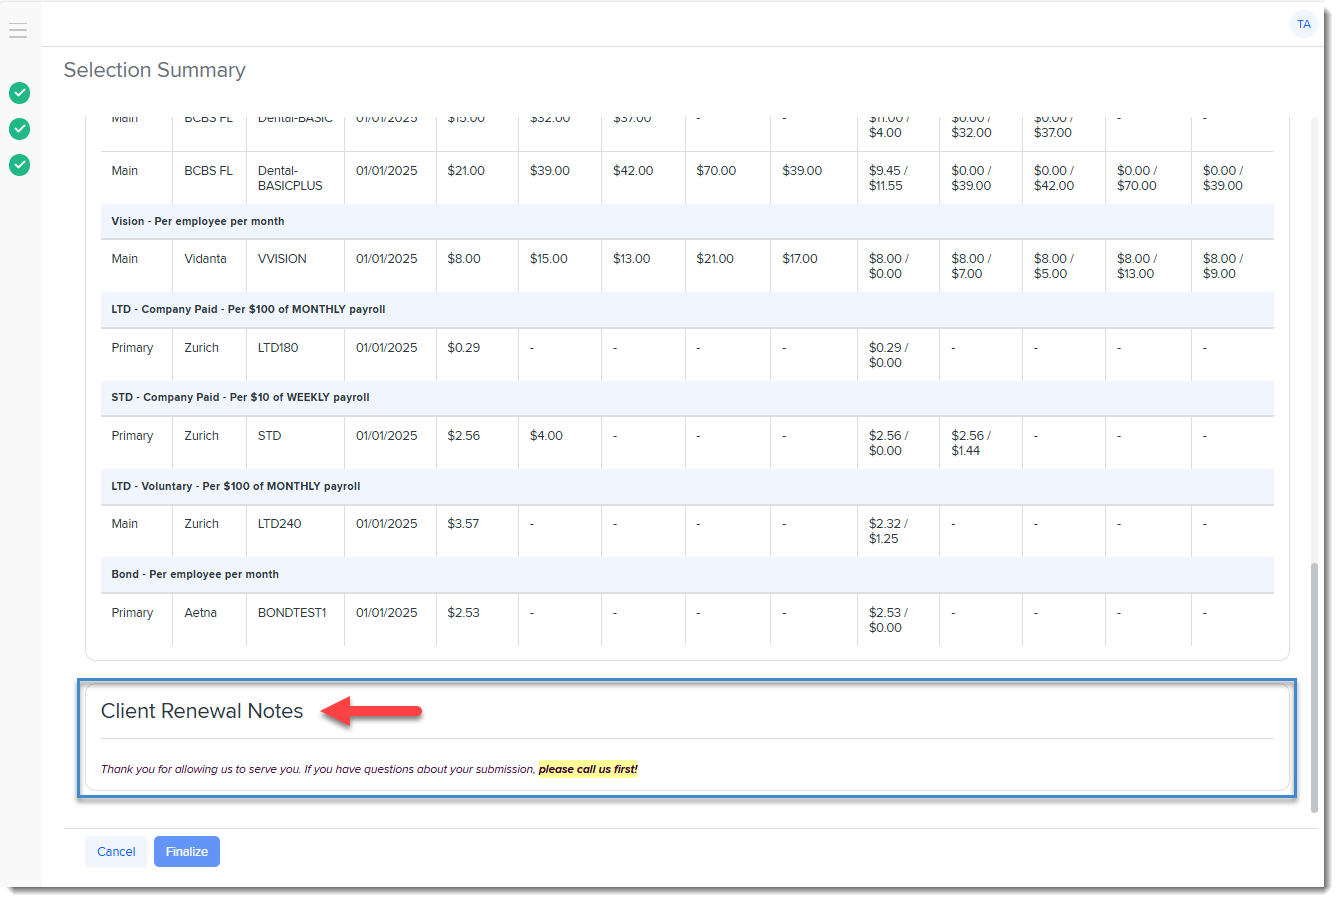
View Client Renewal notes, if present. There could be special instructions or a general note from your Benefits Representative listed for you here.
Note: The field label text of "Client Renewal Notes" can be customized by your Benefits team, therefore, the label may be different than the example shown. Examples: BPM Notes, Benefits Notes, Client Notes, etc. However, the notes box will always be located under the selections grid.
-
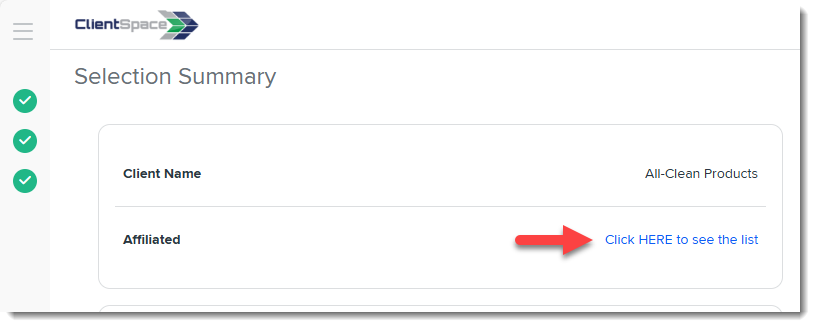
Click the link in the Affiliated section to view the list of related child companies, if applicable.
Note:
-
This is the same list that can be accessed from the Welcome page. This is mentioned in Step 2: Open the Batch.
-
If the number of related child companies exceeds the number of items that can fit within the visible area of the popup window, a vertical scroll bar displays.
-
Companies are excluded from the Related Companies list when:
-
They have a Status of "Terminated" or the Active checkbox is unchecked on the related Client Master record.
-
All associated Benefits Batches have a Status of "Expired" or the Active checkbox on all associated Benefits Batches is unchecked.
-
-
-
View associated links (if present) such as a Benefits Comparison report or a carrier benefits site.

-
Review FSA, HSA and Commuter plan details, if present.
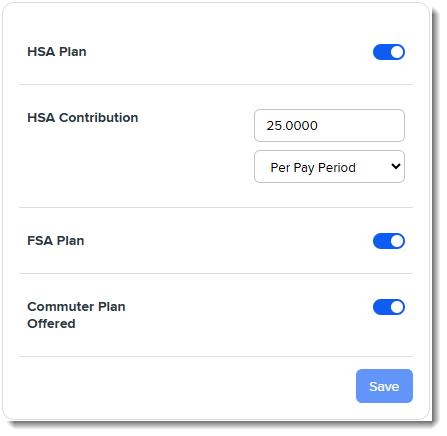
-
If an HSA, FSA, or Commuter Plan is not being offered, use the slider button next to the plan to turn it off. The slider background appears gray when the plan is turned off.
-
You can also edit the HSA Contribution amount and select whether the amount is Per Pay Period or a One Time amount.
-
If you make any changes, click the Save button within the HSA, FSA and Commuter Plan tile.
-
-
-
When you are certain of your selections, sign the Selection Summary.
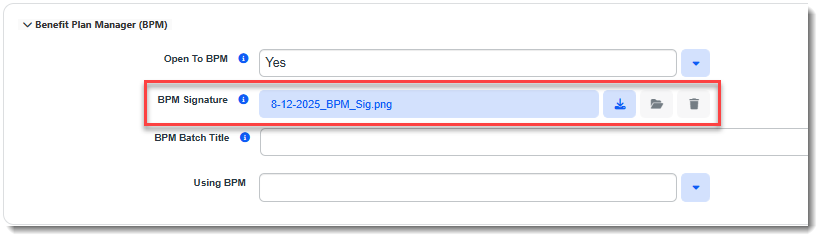
Note: The last signature captured is stored in the BPM Signature file upload field on the associated Benefits Batch as an image file.
-
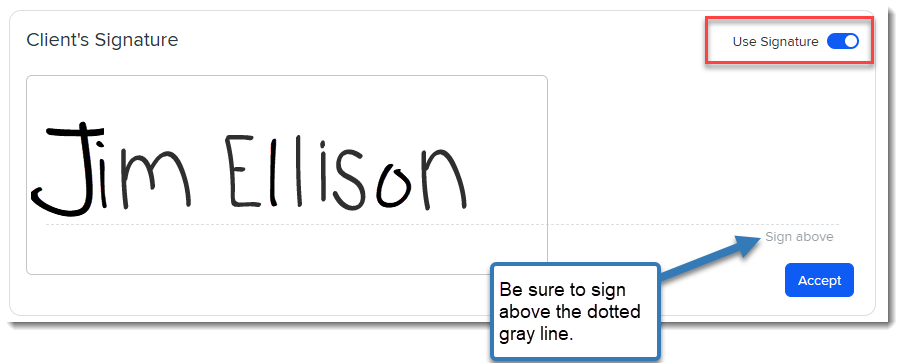
If you can sign your signature: If you have a signature pad, touch pad or wish to use your mouse to sign your signature, click Use Signature, sign your name electronically above the dotted gray line, and click Accept.
-
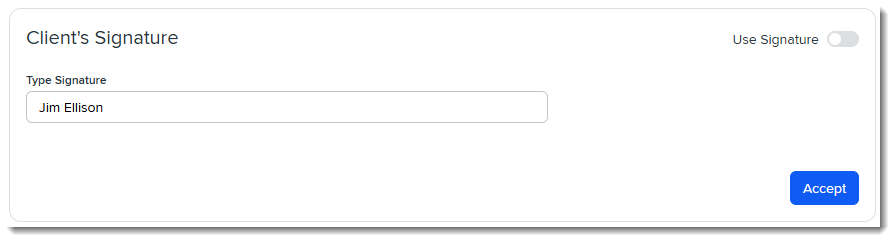
If you cannot sign your signature, type it instead: Ensure that Use Signature is not selected, type your signature in the space provided, and click Accept.
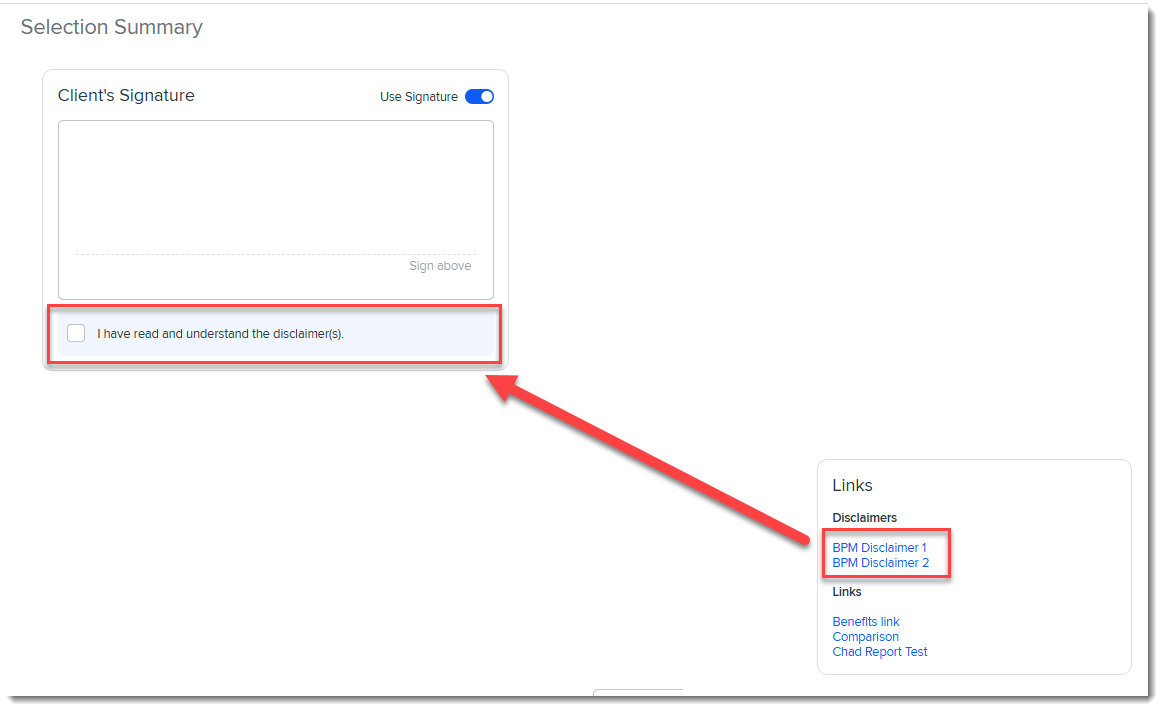
Note: If any disclaimer forms are listed in the Links tile, please review the disclaimers and click the acknowledgment checkbox (which is only displayed when there is at least one disclaimer required) located under the Client's Signature box to indicate that you have read and understood the disclaimers. This step must be completed before you can continue finalizing selections.
-
-
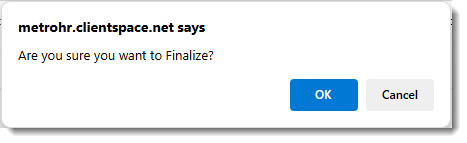
Click Finalize at the bottom of the Selection Summary.
A confirmation message similar to the following displays:
-
Click OK to continue.
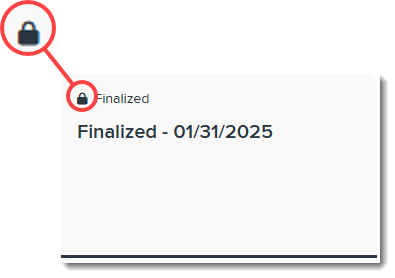
You are returned to the BPM Welcome page where the Benefits Batch card displays "Approved". The lock symbol indicates that this batch can no longer be opened.
Please contact your Benefits Representative immediately if you have submitted in error and need to make changes.