Administering an application can have its challenges. Are you experiencing challenges? Try using the following solutions to overcome those obstacles.
Problem: You attempt to run a merge and you receive the error: "The request failed with the error message: Object moved"
Cause: The Merge template document is no longer attached to the merge under Merge Admin.
Solution: Update the Merge Configuration with a Template Document.
| 1. | Go to System Admin |
The Merge Admin dashboard opens.
| 2. | From the list, select the merge in question and click Edit. |
The Merge Admin Detail form opens.
| 3. | In Template File, click |
| 4. | Save your changes. |
Problem: The allow import option on the Organization record appears to be cleared somehow and nobody seems to know who is clearing it.
Cause: The system automatically clears this option when the Create Prospect link is selected in the header of the Organization.
Solution: Log an Extranet case.
Problem: The Activity Search page on the Org is not displaying the Salespersons calendar events. If you log in as a global admin, the activities appear correctly.
Cause: Salesperson does not have access to the designated Sales workspace. Activities such as Tasks, Notes, and Calendar events need to be attached to a workspace. Before you select the Generate Quote link, a workspace has not been generated for the Organization, so any activity is attached to the default Sales Workspace set under System Admin > App Settings > Default Workspaces. If the salesperson in question is not set as a user of that workspace, the activities do not appear for them.
Solution: Add the Salesperson to the default Sales Workspace.
| 1. | Find the default sales workspace by navigating to System Admin |
| 2. | Go to Workspaces and open a workspace. |
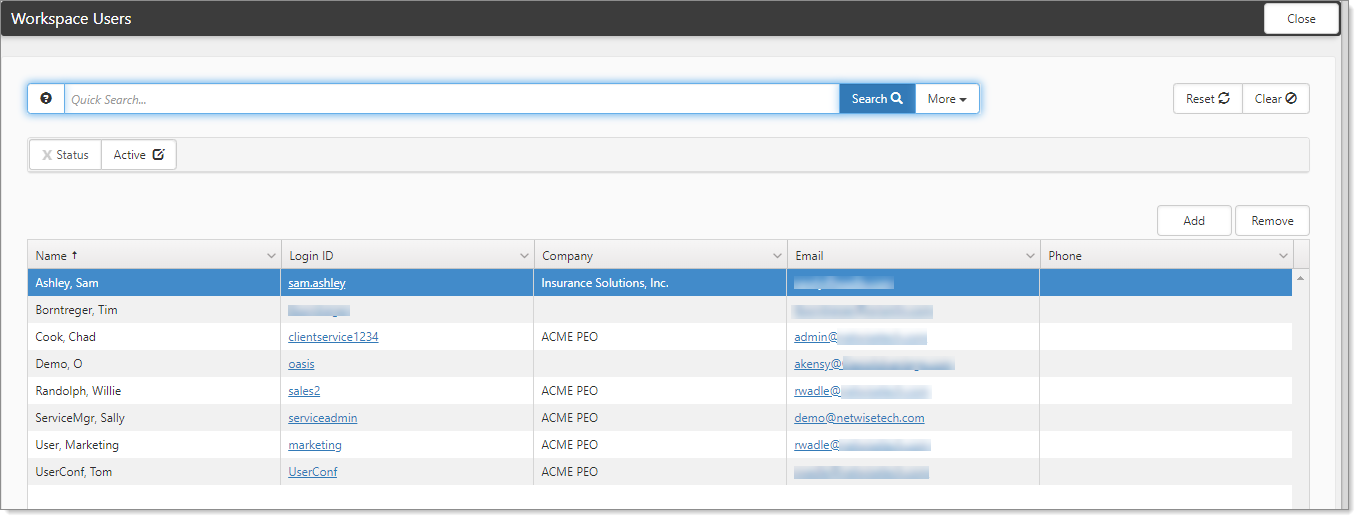
| 3. | In the Action Center, in the menu, select Users. |
| 4. | Click Add and select the user from the list then click Ok. |
This action adds the salesperson as a valid user of this workspace.
| 5. | Verify that the user can now see their Activities. |
Problem: When opening a dataform, the form is marked as Active, but all the fields on the form are disabled. The form may or may not be secured.
Cause: The client workspace has been marked Inactive, so all associated forms are also inactive.
Solution: Re-Activate the workspace.
| 1. | First, determine with the client if they want the Workspace to be marked as inactive. There are valid business reasons for this. |
| 2. | If this is not the case, go to the Client workspace in question. |
| 3. | In the Action Center menu, select Settings. |
| 4. | Select the Active option. |
| 5. | Click Save. |
This action re-activates the workspace and all associated dataforms.
Problem: When we enter a Commission Detail record on a Client workspace, the System does not show the calculated commission amount in the Pricing Console Profit pop-up matrix.
Cause: Misconfiguration of Sales Entity record causes Commission effective date to be set incorrectly.
Solution: Correct the Sales Entity configuration and manually change commission record date for all auto-generated records.
| 1. | Go to Admin Workspace > Sales > Sales Entity. |
The Sales Entity dashboard opens.
| 2. | Open the Sales Entity record in question and look at the Commission information recorded: |
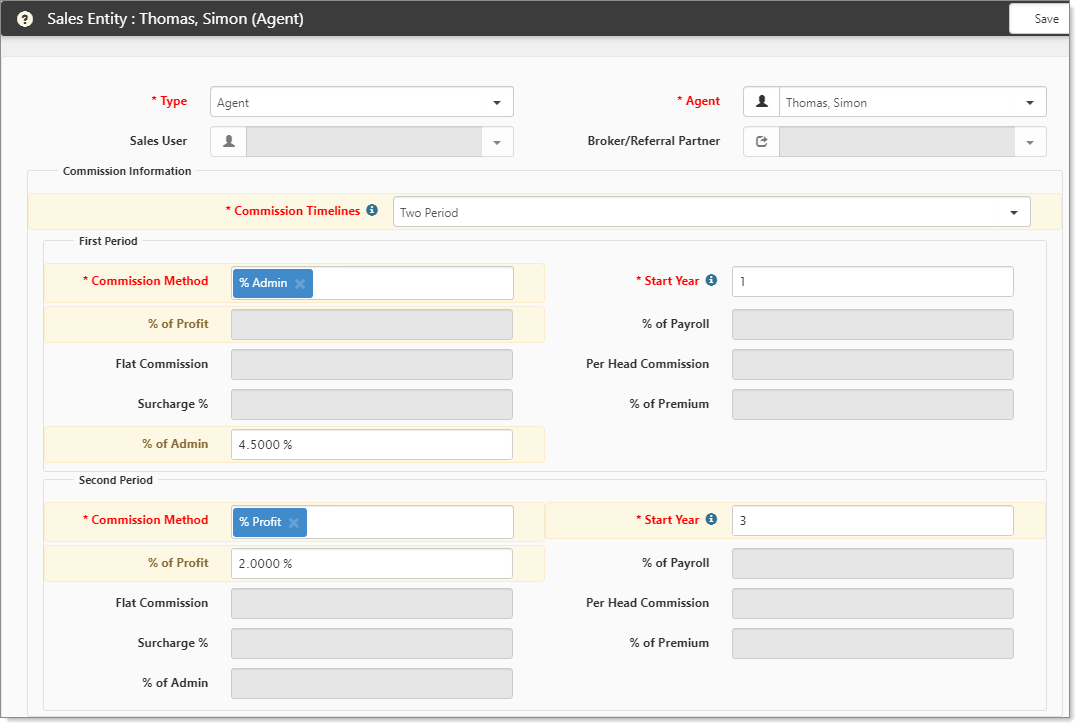
| 3. | Sales Entity records allow you to set up to 3 tiers of commissions for each sales entity. In the example above the Sales Entity has two tiers or periods configured. |
| 4. | The first period starts the first year (1) of the Client's Contract Effective date and calculates commission based on 4.5% of Admin on the Client. |
| 5. | The second period starts in the 3rd year (3) of the Client's contract and calculates commission based on 2.0% of Profit on the Client. |
| 6. | So, if the Client's contract effective date was March 1, 2014, the Salesperson would be paid 4.5% of the admin fee starting March 1, 2014, and running through February 28, 2016, then starting in the third year of the contract (March 1, 2016) |
| 7. | The salesperson would be paid 2.0% of the Admin collected from the client.** |
After correcting the Sales Entity record you will need to fix the Sales commission detail records for each affected workspace.
| 1. | Go to the workspace in question and open the Commission detail records for the affected Sales user or Agent. |
| 2. | Update the Effective Date field on the Commission record to the appropriate value. This effective date is calculated on Workspace creation using the Contract Effective Date and the Start Year information configured above on the Sales Entity record. |
| 3. | Save the commission detail record(s) and review the Profit Matrix on the client again to ensure commissions are being calculated properly. |
Information about Sales Entity Configuration can be found by reviewing the contextual help text. On any dataform, point to the field label and if the label changes color, then there is related help text to be found by clicking the label.
Problem: A user cannot login and as a Global Admin you are unable to assume the external user.
Cause: The external user account is linked to a template workspace.
Solution
| 1. | Go to System Admin |
| 2. | Search for the user. |
| 3. | Change the Default Workspace to that user's company workspace. |
Problem: The cause, nature, or body part drop-down list is not appearing when filling out a Workers' Compensation Claim.
Cause: The metadata form for each of those fields is not configured.
Solution: The metadata form needs to be set on the Lookup Group detail.
| 1. | Go to System Admin |
The Lookups dashboard opens. The lookup groups that correspond with the three lookup fields are AccidentCause, TypeofInjury, and InjuredArea.
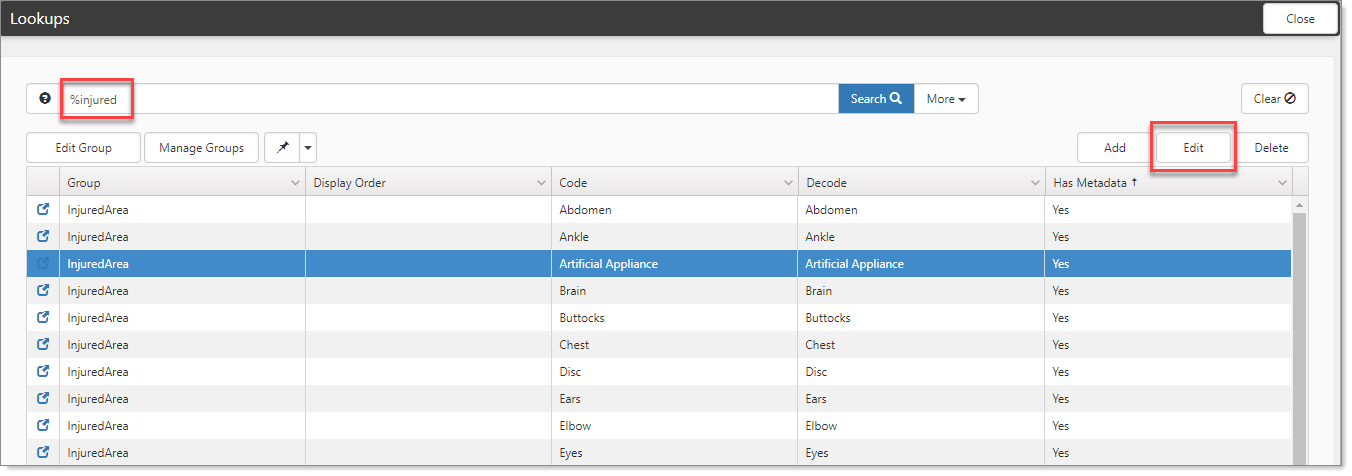
| 2. | Locate a lookup group and click Edit. |
Use the % quick search to quickly locate each one.
The Lookup Details form opens. The following example shows the Lookup Details for AccidentCause.
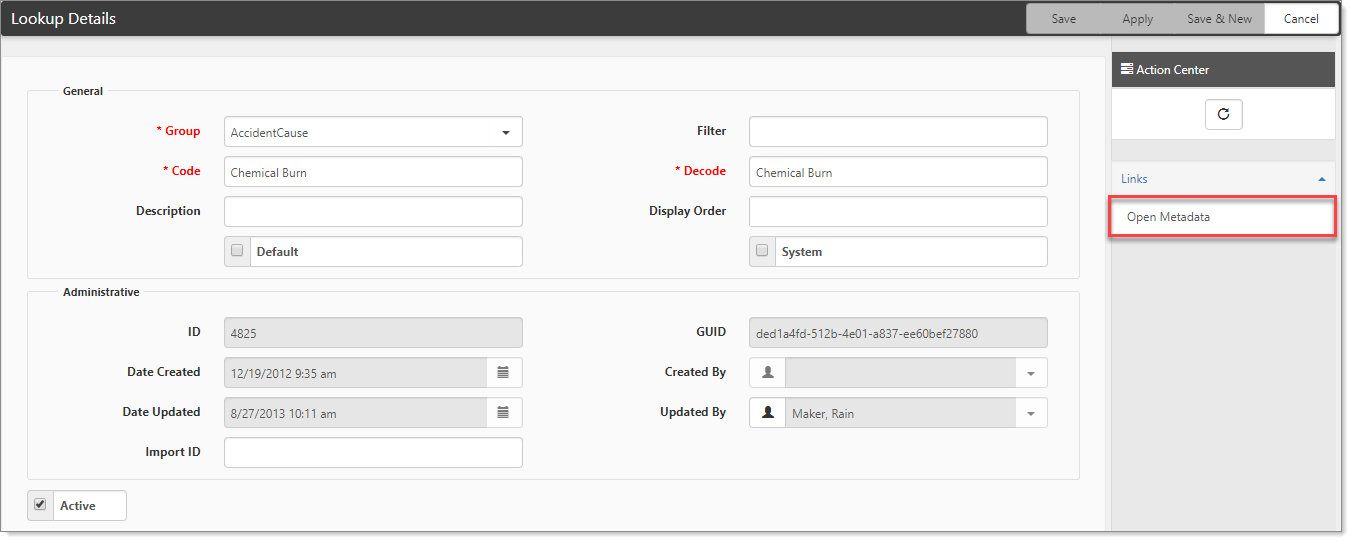
| 3. | In the Action Center, click Open Metadata. |
The metadata form opens.
| 4. | For the lookup group in question, select a value. |
| 5. | Click Save. |
| 6. | Repeat the procedure for each group: AccidentCause, TypeofInjury, and InjuredArea. |
After the metadata is configured, each individual drop-down value in the detail fields can be configured to show or hide based on the selected Category field.
Problem: A ClientSpace user completes and authorizes a Certificate of Insurance, and an email is sent to the Certificate Holder appropriately, but the person who authorized the Cert will sometimes not receive the email.
Cause: The system is designed to automatically email the Certificate Holder and the person who created the certificate, not the person who accepts or authorizes the certificate. If these are the same person, they will receive the email, but if the certificate is created by person #1 and accepted / authorized by person #2, only person #1 will receive the email.
Solution: If you are authorizing a cert and were not the creator of the cert:
| 1. | In the Action Center, click Subscribers. |
| 2. | Add yourself to the notification list on the cert manually. |
Problem: Customer has a client workspace that is in Pending Termination status and the status is not getting changed to Terminated by the scheduled process. The TerminatePending scheduled process normally compares the run date of the scheduled process and the Termination date on the Term form and any Client where the Termination date is equal to or lesser than the date of the scheduled process, and the Status is Pending Termination, the status is changed to Terminated.
Cause: Scheduled process has not run.
Solution: Manually run the scheduled process.
| 1. | Check the scheduled process by going to System Admin |
The Scheduled Processes Admin list is displayed.
| 2. | From the list, look for Terminate Pending. |
| 3. | Make sure it is scheduled properly, specifically look at the next run date. The scheduled process is typically set to run hourly at least every weekday and the next run date should be today. |
| 4. | If the Next Run Date is set to a future date, change it to today and manually run the scheduled process. |
Problem: Salesperson commissions are not included in Gross Profit Calculations.
Cause: Effective Date of the Commission record is set to a future date, so it is not included in pricing calculations.
Solution: Either add a current commission record or edit an existing record to make the effective date less than or equal to the current date.
| 1. | From the modules bar, select Admin Workspace. |
The Admin Workspace tiles display.
| 2. | Select Sales Entity. |
The Sales Entity dashboard opens.
| 3. | From the list, select the salesperson in question and click Edit. |
The Sales Entity form opens.
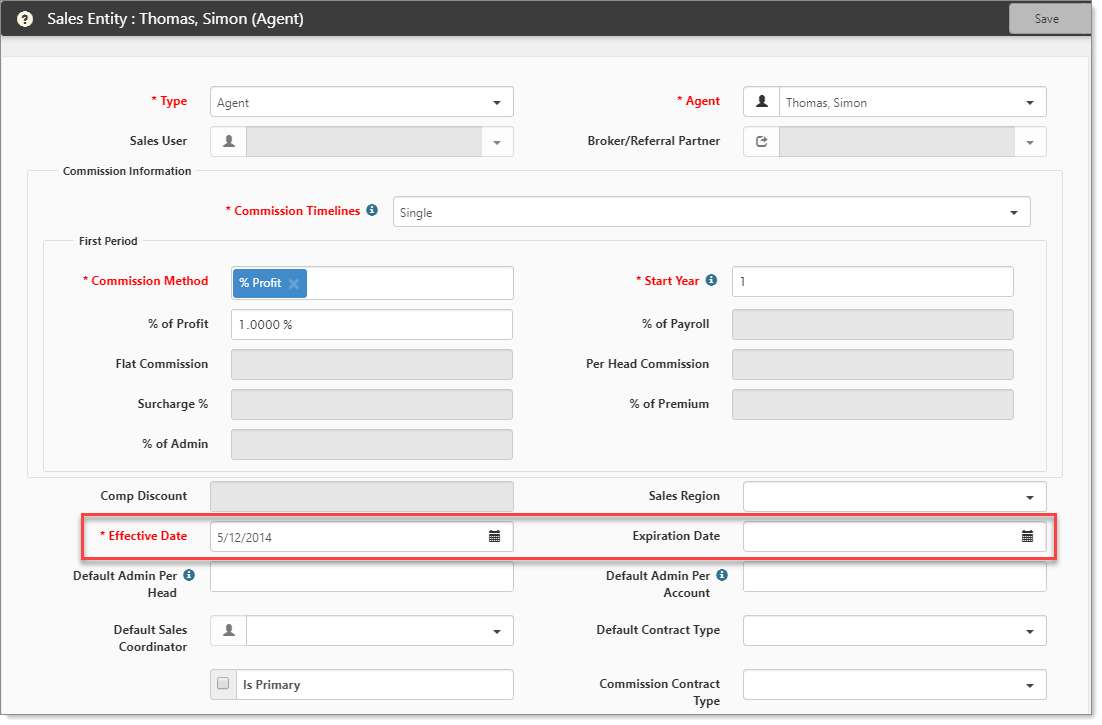
| 4. | Check the Effective Date on the record. |
| 5. | If the commission structure is age banded, a new record may need to be created to cover the current time period. |
| 6. | Otherwise, edit the existing record to include the current time period by changing either the Effective Date (start) or Expiration Date (end) of the existing record. |
| 7. | Save your changes. |
For more information about the PEO pricing system and how commissions work, log an Extranet case.
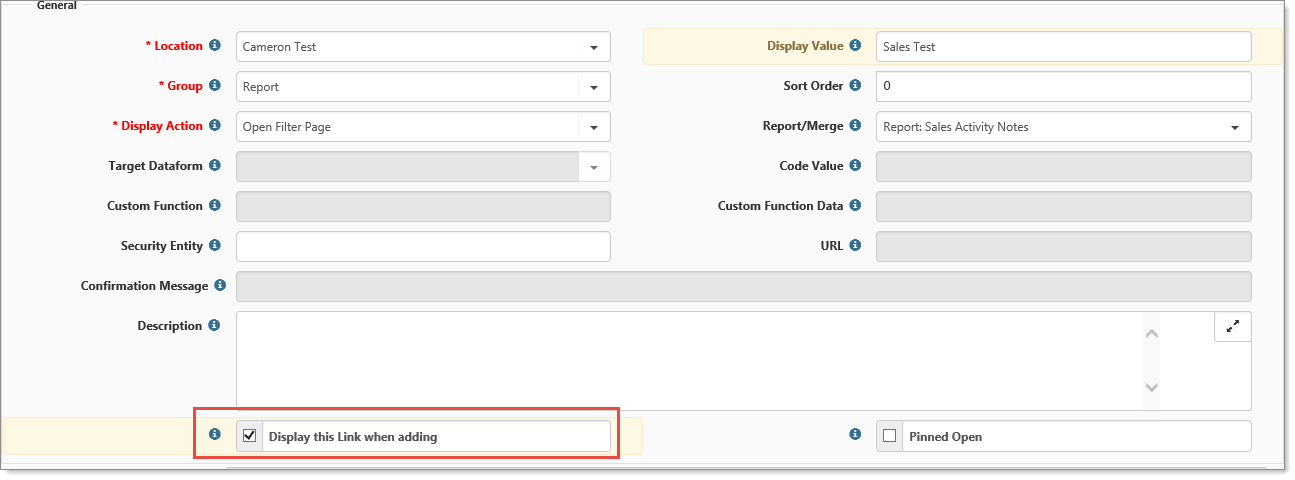
Problem: You have configured a custom link, but when you go to a dataform with the configured link, sometimes it does not display.
Cause: The dataform is a single form and has actually not yet been saved. Because the system dynamically generates the fields when you open the dataform, it looks like the form is there, when there is no copy of the form attached to the workspace.
Solution: Make changes and save the form or set the Custom Link to Display when Adding.
Dataform Links require a dataform in which to attach.
Two ways to resolve this:
| • | Any change that is saved to the dataform causes the page to re-load, which loads the header and display the links. |
| • | Alternately you can set the link to display on Add by selecting the Display this link when adding option on the link configuration and saving the change. |
Problem: You have departmental manager users that are receiving case notifications for Client Service Cases in which they are not the Owner or Assigned To.
Cause: There is logic in the system when the priority is Critical to also notify the Admin Role for the Assigned To Department. For example, the Users in the Benefits Reconciliation and Administration_Admin role were notified because the Assigned To user is in the Benefits Reconciliation and Administration Department.
Solution: There is no way to disable Critical Case notifications on a per person or department basis. It is not recommended to disable them for an entire organization.
Problem: A user has been set as the level 1 or level 2 escalation user on a particular Client Service Case type, but they are not receiving notices, or are receiving them outside of the expected escalation times.
Cause: Misconfiguration
Solution: Several items need to be configured properly for these escalation notices to be delivered to the appropriate users.
| 1. | The ServiceCaseNotification scheduled process needs to be configured to fire at or less than the lowest escalation time, otherwise you can create cases with 1 hour escalations but the notifications will only cue up for the next run of the scheduled process. |
| 2. | To be notified, the user needs to be in a role containing the entity biz_ClientServiceCase_Email_Notifications. |
| 3. | Check if the user is in a role containing this entity by going to System Admin |
| 4. | Add Search filters for the User Name and the Entity Name of biz_ClientServiceCase_Email_Notifications. |
| 5. | Click Search. |
| 6. | If there are no results, remove the Entity Name search parameter and re-search. |
| 7. | Edit an appropriate role and Add the biz_ClientServiceCase_Email_Notifications with View rights. |
| 8. | Save the record. |
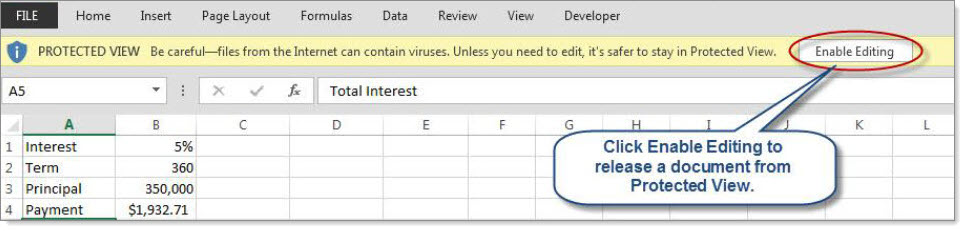
Problem: You attempt to run an Excel merge and the data appears to be merging to the Data (CSExport) tab, but none of your formulas or presentation tabs seem to work.
Cause: Server Side Merge does not have rights to Edit document. The older Security Policy Editor method obtained these rights by default.
Solution: Allow the data to process to the other tabs by clicking Enable Editing at the top of the Excel document.
Problem: Trying to save changes to an inactive Task or Case, most commonly trying to re-activate using a Header Link, but the Form remains disabled.
Cause: Form is attached to a disabled workspace.
Solution: If changes to the form are necessary, you must re-activate the workspace to make the changes.
| 1. | Go to the workspace in question. To find inactive workspaces, from the Clients list, in More, select All. |
| 2. | From the list, select the workspace in question and click Edit. |
The Client form opens.
| 3. | At the bottom of the Client form, select the Active option. |
| 4. | Save your changes. You will then be able to update your task or Dataform. |
| 5. | When completed, determine whether the Workspace should be inactivated and if so, reverse the steps to activate the workspace. |
Problem: The Delete button in Role Admin does not appear to work. You get a confirmation pop-up and click Yes. The role row disappears from the list, but it is back when you Search.
Cause: If the role being deleted is a Departmental Role (_Member or _Admin), they are System Roles and are linked to the department.
Solution: You cannot delete roles with _Admin or _Member. These roles are associated with Departments and the association keeps them from being deleted. If you need to delete the entire department and associated roles, log an Extranet case. There are possible repercussions when making this change. Configuring Organization and Workspace Security.
Problem: Open a Client Workspace and go to Employees and one or more of the employees in the list appear to have duplicate records.
Cause: Inner Join in List Select statement causing multiple rows to come back due to multiple active Employment records.
Solution: Inactivate the appropriate Employment record.
To inactivate the appropriate Employment record, you must first understand how the historical employment records are generated. When a change for an employee job history (employment) record arrives in the system, the original record is cloned, and then inactivated. The original record is then updated to reflect the new changes before being saved. This process should leave only one record in the system with the IsActive flag selected. Sometimes however this process may fail, leaving multiple employment records marked as IsActive.
The Employee dataform list will erroneously join the employee once to each of these records, resulting in a list containing seemingly duplicate employees when there is in fact only one employee records and multiple employment records.
To correct the issue:
| 1. | Open one of the employee records. |
| 2. | Using the header link, open each employment record and look at the Administrative fields at the bottom of the records to find the RecordID. |
| 3. | The Employment record with the lowest ID number (oldest record) should remain Active. (IsActive option should be selected.) |
| 4. | All other Employment records for this employee should have the IsActive option cleared to inactivate them. |
| 5. | Remember to Save your changes. |
| 6. | As you inactivate these Employment records, you will see the duplicate employee records eliminated from the list. |
Problem: In reviewing Employee Information in ClientSpace, it is reported that some employees have multiple employment records, all but one of which are inactive.
Cause: Employment is a historized form - storing a historical track of Employee job changes.
Solution: During the historize process the current record is cloned when there are changes and then saved as inactive, then the current record is updated and saved as the IsCurrent record. This is done to preserve the foreign key relationships between the Employment record and any child records it may have such as I-9 records. There should only be one active employment record at any given time.
Problem: You are attempting to move a Client Workspace through the pricing workflow. The workspace has related companies already in ClientSpace when you receive the error: "This RFP cannot be submitted because there is a lock on this FEIN."
Cause: Related Client Workspace is locked to prevent accidental duplication of FEIN on unrelated companies.
Solution: Unlock related Workspace
| 1. | Find the related workspace that is already in Client status and navigate to the Client Master using Workspace Search. |
| 2. | Clear the Locked option and Save the record. |
| 3. | Try moving the new workspace through pricing again. |
| 4. | The appropriate workspace will be locked during the pricing process. |
Problem: Security behaves differently in NEXT than it does in Classic in that in Classic users have access to the fields in a specific fieldset, but in NEXT they do not.
Cause: In Classic, a secured fieldset only needed View rights to edit the fields inside it. In NEXT, the user needs to be in a role with View and Edit rights.
Solution: Add Edit rights to the Role that includes the fieldset Entity in question.
| 1. | Go to System Admin |
The Security Roles dashboard opens.
| 2. | Search for Roles with the security entity in question. This should be in the format gen_DataformName_FieldsetName. |

| 3. | Ensure that you update the role selections to include View and Edit as in the example. |
| 4. | Save your settings. |
Problem: You are attempting to set up a trigger condition for Dataform Cloning using the Empty or Not Empty options, which should not require a Dataform Field Value, but that field is still required to be able to save the form.
Cause: Bug in the JavaScript on the page.
Solution: Fill the Dataform field value with a value which is appropriate for the Trigger field and save the form. The value clears and the Dataform field value marked not required on Save.
Problem: You have a user working in the system, but they do not appear to have access to all workspaces. Some of them don't appear in the Workspace Search list.
Cause: User account is not on the Template Workspace User List.
Solution: Add the user account to the template user list.
To add users to the Workspace list:
Add the User directly to the Workspace. This may be necessary for installations that have lots of Workspaces, or complex TOC security.
| 1. | Go to System Admin |
The Workspace Template Search dashboard opens.
| 2. | Open the workspace template in question. |
The template opens.
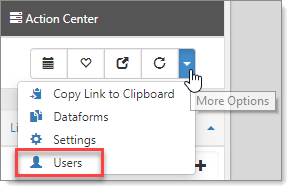
| 3. | In the Action Center, select More Options > Users. |
The list of users that are pre-filtered for this workspace are displayed.
| 4. | Click Add. |
The Add Workspace Users form opens.
| 5. | From the list, select the user in question and click Ok. |
The user is added to the Workspace Users list.
Problem: The Create Prospect link does not appear on the header of Organizations.
Cause: Missing security
Solution: The Create Prospect link has its own security and logic behind it that determines how it presents. For this link to be available, the user must have edit rights to the organization, either through their user or a role in which they are a member being present on the security tab of the organization with Edit rights to that Org. There is also template logic that determines how the link will react when selected. If the user has access to a single template, the Create Prospect link will create a workspace from that template. If the user has access to multiple templates, the Create Prospect link will present the user with a list of these template workspaces and allow them to choose which one to clone. There are two security Entities that come into play in the PEO system for displaying and populating the Create Prospect link: the CRM entity as well as the template_YourTemplateName_member entity.
| 1. | First, the user will either need to be a Global Admin, or be included on the Security tab of the Organization in question with Edit rights to the Organization (normally either the Sales user that created the organization or the Admin for that users default department). |
| 2. | The user will also need to have the Can Create Workspaces option selected on the user profile. |
| 3. | The CRM Entity controls Organization access. To generate workspaces from an Organization, you will need Edit access to the organization. |
| 4. | Workspaces are generated from templates, so to have access to this functionality, the user will need template member access. |
| 5. | The format for template member entities is the template name, bracketed by the words 'template' and 'member so: 'template_YourTemplateName_member'. |
| 6. | Both of these entities should be added to a role in which the user belongs under the Role Admin dashboard located under System Admin |
Problem: You are creating an Ad-Hoc report and when you add multiple filters to the report, some of the filters do not have all of the options that you would expect.
Cause: Filters in the Izenda reporting tool are additive, so if the first filter in say a pricing report selects only workspaces in the Prospect status, the second filter for Pricing State will be affected - if there are no Prospects in Georgia, Georgia will not appear as a valid option in the Pricing State filter list.
Solution: If you do not want this behavior to occur, simply move your least restrictive filters to the top of the filter definition page. In the example above, moving the Pricing State filter above the Status filter will resolve the issue.
Problem: Organizations created through the SFDC API are being generated with an AssignedTo user of Salesforce Service, instead of the appropriate sales user.
Cause: No matching (or blank) Sales user email address in ClientSpace or Salesforce.
Solution: Check the Sales user account email address in ClientSpace and Salesforce. If the values do not match, update one or both email addresses so they are identical in both systems, then re-run the Salesforce Sync.
Problem: You are attempting to open the Organization Dashboard, but on open, when the list refresh should happen, no records are returned, and the entire list disappears.
Cause: Timeout issue on the initial load of data into the list. This is caused by too many records being returned in the default search.
Solution: Reset the default rows per page returned to the list.
| 1. | Go to System Admin |
The App Settings form opens.
| 2. | Check the Rows per Page setting. It is likely set to a very high number. |
| 3. | Reset the Rows per Page to a more reasonable number, we recommend 250. |
| 4. | Save the record. |
Problem: When reviewing Client payroll statistics information, you find the PayPeriod amounts are double, triple or even more times greater than they should be.
Cause: Missing data fields on the Voucher import records, or mis-configured Import Configs cause the fkPayrollStatisticsID to not get updated, which in turn causes dupe Payroll Statistics records to be produced.
Solution: The process that generates the Payroll Statistics records and updates the vouchers uses many concurrent Voucher record fields to tie these records together - these fields include Voucher.State, Voucher.CompCode,, Voucher.STARTDATE, Voucher.ENDDATE, Voucher.PAYDATE, AND Voucher.PAYCYCLE. If any of these fields are missing either from the Import Config, or the Voucher record that is being produced from the payroll system, the Voucher updates will fail. The following steps will help to determine the cause, and associated resolution for the issue.
| 1. | Go to System Admin |
| 2. | Examine the Import Configuration for the Voucher files, and make sure that each of the fields: Voucher.State, Voucher.CompCode, Voucher.STARTDATE, Voucher.ENDDATE, Voucher.PAYDATE, AND Voucher.PAYCYCLE, are in the configuration. Make note of the appropriate field name from the voucher file being produced by the payroll system. |
| 3. | If any of these fields are missing, update the Import Config to include them by first showing inactive fields, and re-activating the field for import. If the field is missing, add it to the import configuration. |
| 4. | If all of the fields appear on the import configuration, the problem most likely is in the imported file itself. |
| 5. | Check the Voucher file by going to System Admin > Imports > Manage Import. |
| 6. | Open the record in question by double-clicking in the list or highlighting the record and selecting Details. |
| 7. | Choose View File and look for each of the above fields, ensure the column names match the import configuration and that the columns hold data. If they do not, correct the issue. |
| 8. | When you are sure the fields are properly named, populated and configured for import, and can see the fields being filled on the voucher records, create an Extranet case to have the duplicate Payroll Statistics records removed from your system, and the newly generated records synchronized with the associated voucher records. |
If you are unable to determine the cause, or unable to re-configure your imports, log an Extranet case.
Problem: There are zeros listed for external commissions in the client pricing console, even though there is a broker attached to the client.
Cause: The Effective Date of the commission record is set for a date not yet recognized by the system as it is in the future. This makes the commissions not effective at the current time.
Solution:
| 1. | From the Workspace landing page, at the bottom, select Sales > Commission. |
The Commission dashboard opens.
| 2. | Select the appropriate commission record. |
| 3. | Change the Effective Date to a date prior to or the current date. Example: Today's date is 5/1/15, change it to 5/1/15 or an earlier date such as 4/15/15. |
| 4. | Save the record. |
The system will now recognize the commission record as being effective.
Problem: When creating pricing by using the Add State and Code approach with a contract type set to use state master, the system displays an error indicating that the pricing policy cannot be determined.
The following message is an example for the state of Texas:
"The Pricing cannot be generated because a Pricing Policy cannot be determined for TX. Please contact your system administrator."
Cause: The system cannot determine the policy to use since the state is not set to use a default policy for the selected Comp Model on State Pricing, and the contract type is set to use the state master.
Solution:
| 1. | On the Pricing Console for the workspace, select the state in the State column of the State and codes section. |
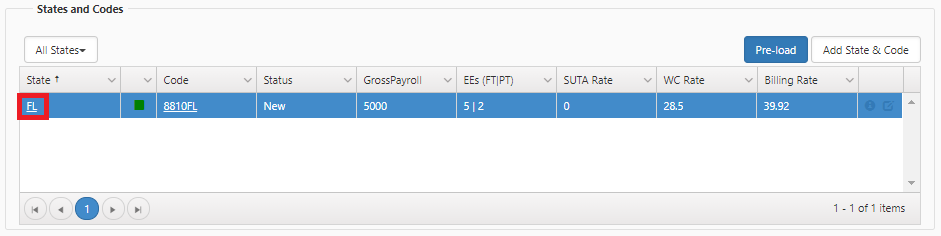
| 2. | On the Pricing State console, determine the value in the Comp Model field of the Work Comp section. |

If the Comp Model field contains:
| • | Master, the system is attempting to use the value from the Default Master Comp Policy field on the State Master, but that field is empty. |
| • | Client, the system is attempting to use the value from the Default Base Client Policy field on the State Master, but that field is empty. |
| • | MCP, the system is attempting to use the value from the Default Base MCP Policy field on the State Master, but that field is empty. |
| 3. | Go to System Admin |
| 4. | Select the state. |
| 5. | Select an item or add a new item in the Default Master Comp Policy field and Save the record. |
The system will now create pricing by using the pricing policy default indicated by the Comp Model and the state.
Problem: The quick create link (Add Codes) is displaying on the Client Master page in ClientSpace. This link should be hidden on the Client Master so that codes may only be added through the Pricing Console.
Cause: Custom Link configuration has been changed to remove the Pinned Open configuration
Solution: Because of the way the links are generated in the right navigation menu, this link needs to be Pinned Open. The right navigation dynamically generates and displays the list of unpinned links, so the quick create link that was hidden when the page loads, is dynamically re-added to the page when you select More. Edit the Custom Link configuration for this link and ensure the Pinned Open option is selected.

Problem: You are a Global Admin attempting to submit pricing with deep Workers' Comp discounts, but the system throws a hard error about the Comp Pricing being below cost.
Cause: There is validation that happens during the submit process to ensure the cost to billing ratio is not exceeded. In some cases, however, you may want to forgo these validations as you will make up any losses through another portion of pricing.
Solution: Disable the validation on submit using the Override Validations option on the Pricing Batch dataform. Select this secured option will allow a Global Admin or administrative user with appropriate rights to skip the pricing validations for this batch.
Problem: You have designed an Ad Hoc report and when you view it in Ad Hoc Reporting it is too wide for the page, but a scroll bar allows you to access the missing columns. Opening the report in Business Intelligence however these columns are missing and inaccessible.
Cause: Enable Responsive Design feature is enabled on the report. This feature, introduced in a version 6.9.0.6 of Izenda reporting makes the report columns responsive to changing page size, such as on a tablet or mobile device and removes columns from the right side of the report to allow it to fit the current screen. This will even drop columns on long reports that will not fit within the monitor space. This feature is enabled by default on reports.
Solution: There are multiple solutions to this issue which you use should be based on how frequently the report is accessed and in what format
Resize solution: Report is mostly used on a monitor and fits within the screen:
For cases where the report will rarely need to be resized because it is not used by mobile users and fits nicely into the desktop real estate we recommend changing the zoom level in the browser - this is easy for the end user to do without having to make changes to the report that would affect all users. To change the zoom level:
Internet Explorer: Do one of the following:
- Press Ctrl and use the scroll wheel of your mouse or use Ctrl - (Control + Minus or Dash key) to zoom out
- OR use the Zoom level in the lower right corner of the browser to adjust the zoom to an appropriate level.
FireFox: Do one of the following:
- Press Ctrl and use the scroll wheel of your mouse or use Ctrl - (Control + Minus or Dash key) to zoom out.
- OR use the Zoom by going to Settings > Zoom in the upper right of the browser to adjust the zoom to an appropriate level.
Chrome: Do one of the following:
- Press Ctrl and use the scroll wheel of your mouse or use Ctrl - (Control + Minus or Dash key) to zoom out.
- OR use the Zoom by going to Settings > Zoom in the upper right of the browser to adjust the zoom to an appropriate level.
Change Report Settings: Report does not easily fit within the monitor screen area
When you do not want to constantly resize the report and it is rarely used by mobile applications that would require responsive design, you can disable this feature on a report by report basis.
| 1. | Open the report in design mode. |
| 2. | Click the Style tab of the report. |
| 3. | Go to the series of options that affect page visualization. |
| 4. | Clear the Enable Responsive Grid option. |
| 5. | Save the report. |
Problem: Client calls because their scheduled processes, such as send mail, do not appear to be running, but they are not hung up in the running state.
Cause: There is a scheduled process on the Virtual Hosting server (Extranet) that kicks off the scheduled processes on the hosted client sites. If this process hangs up on Extranet, it will never start the client processes.
Solution:
| 1. | Open the Extranet and go to System Admin |
| 2. | Check the Scheduled Processes to see if the Kickoff Client Processes is stuck in the Running state. |
| 3. | If so, edit this process and clear the Running option and click Save. |
| 4. | Manually re-run this process by selecting it in the list and clicking Run Process. |
Problem: Client calls because a scheduled process they expect to have run (SendMail for example) does not appear to be working. When you examine the scheduled processes, the one in question has a last run time and is active. The process also appears to be currently running.
Cause: Sometimes the scheduled processes will hang - they start, but then fail prior to completion. If this happens, the Running flag that is set at the beginning of the scheduled process never gets reset, since the system only allows one instance of a running process, it will not restart until the Running flag is reset.
Solution: Reset the Running flag
| 1. | Manually open the scheduled process and clear the Running option to reset this flag. |
| 2. | Save and close the record. |
| 3. | Manually run the process using Run Process from the Scheduled Process dashboard. |
Problem: You have an ex-employee who has been terminated, their ClientSpace account de-activated, but the user name still appears in drop-down lists such as on the Client Team dataform.
Cause: Inactive user is still a Role Member for the role associated with the list.
Solution: Clean up user roles
You can cleanup user roles by removing users from the role or removing roles from the user.
CASE 1: Remove the user from the Role:
| 1. | Find out which role is associated with the user filtered by role (element type) field on the Client Team dataform by completing the following: |
| • | Go to System Admin |
| • | Edit the Client Team dataform |
| • | Select Fields in the Action Center. |
| • | Open the field for the role. |
| • | Select the Advanced Settings property. The role is represented by the alphanumeric string stored in the Advanced Settings field. |
| 2. | Copy the info in the Advanced Settings field and go to System Admin |
| 3. | Open the record by clicking Edit or double-clicking the row. |
| 4. | Select the Users tab. |
| 5. | Select the Show Inactive option and search. |
| 6. | You should now be able to highlight and delete the user name from the role list. |
CASE 2: Remove the Roles from the User:
| 1. | Open the user profile in question by going to System Admin |
| 2. | Select each of the Roles on this tab and delete them. |
| 3. | Save the record. |
CASE 3: Edit Advanced Settings and set the "ShowInactiveUsers" parameter to false:
| 1. | Open the field for the role by completing the following: |
| • | Go to System Admin |
| • | Edit the Client Team dataform |
| • | Select Fields in the Action Center. |
| • | Open the field for the role. |
| 2. | Select the Advanced Settings property. |
| 3. | Add the "ShowInactiveUsers":false parameter to the Advanced Settings field and click Save. |
| 4. | Save the changes to the field. |
Problem: You attempt to run the OSHA or OSHA 300 report in ClientSpace, but the Year that you need to run the report for is not available in the filter criteria.
Cause: The current year lookup has not been created yet. These reports utilize a special lookup group called OSHAYear
Solution: Add the necessary years to the OSHAYear lookup group. See To add values to the new group: in Configuring Lookups.
Problem: Client attempted a third-party login to the Extranet via the ClientSpace Module and receives the error "The third party application key was not found. Click the button below to login."
Cause: The Third Party Application Key has not been set up properly on either the Client site or the Extranet
Solution: Log an Extranet case for assistance in configuring the Third Party Application Key.
Problem: A ClientSpace user attempted to add a WC state and code to the pricing console prior to submitting the deal to underwriting and he received an error message - "An error occurred executing the business rule: Recalculate Pricing."
Cause: Insufficient Rights on the Quick Edit form. This form has required fields that can be secured, if the user does not have view rights to the fields, they disappear and cause the error.
Solution: Update one of the user roles to have at least View rights to all applicable fields on the Quick Edit form (Or create a Quick Edit Role). Ensure the user in question is a member of that role.
Problem: You are attempting to approve pricing and every time you try to clear the Needs Review option on a Pricing Comp Code, it gets re-selected on Save.
Cause: The Comp Model is not set on the associated Pricing State Master dataform.
Solution: The Comp Model needs to be set on the associated Pricing State of the Pricing Console on the Workspace that is having problems.
| 1. | To keep this from reoccurring, the Comp Model needs to be changed in the Admin Workspace. |
| 2. | Go to the Admin Workspace > State Master and select the state that the comp code is in. |
| 3. | Set the Comp Model for the State and Save the record. |
Problem: You have submitted a deal for pricing but realize the Contract Type or Legal Entity listed on the Client Master is incorrect. When you attempt to edit these fields, even as a Global Admin, they are read-only.
Cause: Contract Type and Legal Entity settings can factor into pricing, and can change pricing dramatically, so these fields are locked by design during the submission process.
Solution: Re-price the deal. Re-pricing a deal effectively resets it, unlocking these fields for edit.
Problem: You have a user that is in roles with the CRM Entity, but they still do not see any Activities on the workspace dataforms.
Cause: Missing Organization Access
Solution: Because Activities are tied to the Organization record, for a user to access those notes they need not only the CRM entity on one of their user roles, but access to the organizations in question. If this is a Sales user, this access automatically shows up as they create Organizations and associated Workspaces. For Non-Sales, internal users, they need to either be added to the security tab of the Organizations for which they need CRM Note access or added to a role that has CRM Admin access.
Problem: Organization users do not have access to view or download attachments from an ORG
Cause: Affected user does not have access to the CRM Attachments workspace.
Solution: Prior to a workspace being created, any attached items need to be associated with a workspace, so the system uses the CRM Attachments workspace. Add the affected user to security on the CRM attachment workspace using the following steps:
| 1. | First, determine the workspace in your installation that is being used as the default Sales Workspace. This can be found in App Settings. |
| 2. | Go to System Admin |
| 3. | You can provide Workspace access to a single user by opening the user profile under System Admin | Users | Edit user, selecting the Workspaces tab and choosing Add to search for the default sales Workspace name and add this workspace to the users Workspace list. |
| 4. | Save the user record. |
Problem: A critical case was logged, and many users were notified who were not on the notifications list for the case.
Cause: The Business Rule Send Notifications notifies members of the associated Department Admin role for the Assigned To user when a critical case is created.
Solution: The Send Notifications business rule is core functionality of ClientSpace, which controls all case notifications. You may want to consider cleaning up the Departmental Admin Roles in ClientSpace to remove non-essential users. If this does not fit your business model, log an Extranet case to discuss custom development.
Problem: You attempt to configure an activity such as a Calendar event on a ClientSpace Organization, but the user you would add to the Calendar attendees is not available from the Attendee list
Cause: The user in question does not have access to the CRM Sales Workspace.
Solution: Prior to an Organization having a workspace generated and becoming a Client, the Org does not have its own related workspace. These pre-workspace organizations will all share a workspace called CRM Sales Workspace.
To make the users available for activities, you need to add them as users of this workspace:
| 1. | Open the workspace in question. |
| 2. | In the Action Center menu, select Users |
The list of users with access to the workspace are displayed.
| 3. | Click Add. |
The Add Workspace Users dialog box opens.
| 4. | Select the user and click Ok. |
There will be a slight delay while the workspace provides this user access.
Problem: On the task notification list, not all the users are listed.
Cause: This list shows all users that have access to the Workspace the task is associated with. If the task is not associated with a workspace, then the task is attached to the CRM Sales Workspace.
Solution: The User needs to be added to the Workspace. There are two ways this can be done.
| 1. | Go to System Admin |
| 2. | Open the user's profile. |
| 3. | In the Action Center, click |
| 4. | Add the Workspace to that tab to give access to the workspace. |
| 5. | Go to the Workspace, and in the Action Center menu, select Users |
| 6. | Click Add to open a list of users. |
| 7. | Select the User and click Ok. |
Note: By giving a user access to a Workspace Template, you are giving that user access to all Workspaces created from that template.
Problem: You attempt to click on a linked file to open it, and instead of getting the dialog that allows you to either Open or Save the file, you only have the option to Save.
Cause: File name to long causing truncation of file extension.
Solution: Check the length of the file name. Extremely long file names can push the file extension past the field limitations, truncating the file name and dropping the extension.
| • | If this has happened, save the file with a shorter file name and the proper file extension, then re-attach the file. |
| • | The Open option will then be available. |
Problem: Automated business rules can be used to process workflow and sometimes do not work as expected.
Cause: Business Rule trigger conditions are not being adequately met in the expected order, causing rules to fire prematurely.
Solution: Understand the workflow involved and review the ordering of rule firing. Business rules fire on save and always as follows:
| • | Hard Errors in their listed order - then |
| • | Soft Errors in their listed order - and finally |
| • | Business logic rules in their listed order |
If a hard error is preventing a trigger condition for a business logic rule, or business logic rules are ordered such that trigger conditions are not met, workflow may work, but only intermittently. If you have questions about the design of your workflow or need help, log an Extranet case.
Problem: You attempt to use a search dashboard such as the Client Service Case Search or Organization Search and the Org/Workspace you are searching for does not appear in the Client Filter parameter.
Cause: Org / Workspace has been marked as Inactive.
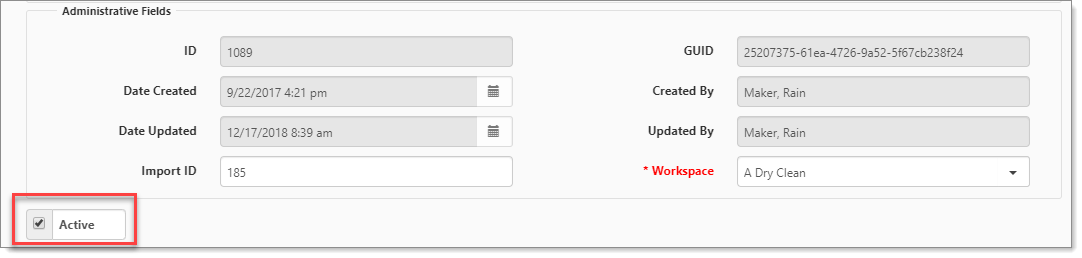
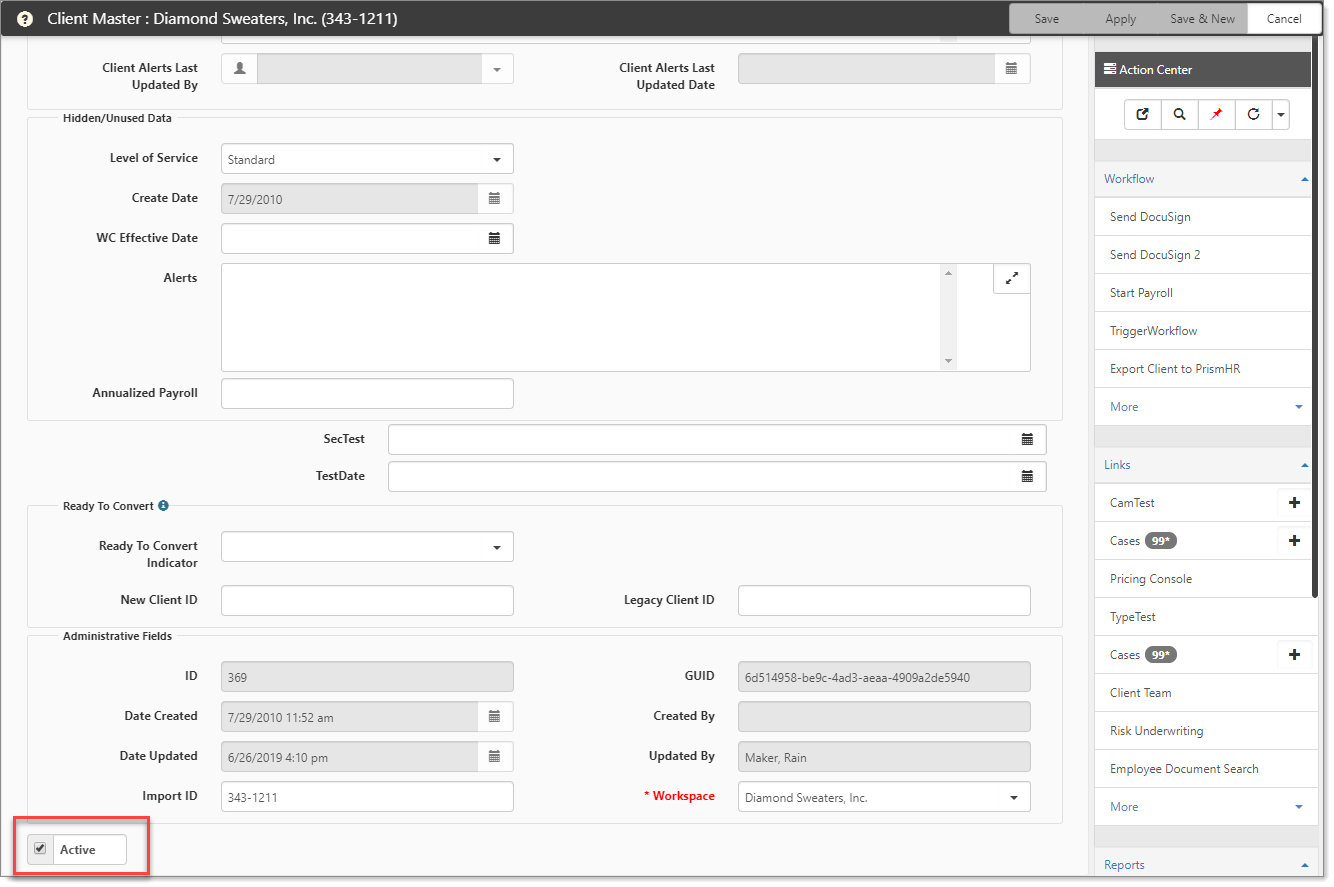
Solution:
| • | Select the Active option at the bottom of the Org detail page to activate the Org. |
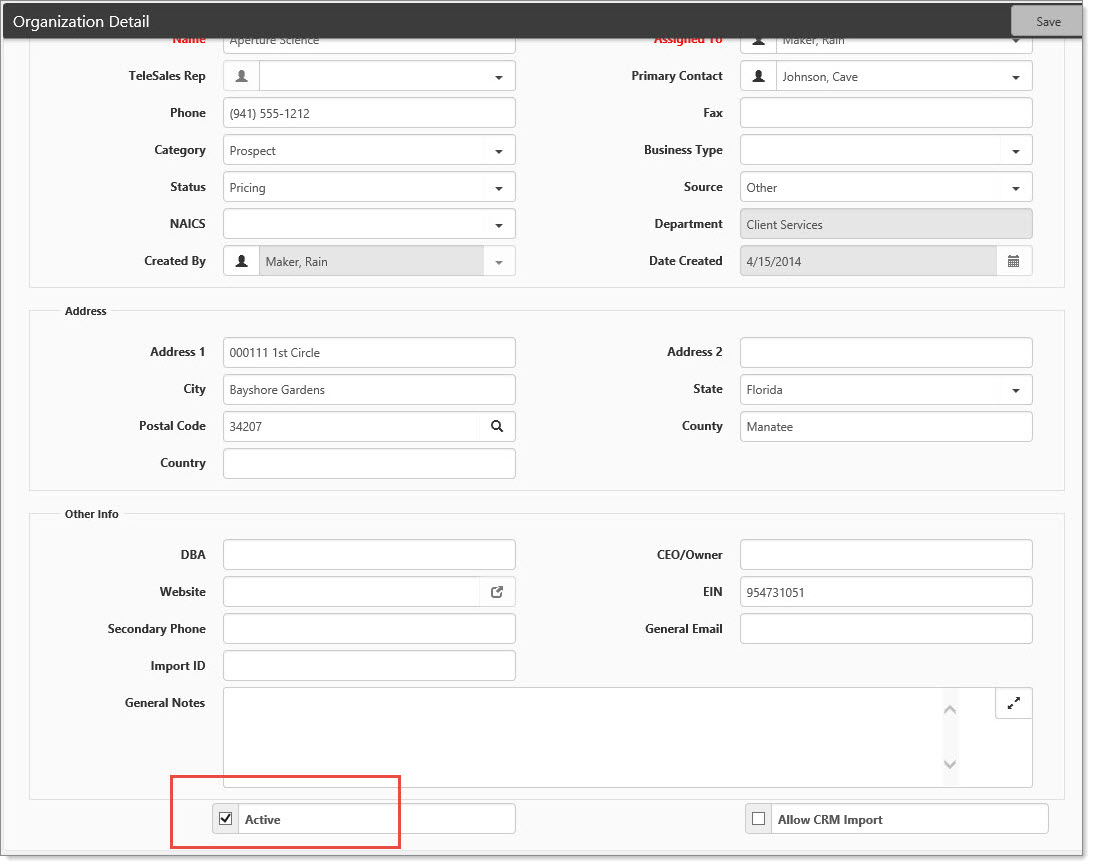
| • | Or, you can select Active in the Workspace settings. |
Problem: When we enter a particular client name in the workspace name search field, that workspace does not show in the drop-down list to select. The search function seems to work correctly for all other workspaces, but not this particular one. The workspace in question is active.
Cause: Workspaces Associated Organization has been inactivated. The Workspace type ahead search functions will use the Organization data and will ignore inactivated Orgs.
Solution: Edit the Organization record and make sure the Active option located just below the Org header is select. If not, select it.
Problem: Organizations or Contact tasks not automatically attaching to the Sales workspace even though the Default workspace is set under App Settings.
Cause: When you create a task or calendar event from an Org or Contact prior to Creating a workspace for that Org the tasks will generally get attached to the Sales Workspace designated in the App Settings page. However, the ClientSpace system allows for multiple workspaces to be designated as CRM related. When this happens, you are presented with a list of CRM related workspaces on Task Creation.
Solution: Either select the appropriate workspace from the DropDown list, or if there is a workspace improperly set as "CRM related" then correct this by performing the following steps.
| 1. | Find the Name of the Workspace you need to adjust through the Select Workspace quick jump. |
| 2. | Open the Workspace Search dashboard and navigate to that workspace. |
| 3. | From the Workspace go to the Workspace Maintenance > Workspace Settings area at the top of the TOC. |
| 4. | Clear the CRM Related option and save the record. |
Problem: You attempt to use Time Tracking on a dataform in your environment, but the Category field on the Time Tracking record is blank. As this is a required field you are unable to save the record.
Cause: Time Tracker Categories have not yet been configured in your environment
Solution: Configure Time Tracking Categories
To configure Time Tracking categories in your environment:
| 1. | First, check to be sure that all the appropriate Category Groups have been configured for your environment. Go to System Admin |
The Lookups list is displayed.
| 2. | Filter for the Group Time Tracker Category. |
| 3. | Review this lookup and If required, add any additional time tracker groups you need. |
| 4. | Go to System Admin |
| 5. | To add a category, click Add. |
The Time Tracker Categories Details form opens.
| 6. | Provide a Category Name and select an appropriate Category Group. |
| 7. | Click Save and continue until all Time Tracker Categories have been configured. |
| 8. | Verify your new categories by adding a time tracker record and reviewing the Time Tracker Categories list. |
Problem: User has added a Parent-Child relationship between two dataforms by Adding a Parent Form field to the Child dataform. The new field appears to be configured properly, but the Related dataform drop-down still does not appear on the Parent Form.
Cause: Child form is not a member of the Template Workspace. Both the parent and child dataforms need to be members of the Template workspace for the relationship to work.
Solution:
| 1. | Go to System Admin |
| 2. | Select the Template in question. |
| 3. | When on the Template Workspace, in the Action Center menu, select Dataforms |
| 4. | Ensure that both the Parent and Child dataforms are added to this workspace (it is not necessary for the child form to be on the TOC as it can be accessed through the Parent Form). |