Installing from outlook.live.com
This section describes how to configure the add-in from outlook.live.com.
Keep ClientSpace and Outlook open during the installation procedure. You will need to toggle between your ClientSpace site and Outlook session. The procedure requires that you keep the sessions open while gathering the various pieces of information.
To install the email add-in for Outlook:
| 1. | Sign in to your Outlook account. |
| 2. | Open an existing email. |
| 3. | At the top of the email message, on the right side, click . . . (More actions). |
A list of options is displayed.
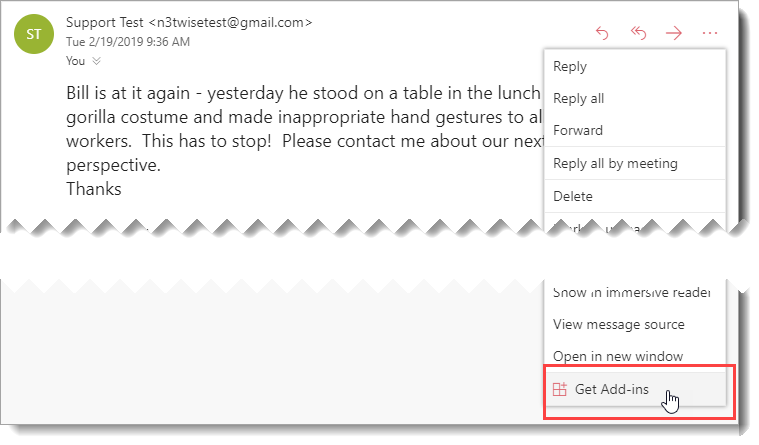
| 4. | Click Get Add-ins. |
The Add-Ins for Outlook dialog opens.
| 5. | Click My add-ins. |
| 6. | Under Custom add-ins, click Add a custom add-in > add from URL. |
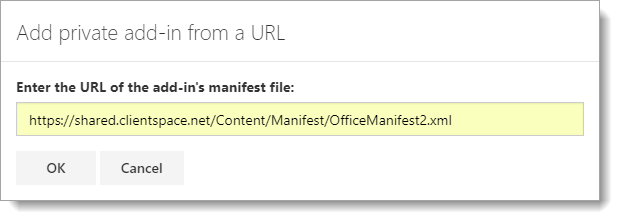
The Add private add-in from a URL dialog opens.
| 7. | In Enter the URL of the add-in's manifest file, paste the following URL: https://shared.clientspace.net/Content/Manifest/OfficeManifest2.xml |
Note: A user's ability to install the add-in manually depends on your security policies. For instance, if you do not permit users to browse to URLs, an administrator with appropriate privileges can browse to the manifest file at https://shared.clientspace.net/Content/Manifest/OfficeManifest2.xml, download the file and provide it to users.
| 8. | Click OK. |
A Warning message is displayed: "This custom add-in may access your personal data and send it to a third-party service. It hasn't been verified by Microsoft. Make sure you trust the source of the add-in."
| 9. | Click Install. |
The ClientSpace for Outlook add-in is added and displayed in the Custom add-ins area.
| 10. | Click X to close the dialog. |
The next few steps configure the settings: URL, Username, and Mail Key.
Next: Check your email address in ClientSpace
To ensure that your email address is added to your ClientSpace User Details:
| 1. | From ClientSpace, click |
The User Details form opens.
| 2. | In Email, ensure that the appropriate email address is recorded. This email should be the same email address as the one you use for Outlook (for example jsmith@outlook.com). |
| 3. | Update the information in ClientSpace if required and click Save. |
Next: Obtain Mail Key from ClientSpace
To obtain the Mail Key:
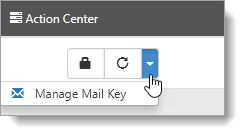
| 1. | In ClientSpace, from your User Details page, in the Action Center, select More Options > Manage Mail Key. |
The Your Mail Key form opens.
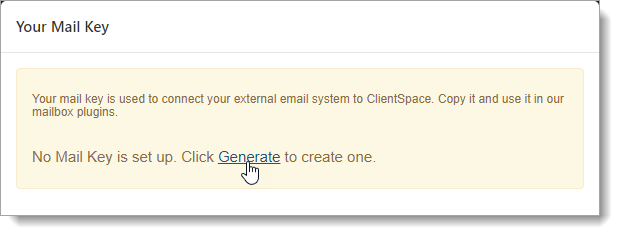
| 2. | If no Mail Key is set up, click Generate to create one. |
Your Mail Key is displayed so that you can copy and use it for connecting to your external mail system to ClientSpace.
| 3. | Click the key to copy it to your clipboard. |
The Clipboard opens showing the key.
| 4. | Click Ok. |
| 5. | Click Close. |
At this point, the key is copied to your clipboard and you are ready to paste the Mail Key in the Outlook configuration pane.
Next: Back to Outlook
To continue the configuration:
| 1. | In Outlook, from the previously opened email, click . . . (More actions). |
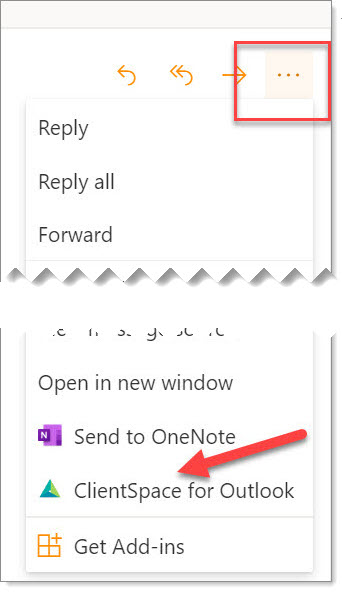
| 2. | From the list of options, click ClientSpace for Outlook. |
The ClientSpace for Outlook pane opens beside the open email. You must open this pane for every Outlook email that you want to post to ClientSpace.
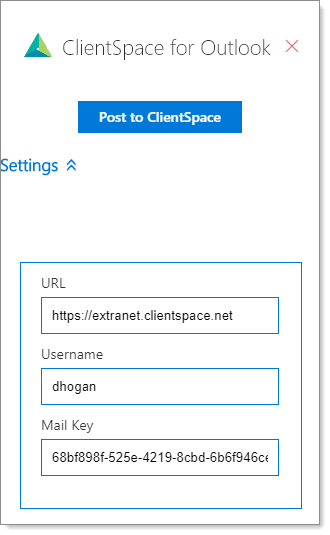
| 3. | In the ClientSpace for Outlook pane, if you do not see fields for URL, Username, and Mail Key, click Settings. |
The fields are now displayed.
| 4. | In Mail Key, paste the key that you just copied. Let's fill this field first so that you retain what you just copied to the clipboard. |
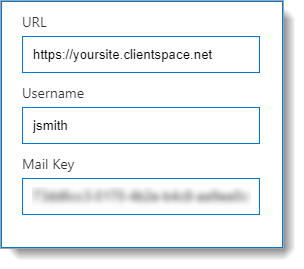
| 5. | Go to your ClientSpace site and copy the ClientSpace URL (for example, https://yoursite.clientspace.net). Note: DO NOT append /next to the end of the URL. |
| 6. | In URL, paste the URL of your ClientSpace site. |
| 7. | In Username, type your ClientSpace username (for example, jsmith). |
Now you are ready to post the opened email message to ClientSpace.
| 8. | Click Post to ClientSpace. |
This action logs you into ClientSpace displaying the email message from Outlook, which is now visible in ClientSpace.
| 9. | If pop-ups are blocked, click the Pop-up blocker and select Always allow pop-ups and redirects from https://outlook.live.com. |
What's next?
When you click Post To ClientSpace, you are then logged into ClientSpace. The Post To ClientSpace page appears.
From the Post To ClientSpace page, you can:
| • | Attach the email to a dataform (record) |
| • | Create an activity |
| • | Create a case |
| • | Create a task |
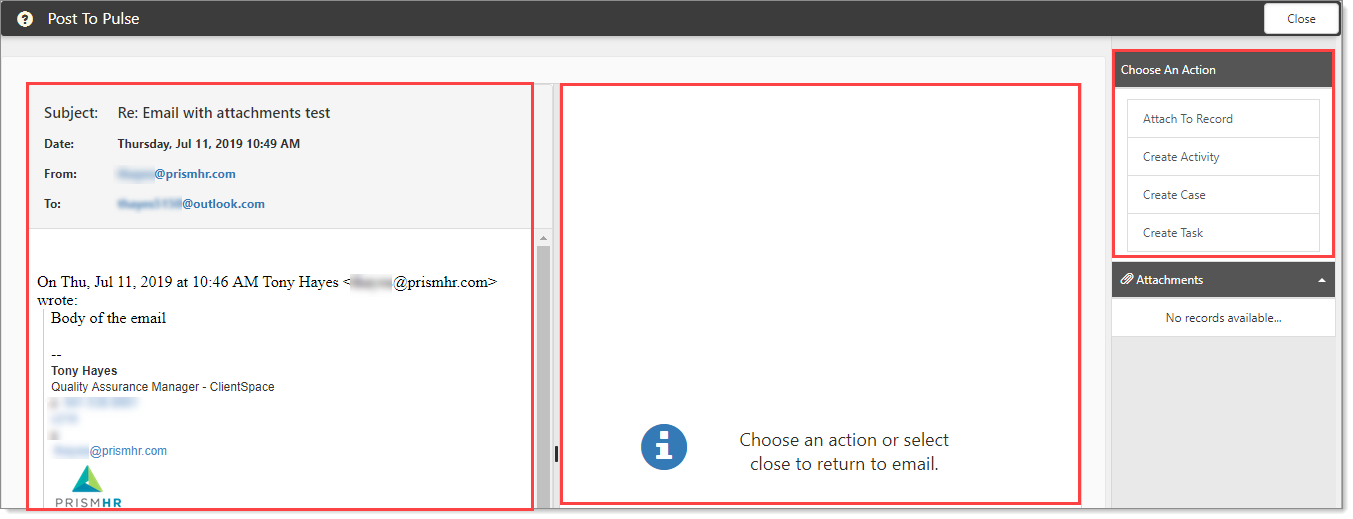
Additionally, Global Admins can post Help topics for this page and make them available to your users. You are now logged into ClientSpace, ready for the next action.
For the procedure on how to create activities, cases, and tasks from the Post To ClientSpace page, see Creating Activities, Cases, Tasks, and Claim Notes from Outlook.